Showing posts with label Papaya Collage. Show all posts

Tuesday, June 18, 2013

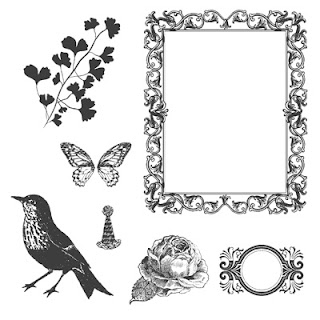
Great Stamp Sets: Papaya Collage

 
Papaya Collage is part of the "Step Outside" collection in the new 2013-2014 Stampin' Up! Idea Book and Catalogue and is featured on page 62.  

This seven piece stamp set offers a variety of stamp images that can be used singly or as a "collage" in your creations.  

Papaya Collage is one of those classic great value stamp sets and is offered in Wood or Clear Mount versions. It coordinates with the 3/4" Circle Punch on page 182 and will work nicely with some of the new framelit dies.
In the fall of 2011 I had the privilege of being asked by Stampin' Up! to be a featured Guest Artist in their May 2012 Stampin' Success Magazine, and my mission was to try out the brand new Papaya Collage stamp set. 


I needed to create at least 5 projects showcasing this set's versatility.  This was such a surprise and honour for me as a Stampin' Up! Demonstrator to be recognized in their demo only magazine and I was really looking forward to it.
To tell the truth, the invitation couldn't have come at a better time as I was planning on making a very special present for my mother's upcoming 90th birthday, and my theme was about "remembering life". 

I chose some old wedding photographs that were in a rich old sepia tone with some hand painted peach tones in the skin colouring. I decided to use neutral card stock and designer papers and add just a pop of colour with Calypso Coral to reflect the vintage look I was trying to capture from the picture.  My gift collection included a scrap book picture, a gift bag with matching gift card, a birthday card and a notebook for writing down all those memories.  Papaya Collage was absolutely perfect for this project because it gave me so many elements to play with.

Vintage Scrap Book Page:

This picture shows the layering of the floral image from the stamp set. To achieve this effect I stamped the floral image several times and then fussy cut the layers and assembled them with dimensionals.  It's not as time consuming as it sounds, but well worth the effort.
I used the Adorning Accents Embossing Folder for the small hearts pattern on the Very Vanilla strip. The sentiment "Remember When" is from the now retired stamp set "Word Play".  The Designer Frames embossing folder was used to cut out the beautiful Calypso Coral frame around the picture. 

The Birthday Card and Gift Tag:
I assembled a window frame design for the Birthday Card and stamped the cute little party hat in each of the boxes.  Love that repetition of images. I added lots of layers of DSP and card stock and a cute little lolly for a very festive look as well as three tiny Vintage Trinket brads.  I loved this card so much I redesigned it for swaps at Convention in 2012, using different card stock and designer paper. Everyone loved it.
Isn't this gift tag just the cutest.  It's a 3 x 3 card with a matching envelope which I made with the Simply Scored tool.  The card and envelope were a little fussy but really took very little time to make.  

I love butterflies and so does my mom, so I fussy cut a couple for the cover of the gift card.  I cut a 2 3/4 x 2 3/4" piece of Very Vanilla card stock and inked up the sentiment and flower image from Papaya Collage with Calypso Coral and Soft Suede markers to colour the edges of the leaves before stamping them and then glued this piece to the front of the small envelope. I really liked the soft look this gave to the leaves.
The Gift Bag:  
 I had fun making the gift bag from matching Designer Series Paper.  
Basically I repeated the gift card envelope design for the front of the gift bag only I used a piece of Very Vanilla card stock that was die cut with the Scallops Die.  Again I added butterflies and stamped the two toned leaves.  A splash of Calypso Coral card stock embossed with the Very Vintage Embossing Folder, made the front of this gift bag pop.  Some beautiful striped ribbon in Very Vanilla and Early Espresso and added for the bag handle. 
 The Note Book:

I used a small notebook from the Dollar Store covered with designer series paper for the base of this project.  There is a small pen housed in the side of the jacket cover.  The base cardstock was Calypso Coral. Absolutely every piece of card stock and stamped image was distressed with a sponge dauber for that aged look.
I stamped the scroll image from Papaya Collage using the Stamp-a-ma-jig along a strip of Soft suede and embossed it with Versa Mark Ink.  Once it was heat set, I took sponge daubers with Calypso Coral and Early Espresso inks and rubbed the surface to get a vintage look.  The brads were from the Antique Brads collection.
I stamped the beautiful butterfly images on Crumb Cake cardstock in Early Espresso ink and then fussy cut them out. Three small basic pearls were added to the centers and I curled the edges of the wings with my bone folder and mounted them with dimensionals.
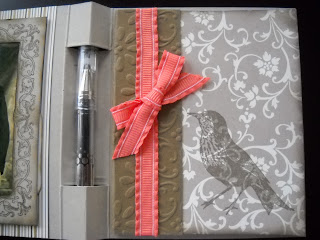
This view shows the inside of the notebook holder.  I covered the small notebook with DSP and stamped the bird image in Early Espresso.  A strip of Soft Suede cardstock formed a binding on the book, covering the edges of the DSP.  A small piece of Calypso Coral ruffled ribbon was tied around the book before it was mounted to the card base with sticky strip.  In this view you can see the small pen in its holder.  I bought the pens at Staples and they were in a variety of colours.  I lucked out with a brown pen to match the card design. 
I cut two tags with the Two Tags Die Cut in Very Vanilla to add to the notebook. The one on the front has the sentiment "Remember When" stamped on it and the second tag is stamped with the rose image.  Both tags were antiqued with a sponge dauber around the edges using crumb cake ink.
The Two Tag die cut on the inside actually covers the backside of the one used on the front of the notebook jacket and it's layered below the Papaya Collage Frame image.  I hand cut the center of the frame away with an X-acto knife and glued it in place over top of the photo.

I hope you liked this post on my gift set.  Although it's a year after the fact and many of the items used for this gift set have since been retired the one nice thing about vintage is "it's timeless".  Here are the products I would use to re-create this project today:

DSP:  Neutrals Designer Series Paper stacks Item #130132
Card Stock: Baked Sugar, Crumb Cake, Very Vanilla, Early Espresso, Cantalope Crisp & Pear Pizazz
Inks:  Baked Sugar, Crumb Cake, Early Espresso, Cantalope Crisp & Pear Pizazz
Ribbon:  Calypso Coral or Chocolate Chip Chevron Ribbon, and Crisp Cantalope 3/8" Ruffle Stretch Ribbon.
Accessories: Label Collection Framelits, Finishing Touches Edgelits, Butterfly punch, Beautiful Baroque Embossing Folder instead of Vintage one.

Friday, July 13, 2012

Convention Swaps Sneak Peak

The countdown is on! I leave for convention in just five more days! Before I go I thought I'd share a few more sneak peaks of my convention swaps.  I hope you enjoy them. Don't worry, I'm doing a full card reveal on Monday the 16th, so be sure to come back and see the finished cards.


Here's a peak at a card I've created for Patty Hargrove's 10+1 Full Card Swap Group 2 on Wed July 17, 2012. She's invited me to be captain for Group Two during the swap, and I'm so looking forward to this. What fun! 
Patty has worked really hard to pull this swap together and she's done a great job!  She's organized five groups of 10 swappers and a "No Show" group for this swap. 

This is a full card swap.  Each card must have at least 2-3 layers and one or more embellishments.  Only new stamp sets from the 2012/2013 Idea Book and Catalogue will be allowed and the list is fantastic.  I can't wait to post pictures of the swap and card samples. I know you're going to love them! 

Before I go on, I just wanted to say that for her "first time ever organizing a swap", Patty deserves a really big round of applause!  Being the Swap Organizer requires a lot of energy and organization and she's really worked on this one.  She's provided us with regular updates on who's participating the sets being used, as well as instructions we'll need once we're at Convention.  She's even collected all our phone numbers so we can be in touch before the session if anyone's late or whatever.  It's so exciting I just can't wait!. 

Click on this link to check out Patty's wonderful blog.  She's already posted pictures of some of her completed swaps she's and they look fabulous.  Great ideas here folks!

Okay here's a peak at my second swap: 

This is also for Patty Hargrove's 10+1 Full Card Swap - "No Show" List on Wed July 17, 2012.  This is an overflow group Patti set up just in case someone didn't show up for the swap. She calls us her "Angels in the Wings".  I guess it's appropriate I have wings on my card!  There are now seven of us in this group, and if none of the groups are shorted we'll be swapping amongst ourselves.  What fun!

 
And, last but not least, here's my third and final peak:  
These cards are for the Late Night Stampers 80+1 Swap on Friday July 20, 2012.  That's right 80+1.  This is a dinner event and will be one of the big highlights for the week.  I can't wait to see all the commotion as everyone gets together to swap!  

I had fun making these little birdies and you'll be surprised when you see them on the card.  One thing I can tell you is that after doing 80+ of these little suckers I was sure glad I own Stampin' Ups! Bird Builder punch!  LOL.  I simply couldn't imagine fussy cutting all these.


Wednesday, May 30, 2012

Papaya Collage Birthday Cards

On Sunday I had the pleasure of getting together with two of my favourite stampers, Ethel and Sheri. 

What a great afternoon we had! We looked at sneak peaks and chatted about the new catalogue and all the great stamps and products that will be coming out on June 1st with the release of the 2012-2013 Idea Book and Catalogue (IBC).

We made one project during our get-together based on a happy birthday card I designed using the new Papaya Collage Stamp set.  I took my inspiration for this card from a wedding invitation and "Save the Date card I'd recently received.


My original card was made with Daffodil Delight cardstock and ink to mimick the colours used in the Save the Date card.  It looks dull in this picture, however in real life it was beautifully bright and cheerful.

For our group card we chose Wisteria Wonder for the card base, markers and ruffled ribbon.  The front of the card base is embossed with the Framed Tulips embossing folder. 

To create the beautiful floral image we used a Wisteria Wonder marker to colour in the flowers and a Basic Black marker for the stems.  Before stamping we huffed on the stamp image to make sure it was moist enough to transfer the ink to the card stock. 

The butterfly was first wetted in Versa Mark then in Basic Black ink before stamping the image on Whisper White cardstock.  Once stamped, Clear embossing powder was applied and then heat set.  The image was then coloured with Wisteria Wonder and Basic Gray markers. 

Three basic rhinestones were used for the butterfly's body and the finished butterfly was mounted with dimensionals to the card front. 

The sentiment "Just for You" from the Tea Shoppe stamp set was also stamped in Basic Black ink and heat embossed to add some dimension.

Three butterflies were stamped on the Whisper White card insert on the inside of the card and coloured as above. 


Here are the three cards we made together. 
 Here are the two cards together.  Pretty don't you think?

Zany Birthday FMS#628

Well another week has flown by and there's a promise of Spring between the rain drops.  I'm thrilled to see all the cherry trees sta...