Showing posts with label Masculine Cards. Show all posts

Wednesday, January 17, 2018

Watercooler Wednesday #WWC153 - Gail's Masculine "Anything Goes" Challenge

This past week has been so much fun.  It's been filled with good things like being with friends, playing cards, cooking Pierogies and entertaining.  All things that put joy in my heart.  The warmer weather and longer days are also contributing to my good spirits.  

Although I didn't have much time for stamping my thoughts were on it and I was able to design a card for the WWC153 at the Watercooler.  Gail Allen is our hostess and she's challenging you to step away from your comfort zone and make a "Masculine Card".

The WWC153 challenge is open for links until 5:00pm MST Monday January 22nd, 2018.  There's plenty of time.

Here's My Card:


Supplies:
Stamps:  Country Living, Gorgeous Grunge, Make a Wish (Fiskers)
Inks: Smokey Slate, Momento Tuxedo Black, Chocolate Chip, Early Espresso,
Card Stock:  Smokey Slate, Basic Black and Sahara Sand 
Accessories:   Paper Trimmer, Detail Scissors, Big Shot, Happy Birthday Thinlet, Tom Bow Adhesive, Gray Dots.


I made this card for a friend whose birthday is coming up soon.  He's into guitar picking and wearing boots, so this card is perfect for him.   I started with a Basic Gray layer for the card base and added a layer of Basic Black.  My third layer was a piece of Sahara Sand that I'd stamped the images on, but I kind of messed up on the stamping and had to cut it down  by a 1/4"  on all sides. Because this panel was so much smaller than I'd anticipated I layered on some   additional layers of DSP that I found in my scrap drawer.
I decided to use the Happy Birthday Thinlet for my sentiment on this card. The bold lettering was perfect.  Because this card is going overseas, I wanted it to be as light as possible and not too bulky.  By cutting two layers of the words in Basic Black and gluing them together, I was able to add a bit of texture and pop and keep the card weight in check. 

I coloured the boots with Chocolate Chip and Early Espresso inks that I'd watered down considerably.  I wanted the guitar to be the focal point so I coloured it with more intensity.  I has a bit of a sheen like a real guitar would. The basic gray dots and splashes from Gorgeous Grunge were added for more expression.

I kept the masculine feel on the inside of this card by adding a strip of the dsp and a piece of basic black card stock.  The sentiment is from an old Fiskars set I have called "Make a Wish".  I stamped it in Momento Tuxedo Black. 


And that's it for this week's challenge.  Hope you liked my card and will leave me a word of encouragement.  Don't forget to check out the entries by the other Design Team Artists at the Watercooler Wednesday challenge.

Happy Stamping!
Penny Tokens Stampin' Spot

Wednesday, December 20, 2017

Watercooler Wednesday Challenge #150 - Heidi's Masculine Anything Goes - Two Week Challenge

Hi stampers!  Christmas is just around the corner and I don't know about you, but I'm way behind this year with my card making and Christmas preparations.   I've been thrown off schedule with all the events happening where I live and company, but I wouldn't have changed it for the world.  Life happens!  

With that in mind, this week's Watercooler Wednesday challenge is going to span two weeks instead of our regular one week, to accommodate everyone's busy schedule and Christmas week.   I think everyone will give a round of applause to our Administrators for arranging that.  I know I will.  

Remember this Linky doesn't close until Monday, January 1st, 2018 at 5 p.m. Mountain Standard Time, so you've got plenty of time to get crafting.   All you need to do is follow a few simple rules and link up your post to our blog using the Linky.  Check out the details on Watercooler Wednesday Challenge blog's home page. Hope you'll join us.

Here's My Card:
 

This week I'm adding to my Masculine birthday stash and have chosen a country western theme for those male friends and relatives who are "a little bit country". 

Supplies:
Stamp Set:  Country Living, Basic Butterfly and Cupcakes Clear Stamps, Howdy from Artful Impressions
Card Stock:  Whisper White, Crumb Cake, Early Espresso
DSP and Specialty Papers:  Coffee Break DSP, Gold Foil 
Ink:  Early Espresso, Crumb Cake and Momento Tuxedo Black, H2O Twinkles
in brown shades
Accessories:  Big Shot, Paper Trimmer, Circle Dies, Sponge Daubers,Stamp-a-ma-jig, Tom Bow Adhesive, Dimensionals, Aqua Painter.

When I began making this card I couldn't decide whether I wanted to showcase the boots or the guitar from the Country Living stamp set but after a few trial runs, I wound up doing a bit of both. 
 
Country Living Stamp Set
The Details:
The card base is an 8 1/2" x 5 1/2" piece of Crumb Cake card stock that was scored and folded at 4 1/4".  I added an Early Espresso layer that measured 5 1/4" x 4 followed by a 5 1/7" x 3 7/8" piece of the coffee ring paper from the Coffee Break Designer Series paper pack. 


I added three more layers to the card front  a gold foil, an Early Espresso and a Whisper White.  When I was trying to decide how to feature the guitars, I began stamping using my Stamp-a-ma-jig to place the guitars end to end on a larger sheet of Whisper White card stock.  I stamped the guitars in Early Espresso and coloured them with a wash of Crumb Cake and the H20's.  

I had a small Artistic Impressions stamp that said "howdy" that I thought would lend to the country feel and I stamped it randomly between the guitars with Early Espresso ink.  

I splattered Crumb Cake and Early Espresso inks over this panel to give it a weathered look.  When I finished stamping I cut this panel to 3" x 4 1/2" and adhered it to a piece of Early Espresso that measured 3 1/8" x 4 5/8".  This panel was attached to a 3 2/8" x 4 6/8" Gold Foil panel with Dimensionals.  The Gold Foil panel was glued to the center of the DSP panel. 

Love those boots.  I started out by stamping the boots with Momento Tuxedo Black ink on a piece of Whisper White card stock and then I applied a wash of Crumb Cake ink with my Aqua Painter.  I layered on Early Espresso and some of my H2O inks in various shades of brown to finish off the design.  In real life the boots look pretty leathery which was the look I was going for.  The boots were added to the front layer with Dimensionals.


I stamped the "Happy Birthday" sentiment from my Cupcake Clear Stamps set on a piece of Whisper White card stock and cut it out with a 1 1/4" circle punch. I sponged the edges of the circle with Early Espresso.   I cut additional circles from Early Espresso and Gold Foil and layered the sentiment to them.  The Dots are from my stash and I can't remember the Manufacturer.  

The inside of the card features the "Happy Birthday" sentiment from the Basic Butterfly stamp set, some more of the Coffee Break paper and a spare guitar that was left over from my earlier efforts.  After I took the pictures of the inside of the card I actually added a 1/4" x 5" strip of Early Espresso to cover the meet lines between the DSP and the White card stock.  It was an afterthought but worked well.

Well that's it for today's post.  Just a simple card, but I know it will make one of our friends very happy. How about you, do you struggle with themes for your masculine cards?  Do your like the country theme in this card?  I'd love to hear your thoughts on this and my card.

If you haven't already done so don't forget to drop by and check out the awesome masculine cards contributed by the rest of the design team.  They're pretty stunning and inspiring.  Just click here to return to the Watercooler Wednesday WWC150 Challenge.  Thanks for stopping by!

Happy Stamping!
Penny Tokens Stampin Spot

Wednesday, November 15, 2017

Watercooler Wednesday Challenge #145 - Judy's Masculine "Anything Goes"

Hi Stampers!  Welcome to our Watercooler Wednesday weekly challenge.  This week our hostess is Judy Markowitz and she's challenging you to make a Masculine themed card or project and link it to our challenge site.  

What could be easier, hope you'll join us.  The Linksy is open until 5:00pm on Monday November 20th.  All you have to do is make something masculine and link it to your post through our Linsky and follow a few simple rules.  All the stuff you need to know about playing along is located on the Watercooler Wednesday Challenge Main Page. 

Here's My Masculine Card:


Supplies:
Stamps: One Wild Ride, Happy Birthday Gorgeous and Route 66 (Carta Bella)
Ink: Crumb Cake and Early Espresso
Card Stock: Crumb Cake, Very Vanilla and Early Espresso plus a scrap of card stock with a straight edge for Retiform sectioning.
Accessories: Paper Trimmer, Detail Scissors, Post It Notes, Sponge Daubers

Some Details:
1. The card base is a 4 1/4" x 11" piece of Crumb Cake scored at 5 1/2".

2. The first layer is a 4" x 5 1/4" piece of Early Espresso.

3. The second layer is a 3 7/8" x 5 1/8" piece of Very Vanilla.

4. For the motorcycle layer, I cut rectangles from Crumb Cake, Chocolate Chip and Very Vanilla using my Pinpoint Rectangles dies.  The largest rectangle measures 2 1/8" x 3 1/8" and graduate down in size. 


The edges were sponged with Crumb Cake ink and the sentiment "Birthday Wishes to the Leader of the Pack" from the One Last Ride Stamp set and the tire tread were stamped in Early Espresso ink. The motorcycle was stamped twice on scraps of Very Vanilla ink, fussy cut and the images were put together with Dimensionals. Before layering the motorcycle across this panel, the edges were sponged with Early Espresso ink.

5.  The inside panels are a 4 x 5 1/4" piece of Early Espresso topped with a 3 7/8" x 5 1/8" piece of Very Vanilla. The "Happy Birthday" sentiment is from the Happy Birthday Gorgeous Stamp set.  I inked up the motorcycle with Crumb Cake and then stamped off on a scrap of paper before stamping the image on the bottom of the panel.


The technique used for the background of this card is called Retiform. Click here to see a video by Randi Collins that shows the step by step process to create this type of background.

 
You'll need two sponge daubers, 3 or 4 Post It Notes and a strip of scrap card stock that has a straight edge. For the pattern on my Retiform background I randomly stamped images from One Wild Ride and Route 66 stamp sets.


Well that's all there is to this simple card.  I hope you enjoyed it and will try this technique with your own stamps.  It works best with a stamp set that has more imagery than words.  I'd love to see what you create or hear your thoughts on this technique.

If you haven't checked out the entries from the other Watercooler Wednesday Design Team members just click here to return to the home page.
Happy Stamping!
Penny Tokens Stampin Spot

Wednesday, September 20, 2017

Watercooler Wednesday Challenge #137 - Penny's Masculine "Anything Goes"


Today is the second of two rainy days in BC.  Good for the fires but depressing for the soul unless you have something to do.............like spending time in your craft room.  Nothing could be better!

It's time for this week's Watercooler Wednesday Challenge and I get to be the hostess!  What fun!  

Before I get on with the challenge details I'd like to welcome our newest temporary guest artist Charlotte Ehrukainen from Finland. Charlotte's contributed many, many times as a participant in our challenges as "Lady Joyful", and has often Rocked the Watercooler with her terrific designs. So, welcome Charlotte it's going to be great having you on board!

This week is one of those love it or hate it challenges because it's about crafting a Masculine card. Don't groan..... I get it.  With the over abundance of floral and cutesie stamps that are geared to our feminine side, it's sometimes hard to come up with a design for the guys in our life.  Well don't despair, our WCW Design Team artists have come up with some  delightful samples that I'm sure will inspire you.

Here's My Card:
 
Here's what the inside looks like.  When you open the card the secret hinge allows this display to pop out.  There's plenty of room on the red bottom panel for writing a birthday message.


This is a Twist and Pop birthday card I made for a friend's cousin who was celebrating his 70th birthday. To create a card that was perfect for him, I needed to get into detective mode to find out whatever details I could about his life so the card would be a very personal experience for him.

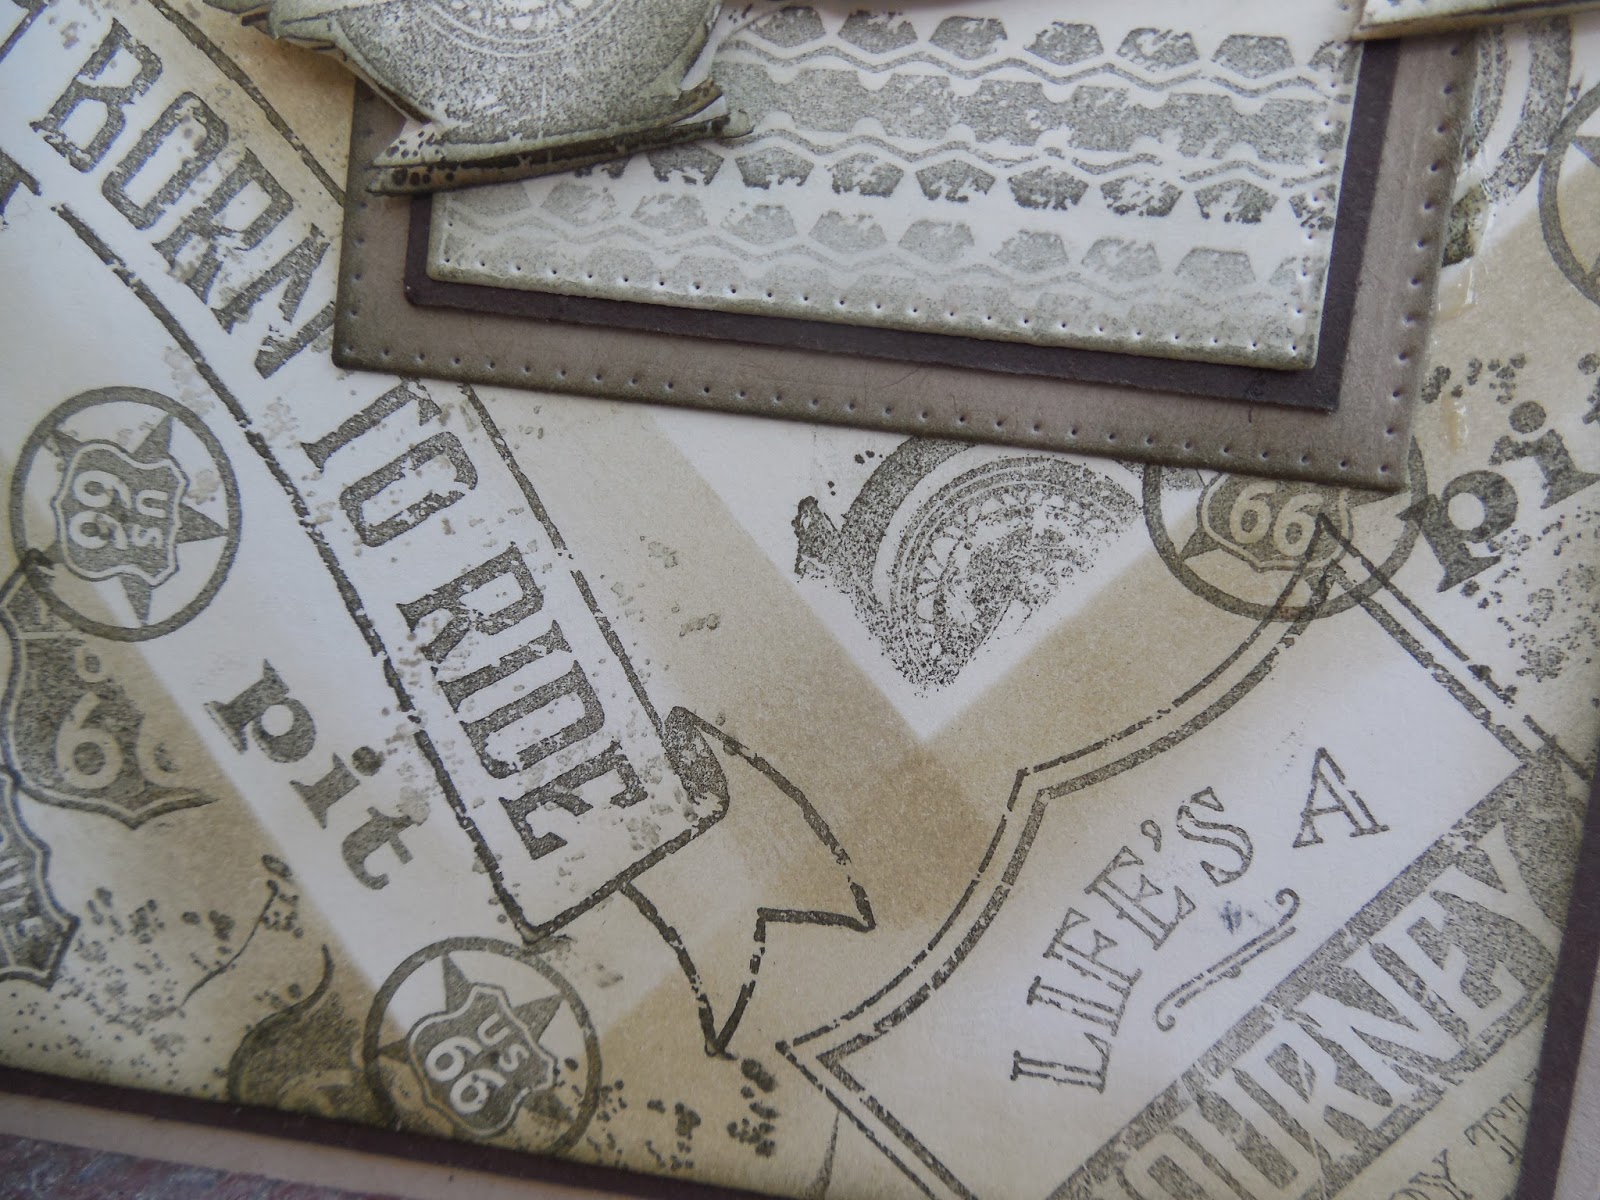
On questioning, my friend said her cousin was a well traveled man who loved carsHe's taken to the open road in his little red and white Corvette and on his Harley driving through California and Arizona on many trips.  He's also traveled Route 66 and been a big NASCAR fan.  So, road trips in the southern states have played a big part in his life.  

From this information, I tried to create a card that mirrored her cousin's life experiences and would signify not only what a great journey he's had but those he will continue to have.

Supplies:
Stamp Sets: Stylized Birthday, Guy Greetings, One Wild Ride, Badges and Banners, Happy Birthday Gorgeous, Gorgeous Grunge and Route 66 (Carta Bella non SU)
Card Stock: Basic Black, Real Red, Crumb Cake and River Rock (R) and Route 66 DSP Carta Bella
Ink: Momento Tuxedo Black, Real Red, Crumb Cake and River Rock
Accessories: Big Shot, Paper Trimmer, Detail Scissors, Stamp-a-ma-jig, Post-It Notes for masks, Dimensionals, Mini Glue Dots, Tom Bow Glue, Sticky Strip, Envelope Maker, Misti.

The Envelope:  
This card making adventure begins with the Real Red envelope which I made with my Envelope Maker. It's a handy tool to have when making a Twist and Pop card because they can be bulkier than an A2 card and need some room.
The lighting in this photo doesn't make it look like Real Red but trust me it is.  I've stamped the Badge from Badges and Banners  in Momento Black ink on Crumb Cake.  It was cut out with the Best Badge Punch.  The Banner with Dan's name in it was punched out with the Duet Banner Punch, and the little houses are from the retired Sleigh Ride Edgelits.  The strip of DSP is from the Carta Bella Route 66 DSP.
This envelope started with a 9" x 9" piece of textured card stock.  This card stock isn't as dense as regular card stock, so it's easier to work with when making envelopes.  The only pitfall to using it is it's rough and uneven texture which makes it difficult to stamp on. To remedy this  I used my Misti to stamp the Stylized Happy Birthday sentiment multiple times to get a good image without fear of blurring it. 
Details:
I'm not providing instructions on how to make a Twist and Pop card in this post, but you can check out this link to one of my previous posts that provides a detailed tutorial. 

The Belly Band:
This Belly Band is unique because it's made from an Acetate Window Sheet rather than card stock.  The Acetate measured 3 1/2" x 10".  By mounting the die cut on the Acetate, it still allowed the map on the top of the card to show through. 
I mounted the Happy Birthday die cut sentiment which was cut from Real Red and Basic Black card stock to the center front of the Belly Band.  The two die cuts were glued together with Tom Bow glue.  They were offset slightly to get an illusion of a shadow and depth to the letters.  Mini glue dots secured the lettering to the Acetate Sheet.
To finish the Belly Band, I carried on the desert theme from the front of the card on Crumb Cake card stock and stamped the bike from One Wild Ride.  

I stamped a second image of the bike on a Post It Note and masked the original image before stamping the cactus and the "pit stop" images.  These stamps were from the Route 66 stamp set. The edges of this layer were sponged with Basic Black ink and I used the large splatter stamp from the Gorgeous Grunge stamp set to add dots of Real Red, River Rock and Basic Black ink randomly across the images
 The Card Front:
I found some great DSP with a matching stamp set called Route 66 that was perfect for my card.  The top section of the card was a 3 7/8 x 5 1/8" piece of the DSP that features a map of California. 
I stamped the Corvette on a piece of River Rock card stock, and fussy cut out the car.  The desert scene from the Route 66 stamp set was stamped in Momento Tuxedo Black ink.  The sentiment "To a Classic" from the Guy Greetings stamp set was perfect for the Banner which was cut out with the Bunch of Banner Thinlet dies.  The edges were sponged with black ink.  

The Inside Panels: 


The top panel dsp has a map of Arizona and the motorcycle is from the One Wild Ride stamp set.  I've also used the Route 66 stamp set again to recreate the desert image.

The first two panels in the center of the pop up feature the Best Badge and Banners and Badges stamp set and the new Every Day Label Punch. the Happy Birthday and confetti are from the Happy Birthday Gorgeous stamp set.
The third panel has an old Chevy from the Route 66 stamp set and the sentiment "Hope Today is One Wild Ride!" is from One Wild Ride. The Real Red numbers were cut out with the Large Numbers Framelit dies.

Well that's the end of this journey, and I hope you enjoyed it.  It's such a challenge making a card that tells a story and I think I've succeeded in capturing some of Dan's journey.  My friend said he really liked the card, so that's all that counts.  If you liked it too I hope you'll leave me a comment. 

Don't forget to check out the rest of the WWC Design Team if you haven't already done so.  Just click on the Designer's name above their cards to check out their individual blog posts. 

Also, if you want to participate in this challenge, and I sure hope you do, it's easy to play along.  All you need to do is make a Masculine card and link your blog post to the Linsky before 5pm Mountain time on Monday September 25th.  Please don't enter your card in more than 7 other challenges or you won't be eligible to win our "Rocked the Watercooler" or "Honourable Mentions" badges, and that would be sad.  Until next time....

Happy Stamping!
Penny Tokens Stampin' Spot

Wednesday, July 19, 2017

Watercooler Wednesday #128 - Heidi's Masculine "Anything Goes" Challenge

Heidi is hosting this week's Watercooler Wednesday Challenge and it's one of our most popular themes - Masculine Anything Goes.  The Design Team has gone all out to provide you with some terrific examples of Masculine cards and I expect we'll have some great entries for this one.  

I hope you'll join us by linking up your creation with the InLinkz at the bottom of the challenge. 

Here's the Rules:
1. This must be a new project---no back-linking to a previous post.
2. You must link your project back to our challenge (details at top of page).
3. You must link directly to your post, not simply your general blog.
4. Please link to no more than 8 challenges, including ours.
5. Have fun! 


Just click here to go to the Watercooler Wednesday Challenge and use the link-up for WWC128 to share your project. The Linky closes on Monday, July 24th at 5:00 p.m. Mountain Daylight Time and winners will be posted on Tuesday, June 25th at 5:00 p.m. MDT.
Here's My Card: 
In case you haven't noticed, I like to challenge myself by trying out different fancy folds.  

This week's card was inspired by a Dutch Fold Christmas card created by the incredible Dawn Griffiths.  After watching her video on Youtube I was inspired to run to my craft room and pull together this masculine version of her card.  Hope you like it.


Supplies:Stamp Sets:  One Wild Ride, Cool Treats, Gorgeous Grunge, and  Badges & Banners.
Card Stock:  Very Vanilla, Basic Gray, Delightful Dijon and Urban District DSP
Inks:  Momento Tuxedo Black, Delightful Dijon, Basic Gray, Smokey Slate
Accessories:  Paper Trimmer, Tom Bow Glue, Best Badge Punch, Urban Underground Embellishments.

Details:
Once I decided on my stamp sets, card stock and ink colours this card took me from start to finish about 15 minutes to assemble.  It was really straight forward.  Here's how I cut and assembled the pieces:

1.  Card Base:  Cut a 7 1/8" x 8" piece of Delightful Dijon card stock and score on the 8" side at 2" and at 6".  Turn and score from the top on the 7 1/8" side at 2 3/8" to the first score line and then from the bottom on that side to the first score line.  Turn to the next side and score at 2/38 all the way from top to bottom.  Okay now the hard part is out of the way. 

2. From Very Vanilla Card Stock cut the following pieces and then do all your stamping and adhere to Basic Gray pieces:
  • Outside stamped panel - cut 1 piece 3" x 3 3/4"
  • Inside stamped panel - cut 1 piece 3 1/2" x 4"
  • Inside dutch doors - cut 2 pieces 1 1/2" x 1 7/8"
3.  From Basic Gray Card Stock cut the following pieces:
  • Front and inside flap panel - cut 2 pieces 2 1/8" x 3 3/4" 
  • Front panel - cut 1 piece 3 1/4" x 4.  When adhering this piece to the front flap only add tear n' tape or glue to the left side.
  • Outside Dutch Doors - cut 2 pieces 1 3/4" x 2 1/8" 
  • Inside Dutch Doors - cut 2 pieces 1 3/4" x 2 1/8" 
  • Inside panel that attaches to card base - cut 1 piece 3 3/4" x 4 1/2".
 4.  From Designer Series Paper cut the following pieces:
  • For front and inside flap panel cut 2 pieces of DSP 1 7/8" x 3 1/2" and adhere to basic gray pieces.
  • For outside Dutch Doors cut 2 pieces of DSP 1 1/2" x 1 7/8" and adhere to the basic gray panels.   

      Stamping:
For the front panel I stamped the Motorcycle from One Wild Ride on the card stock in Momento Tuxedo Black ink.  I stamped another Motorcycle on a post it note, fussy cut it out and then placed it over top of the first Motorcycle as a mask.  

I stamped the "Life's a Journey" image in black ink over top of the mask because I only wanted the upper portion to show behind the bike.  Before putting this stamp away I stamped it on a scrap piece of Very Vanilla card stock and cut it out with the Best Badge punch.  This was adhered to the inside of the front panel  overhang. 


I stamped "Happiest Birthday" from the Cool Treats stamp set in the center of the inside Very Vanilla Panel.  I stamped "You're" and "Cool" from the same set on the upper Dutch Door.  I also stamped the "Route 66" image from One Wild Ride on a scrap of Very Vanilla and then fussy cut it out and attached it to the side of "Cool".  

I stamped the "No. 1" from Best Badges in Delightful Dijon on the Very Vanilla Dutch Door piece. 

I stamped the large spotted stamp from Gorgeous Grunge after stamping off twice in Smokey Slate and again in Delightful Dijon on the Motorcycle, You're Cool and No. 1 panels.

I added three screw embellishments from the retired Urban Underground Embellishments on an angle to the front panel.

And that's how I made this card. What do you think? If you like it please leave me a comment. I'd love to hear how you liked this version of the Dutch Fold.

Don't forget to check out the WWC128 post to see the designs from the rest of our Watercooler Wednesday artists.  They've put together some awesome inspiration for this Masculine Challenge.

Happy Stamping!
Penny Tokens Stampin' Spot

MAY 2024 HOSTESS CODE

Welcome to my site and Happy May everyone!    Here is my new Hostess Code for the month:  Every papercrafter needs stuff, but not everyone c...