Showing posts with label "Birthday Cards" "Stampin Up". Show all posts

Sunday, March 18, 2012

Simply Scored Diagnonal Plate Envelope Tutorial

I've just purchased the new Simply Scored Diagonal Plate accessory which coordinates with the Simply Scored scoring tool I bought earlier this year.  These two craft tools are going to make my life so much simpler, and I couldn't be more pleased with them. 

The Simply Scored Diagonal Plate is perfect for quickly creating handcrafted envelopes, boxes, and more! To use just sit the Simply Scored Diagonal Plate on top of the Simply Scored base.  It's held securely in place by rubber pads on the back of the plate and has etched grooves every 1/8" so it takes the guess work out of sizing your projects. 

You can score any size card stock up to 12" x 12" and you get instructions for creating common envelope sizes that are very easy to follow. 
Simply Scored Diagonal Scoring Tool, Item #125586 for only $15.95
So now for the Envelope Tutorial:

Since purchasing my new "cool" tool, I've seen a number of videos demonstrating how to use it to make envelopes, but none seemed to address the issue of making unconventional sized envelopes, until I saw one produced by Mike Funke an Independent Stampin' Up! Demonstrator from Southern California.  Here's the link.  Enjoy!

I'll also be demonstrating how to use this fantastic new accessory in my April Envelopes and More Class, so stay tuned for dates and times. 

Monkey Challenge #100: Celebrate! + Sketch.

Congratulations are in order!  100 Challenges...............wow!

That's cause for celebration and the Design Team (Terry Blais and Shirley Sumption) at A La Card Monkey are doing just that. 

This week they're offering up another great sketch and some fabulous BLOG CANDY

You can get in on the fun simply by following their blog challenges, leaving a comment on this week's post or uploading your own rendition of their cute little sketch. 
So, what are you waiting for, you could win this adorable handmade (by Shirley Su's own little hands) Owl, 2 stamp sets, Daffodil Delight Pom Pom Trim, Cherry Cobbler Dazzling Details, Scallop Trim Border Punch, Pearls, a handmade and decorated dispensing container of Whisper White Baker's Twine (made by Terry's own big man hands), chunky glitter, Sweet Stitches buttons, a Thank-You Note kit with stampin' spot and stamp, flower keychain, and an album to alter!

And here's this week's simple sketch and my rendition of the Monkey Challenge #100:  Celebrate & Sketch. 


I was asked to be a Guest Designer this week and what a thrill that was..........I love being in on special occasions and helping my friends celebrate! 

So here's to you Shirley and Terry and all you Monkey fans.   

Sorry for this poorly lit dark picture, but it was all I could produce at the moment and  will replace when I see the light of day!


Stamps:
Sprinkled Expressions Stamp Set - Sale-A-Bration 2012
Outlined Occasions Stamp Set - Sale-A-Bration 2012
Take It To Heart - Occasions Mini Catalogue 2012
 
Ink:
Pool Party
Calypso Coral
 
Cardstock:
Very Vanilla, Pool Party and Calypso Coral
 
Designer Series Paper:
Attic Boutique #125407 - Occasions Mini Catalogue
 
Accessories: 
Basic Rhinestones, Edgelits Adorning Accents Die Cuts #125595 (Occasions Mini), 1 3/8" and 1 3/4" Circle Punches, Finial Press Embossing Folder, Dimensionals
 
Happy Stamping!
Penny

Wednesday, February 1, 2012

Electronic Scrapbooking - Are You Interested

During the month of February Stampin' Up! is offering an amazing opportunity for scrapbookers and stampers to check out the "My Digital Studio" offerings for absolutely free.  I told you it was an amazing offer.  Here's what you get:


  • The free trial includes the My Digital Studio Express Software. This means you get the full design functionality, access to our print services, and the opportunity to purchase My Digital Studio downloads.


  • At the end of the 30-day trial period, you can purchase either My Digital Studio or My Digital Studio Express to continue using the software. You will not need to re-download the program, but will simply enter the product key you receive after purchasing the software. (If you purchase the disc version you'll find it along with the shipped software, and if you purchase the downloadable My Digital Studio Express, you'll receive the product key via e-mail.)


  • You will be able to keep any downloads you purchase during the 30-day trial period.


  • To get the free trial version, add My Digital Studio Express Trial (item 129600) to your online shopping cart, and then download and install it from your Download Manager.


  • If you would like more information about this product contact me or check out the My Digital Studio at mydigitalstudio.net

    Monday, January 16, 2012

    What do "Snow Days", "Puzzles" and "Birthday Cards" Have In Common?

    How many more times do I have to shovel it?

    <><><><><><> <><><><><><> <><><><><><>
    View from my office while I'm composing this note. What a sight!
    It's snowing out today!.   We woke up this morning to about 6 inches of the fluffy stuff and it hasn't stopped all morning.  My DH's cleaned the driveway twice already, and is dreading the thought of having to do it again.


    Guess that means we're stuck inside for as long as this lasts.  I have a grin on my face.  Wanna know why?  Okay, can you see my feet doing the happy dance?  It's because SNOW DAYS are productive days and I get to do my favourite thing........ play in my Stamp Room, have fun and be creative!!!!  Oh yeah, and get caught up on my January Birthday Cards. 

    View from my office window to my upper deck.

    My back yard.............. buried under a foot of soft fluffy snow!
    While I'm stamping he's puzzling.  What a great way to spend a snowy day!
    So in keeping with that thought, I've been in my craft room churning them out.  Here are two birthday cards I've made so far this morning.  Hopefully the gals I'm sending these too won't be peeking. Shhhhh.........

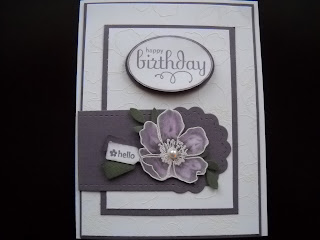
    Here's my first Birthday Card of the day.  This little floral number was made with the following products:

    Ink:  Perfect Plum, Versa Mark

    Card stock:  Whisper White, Perfect Plum and Always Artichoke

    Stamp Sets:  Perfect Punches #120517w/120516cm pg140), Happiest Birthday Wishes Hostess Set (#122615w/122617cm pg10), Fabulous Florets (#123025w/1123027cm pg. 107) and  Tiny Tags (118091w/118592cm pg.136).

    Accessories:  Jewelry Tag Punch (117190pg 210), Two Tags Bigz Die (115954),  Bird Builder Punch (#117191 pg. 213), Extra-Large Oval Punch (#119859 pg 212), Lace Ribbon Border Punch (122362 pg. 211).  Basic Pearls (119247 pg 198), Dimensionals (104430 pg. 206).  White Embossing Powder (109132 pg. 201)
    I've kept the inside of this card pretty basic, by just adding a 5 1/2" strip of Lacey Border punched out of Perfect Plum card stock.  The "A Little Bit Late" birthday wishes sentiment is one of eleven fabulous birthday greetings from the Hostess sets called "Happiest Birthday Wishes".    Ask me how you could purchase or earn this wonderful Birthday Greeting set for Free. 

    The Fabulous Florets flower image that is featured here was stamped on Whisper White cardstock with Versa Mark Ink and then heat set with White Embossing Powder.  Both layers of Whisper White Cardstock on the front of the card were stamped randomly with the same image and embossed.  You have to look close to see the fine detail of the embossing on the white card stock. 

    The flower image was sponged with Perfect Plum Classic Ink.  The Whisper White tag was stamped with the "hello" image from the Tiny Tags stamp set, and then punched out with the Jewelry Punch. 

    The three tiny tags were mounted with dimensionals to give some definition from the plum tag.  The floral image from the Bird Builder punch was punched from Always Artichoke card stock.  A medium sized basic pearl was added to the center of the flower.  This floral arrangement and Jewlery Tags were mounted with dimensionals to the Perfect Plum tag which was die cut using the Bigz Two Tag Die.   

    <>  <> <> 
    Here's a closeup of the floral image and tags. 
      My second card is made with the Just Believe Stamp set. Here are the products used to complete this card:

    Ink:  Baja Breeze, Soft Suede Classic Ink and Markers

    Cardstock:  Baja Breeze, Soft Suede, Naturals Ivory Specialty Cardstock (pg. 181 IB&C).

    Stampsets:  Just Believe (#116948w/120453 cm pg. 109), Tiny Tags (#118091w/118592cm pg 136), Perfect Punches (#117022w/120516cm pg 140).
    Accessories: Framed Tulip Embossing Folder (#121809 pg 218), Silver Brad (#104336 pg. 199) Jewelry Tag Punch(#117190 pg. 210), Extra Large Oval Punch (#119859 pg. 212), 2-Way Glue Pen (100425), Stampin Dimensionals (104430 pg. 206)and Dazzling Diamonds (#102023 pg. 201).
    
    
    Here's a close up of the detail of the details on the front of the card.  The Framed Tulips Textured Impressions Embossing Folder has created the perfect 5 1/4 x 4" frame for this floral image. 

    To create the 2-toned floral image I used Soft Suede and Baja Breeze markers to colour the image and stamped it on a 3 x 4 1/4" piece of Naturals Ivory card stock.  Two-way glue was then applied to the flowers and they were sprinkled with Dazzling Diamonds for a glittery effect. 

    The Happy Birthday sentiment from Perfect Punches was stamped on a piece of Naturals Ivory Specialty card stock and then fussy cut around the inner oval. A piece of Baja Breeze was cut out with the Extra Large Oval punch and the sentiment was adhered with dimensionals. 

    Before mounting the sentiment to the floral image, 3 jewelry tags in Soft Suede, Naturals Ivory and Baja Breeze were sponged, stamped with sentiments from  the Tiny Tags set, and mounted to the main sentiment with a silver brad.  The jewelry tags were fanned out and layered with dimensionals to make them stay in place.


    The inside of the card has been stamped with one of the images from the Happiest Birthday Wishes - Clear-Mount Hostess Stamp set. 

    SAB set "Fresh Vintage".  You can earn this set for FREE during the upcoming Sale-A-Bration sales event starting January 24, 2012.............ask me how?

    Well that's it for today.  Now back to my card room.  Hope you enjoy these cards and thanks for dropping by.

    Penny

    Friday, October 28, 2011

    A La Card Monkey - Any Occasion and Sketch: Monkey Sketch 80

    Hi everyone.  Last week I had the thrill of finding out that my Spooky Cute entry into the  A La Card Monkey Sketch 78 challenge, had won me the honour of being a Monkey Princess and a Guest Designer spot in an upcoming challenge.  That had me swinging through the vines for sure!  Here's my badge of honour.

    I was so excited to be chosen as a Guest Designer because the A La Card Monkey Design Team does such an awesome job of presenting amazing sketch challenges that are always fun and easy to do.  Plus these gals are just so darned nice and helpful I feel like they're all friends.  Anyway it was just a great thrill for me and I wanted to share my excitement and good news with you.

    Monkey Sketch 80 - Any Occasion + Sketch:
    Here's this week's sketch and I'm sure you're going to enjoy it.  In fact, I invite you to play along too.  I know some of you hold back on doing the challenges because you don't have a blog, well don't let that stop you.  For this challenge if you're one of my customer's or demos who doesn't have a blog but would like to join in the fun, simply forward your card to me electronically and I'll post it to my blogsite for everyone to see and comment on.  That will be fun for all of us!!!!


    Although the sketch was for "Any Occasion", I chose to do a Christmas card.  I wanted my card to have the feel of an old ski lodge and someone standing looking out at the view, so I chose a stamp set that I could build a scene with.  Because the white cardstock I was stampin on was only 3 x 3 this limited my choice of stamps, but I finally narrowed down my choice to Christmas Lodge or Snow Much Fun, and you guessed it, Snow Much Fun won out.  Let's see if I accomplished this sketch:
    :
    Isn't this fat little snowman simply irresistible? He's from the Snow Much Fun stamp set and I just couldn't resist having him peaking through the window into the Lodge.  The card base is Cherry Cobbler with a layer of Always Artichoke. I was looking for a wall panel effect with the artichoke layer and I think I achieved that by embossing it with the new Stripes Embossing Folder (123128 pg 218 IB&C) and distressing around the edges with Always Artichoke ink.  I also added a layer of Early Espresso for the window panes and embossed this piece with the Square Lattice Embossing Folder (119976 pg 218 IB&C).   
     
    The snowman image was stamped on a 3 x 3 piece of Shimmery White cardstock with Early Espresso and Versa Mark inks and then heat embossed with Clear Embossing Powder. To build the scene I stamped a mask for the snowman on a piece of sticky note paper and then stamped the tree and the snowball overtop of the original snowman.  It worked!   The sketch was coloured with Baja Breeze, Always Artichoke, Pear Pizzazz, Cherry Cobbler, Pacific Point, and Crumb Cake makers.   The snow flakes are from the Serene Snowflakes set (115438 pg. 36 IB&C) and were stamped in Baja Breeze.   To give a little sparkle to the snow scene I used the new Dazzling Details irridescent glitter glue (124117 pg. 41 Holiday Mini) on the snowflakes, snowball and snowman.

    Here's a closer look at my Snowman.  Once you've stamped your scene on the 3 x 3 inch piece of cardstock just cut it into 1" strips and then cut those strips into 1" x 1" blocks.  For the window pane effect start by lining up top row making sure each square is lined up and there's equal distance between the blocks.  I glued my blocks down with  Tombow glue to ensure they stayed put.  Once you've got the first row done it's just a case of doing each additional row and using the upper one as a spacing guide. 

    The sentiment on my card is from the "Christmas Lodge" stamp set.  I stamped it in Cherry Cobler on a 3/4" by 3" strip of cardstock.  I used the Modern Label punch on each end to add some interest.  The sentiment is layered over top of a strip of the new Cherry Cobbler 3/8 Quilted Satin Ribbon (124105 pg 30 Holiday Mini) and a label punched out in cherry cobbler with the Decorative Label Punch.  The edges were distressed with Cherry Cobbler ink. 


    Hope you enjoyed this post. 

    NESTS OF CHRISTMAS PAPER PUMPKIN ALTERNATIVES USING #fms#662

     Here's the latest sketch challenge from Freshly Made Sketches #662 and designed by Jen T.  Make sure you check out the Design Team car...