Saturday, October 7, 2017

World Card Making Day - BOO

Did you remember that today is World Card Making Day, a day celebrated throughout the world by stampers and scrapbookers.  It's a day for remembering those you love with a card.  A day for relaxing with friends and being creative.  Hope you get your card on today!  

Here's Mine:
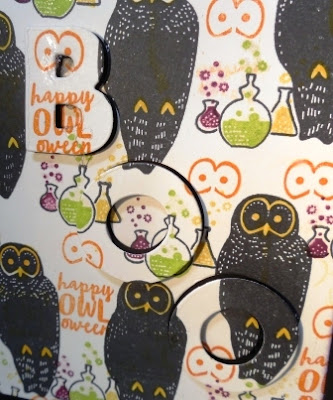
Happy Halloween!   Love this fun background paper I designed.

I used Foam Adhesive Strips to pop up the lettering because they're a tad higher than Dimensionals. 

The Crushed Curry moon is the large surface circle (not quite) image from the Swirly Bird Photopolymer Stamp set.  I covered the entire surface of the moon with Wink of Stella.  Although this is the inside of the card, it could easily be a card front.  What do you think?
 
Swirly Bird


I've been wanting to try the eclipse technique for a while now, but I didn't have the large alphabet dies that everyone's using so I put it off.  But a friend was visiting the other day and she brought an alphabet die set with her (Non-SU), and I thought what the heck!  

The background paper for the front of my card was created with the Spooky Cat stamp set.  I stamped randomly all over a piece of Whisper White card stock until I had a pattern I loved and then I cut it down to fit my card. 
I love those owls.  What fun to stamp.  You can't see it but there's lots of shimmer on this card from my Wink of Stella.
This stamp set is part of the Spooky Night Suite in the new Holiday Catalogue.  It's a very reasonably priced Photopolymer stamp set on it's on or it can be purchased as part of a bundle with the fantastic Cat Punch.
 
Enjoy!

Happy Stamping!
Penny Tokens Stampin' Spot

Wednesday, October 4, 2017

Creative Circle Design Team Blog October Hop - "Haunted Halloween"

September was a complete blur for me with frenzied card making sessions, garage sales and other events so it's hard to think that the month has gone and Halloween is just around the corner. Quite truthfully I've been so focused on getting my Christmas projects finished, I hadn't given too much thought to Thanksgiving or Halloween. Yikes! What was I thinking!

Well, no worries. I'm happy to say that the Creative Circle Design Team (CCDT) led by the wonderful Liz Holloway, hasn't lost it's direction or focus and our very creative and uber talented crew of international stampers is here to dazzle you with a "Haunted Halloween" October hop.

But, before we begin, I'd like to welcome our newest CCDT team members, Jay Soriano of Mitosus Crafts and Stesha Bloodhart of Stampin Hoot. I've been so looking forward to seeing their creations on this hop and it's so awesome to have their collective talents join us this month.

 
Jay Soriano
Stesha Bloodhart


Here's My "Haunted Halloween" Art Decor
Halloween is always such a fun time of the year and  I so look forward to seeing what Trick or Treats Stampin' Up! has in store for us in the Holiday Catalogue.  Well I must say I wasn't disappointed this year!  In fact, the Spooky Night Suite on pages 52 through 55 were the inspiration for me to make this  Halloween Sampler. 

Supplies From the Spooky Night Suite:
Card Stock: Basic Black, Very Vanilla, Cajun Craze, Orange Glimmer Paper, Silver Foil
DSP:  Spooky Night
Ink: Pumpkin Pie, Momento Tuxedo Black, Versa Mark, Smokey Slate
Accessories:  Cat Punch #144666, Black Rhinestone Jewels, Detailed Gate Thinlet Dies, 1", 11/4", 1 3/8" Circle Punches, Bunch of Labels Thinlets, Wink of Stella Clear, Big Shot, Paper Trimmer, Tom Bow Adhesive, Foam Adhesive Strips, Dimensionals.  
Spooky Cat Bundle -18 Photopolymer Stamps are included in the Spooky Cat stamp set.  It includes tattooed cats, witches' hats, growling owls, bubbly potions, and a rat—who needs "the Scottish play" when you can have this!  The cat punch is a no-brainer for punching out beautiful cat silhouettes that can be used at any time of the year and for any occasion.
The Graveyard Gate Bundle is a spooky collection of  graveyard head stones gates and sentiments for creating a spooky setting.  I absolutely love the Detailed Gate Thinlet Dies which are part of the bundle.  These dies can be used for other occasions besides Halloween, such as Sympathy and Wedding cards.

Details:


Picture Frame: I started out with a 13 1/2" x 11" glass picture frame from the Dollar Store. I used a full sheet of DSP from the Spooky Night DSP pack to line the inside of the frame. I added two 1" by 11" strips of Cajun Craze card stock on either side of the DSP to cover the expanse of the frame. 

Sampler Base: For the base of the sampler I used an 8 1/2" x 10 5/8"" piece of Basic Black card stock. The next layer was a 9 3/4" x 7 7/8" piece of DSP.
Potions, pumpkins, witches' hats, cats, and eerie trees; this Halloween-themed Designer Series Paper has it all and it coordinates with Basic Black, Cajun Craze, Pumpkin Pie and Very Vanilla. Product #144610 Spooky Night DSP

Panels: I decided on a layout for my sampler and then measured out the panels I would need to cut. I needed the following: 
1.  Top and Bottom Center Panels:  I cut two 4" x 1" pieces of Basic Black and two 3/4" x 4" pieces of DSP with the science bottles.  These panels frame the center panel on the top and bottom.  I sponged the edges of the DSP with Basic Black ink before adhering them to the card stock. 
This is the center top panel.  I  stamped the mysterious beakers from the Spooky Cat stamp set on a piece of Whisper White card stock and then cut it out with a 1" circle punch.  It was layered on a 11/4" basic black circle layer and added to the panel with Dimensionals.
This is the bottom center panel.  I stamped the black rats from the Spooky Cat stamp set on this panel.
2.  Center Panel: The center panel began with a 4" x 5 1/2" piece of Basic Black card stock.  The next layer was a 3 7/8" x 5 1/4" piece of Orange Glimmer Paper left over from last year's Halloween stash.  I cut out the bottom center of this paper so it wouldn't be wasted and later on cut out the numerals "31".  The next layer was a 3 3/4" x 5 1/8" piece of Very Vanilla card stock.
Lots of detail went into creating this graveyard scene.  I began by cutting out the stars and moon on the top of the panel with the Card Front Builder Die Cuts.  


Next I stamped a variety of head stones in the lower part of the panel with Momento Tuxedo Black ink.  I used masks and stamped some of the tomb stone images off at least 2 times to give a misty impression and some additional depth.  This panel has a real spooky feel going on!

I cut out the filigree gate which is totally awesome with the Detailed Gate Thinlet Die and Basic Black card stock. I used Adhesive Foam strips on the back of the gate and attached it over the stamped tomb stones.    I stamped the two brick columns using stamps from the Graveyard Gate stamp set and mounted them with Dimensionals on either side of the gate, matching up the outer edges so they didn't overlap the panel.  

To finish off the gate I stamped the sentiment "Open if You Dare" on Very Vanilla Card Stock and cut it out with the 1 1/4" circle punch and then layered it on a 1 3/8" Orange Glimmer circle.  The edges were sponged with black ink before it was adhered with Dimensionals.  I die cut the lock and key from Silver Foil. 
For the Gate sign I stamped the "You're Invited" image from the Graveyard Gate stamp set in Versa Mark ink and embossed it with Black Embossing Powder. I cut it out and mounted it in position with Dimensionals.  To make it even more spookier I stamped a bunch of bats around it.  Some of the bats were fussy cut out with my detail scissors and added with Mini Dimensionals. 
3.  Right Panels:
The top right panel began with a 2 1/2" x 5 1/2" piece of Basic Black card stock followed by a Cajun Craze piece that measured 2 1/4 x 5 1/4 and a 2 1/8 x 5 1/8" piece of dotted DSP.  The Trick or Treat sentiment was stamped on Pumpkin Pie and cut out with a banner from the Bunch of Banners Thinlet Dies.  A couple of Basic Black Rhinestones were added on the edges.  

The sparkly date numerals were cut from the center Orange Glimmer Panel and DSP using the Large Number Framelit Dies and mounted with the Eclipse technique and they're mounted with Foam Adhesive Tape.  The "Eat at Your Own Risk" sentiment was stamped on Very Vanilla card stock and cut out with the 1" circle punch and mounted on a 1 1/4" piece of Pumpkin Pie.  

The Large Numbers Thinlet  dies are a great investment and can be used for many occasions.  They cut out the numbers from Glimmer and Foil papers with ease. 

The bottom right panel began with a 2 1/2" x 2 1/8 piece of Basic Black card stock, layered with a 2 3/8 x 2" piece of DSP with the witches hats design.  The edges were sponged with Tuxedo Black Ink.  I stamped a witches hat and fussy cut it out and mounted it with Dimensionals.  Although you can't see it in the picture I coloured the buckle with Crushed Curry and then added Wink of Stella to make it sparkle. 
 

4. Left Panels:
The top panel began with a 3 1/4 " x 2 3/4" piece of Basic Black card stock topped with the DSP that has all the pictures of the tree limbs and the moons. I stamped the owl in Tuxedo Black ink onto the limb and then re-stamped it on Very Vanilla card stock using Versa Mark ink. I embossed with Black Embossing powder and then fussy cut out this image and adhered it with dimensionals. Loved this panel!


The center panel measures 1 1/4" x 2 3/4" and I've added the DSP with the writing on it.  

The bottom panel is 2 3/4" x 2 7/8" piece of Basic Black card stock topped with a piece of DSP that has the cats on it. I punched out one of the black cats from this paper and mounted it with Dimensionals.  I coloured the cat with Wink of Stella to give it some shine. 
 
I hope you liked my Halloween Sample and that it's inspired you to make some Halloween creations of your own.  Whether you set aside time just for yourself, stamp with your girlfriends or have a family night you'll be making memories for seasons and years to come, and having a whole lot of fun in the process!
 
Your next stop on this hop is the incredibly talented Liz Holloway's blog.  Wow I know she has some amazing tricks and treats for you and you're going to be scary thrilled to see what she's designed. 

Happy Stamping!
Penny Tokens Stampin' Spot

Thanks for stopping by and Happy Haunted Halloween!


Watercooler Wednesday Challenge #139 - Kath's Feminine "Anything Goes"

Our weather shifted this week leaving us with three days of Fall wind, cloud and rain.  What's good about the shift is it doesn't make it difficult to stay in doors and stamp, and that's what I did without any guilty remorse. 

This week I had two wedding cads to make.  One of them was for our friend's son and his fiance who were having a small country wedding. I wanted to make them a special wedding and gift card holder, so the timing of Kath Rick's Feminine "Anything Goes Challenge worked out perfectly.   

Here's My Card:


I'm very much about tradition when it comes to Wedding cards.  This wedding was an outdoor country affair so I wanted to make something with a vintage, feminine appeal as well as some WOW factor, and I'm happy to say that's how this card turned out.    

I also wanted to incorporate a gift card holder into the card, but I wasn't sure how I wanted to do that.  My dilemma was solved when I watched a YouTube video by Dawn Griffith featuring a great gift card holder built right into a card.  I knew this design would be the perfect layout for my project and so I CASED Dawns.   All the instructions and measurements are on her blog  "Dawn's Stamping Thoughts" and on her video, so make sure you leave her a comment when you visit those sites.  

Supplies:
Stamp Sets: Floral Phrases#141767, For the New Two (R), Calm Christmas (R) and Colourful Seasons #143726
Card Stock:  Champagne Foil Sheets #144748, Whisper White, Soft Suede, Crumb Cake
DSP:  Non-Stamping Up - Elegant Holiday Paper DCWB
Ink:  Early Espresso, Crumb Cake
Accessories:  Stitched Shapes Thinlet Dies, Lots of Labels Thinlet Dies, Seasonal Layers Thinlet Dies, Dimensionals, Big Shot, Paper Trimmer, Basic Pearls 

Wow my old cake topper which dates back to 1969 sure looks "vanilla" in comparison to the Whisper White in the card and envelope.  Oh well that was 48 years ago, so it's bound to have faded.


Details:
I would have loved to have made my card using the beautiful Year of Cheer Suite, that's featured on pages 36 and 37 of the Holiday catalogue, but unfortunately, the only paper I had from that suite was the Champagne Foil Sheets and some Whisper White card stock. I was really excited about the combo of White, Gold and Crumb Cake in that paper pack. Oh well there was no time to order it in, so I just had to search my paper stack for something else. I struck pay dirt when I found a pack of DCWB paper called Elegant Holiday.
I chose a single-sided sheet of white and crumb cake paper with a pattern of doves and snowflakes on it.  Although it was Christmas paper I figured that the doves were close enough to the wedding theme to make it work.  It also enabled me to use a retired stamp set called Calm Christmas which features a beautiful floral dove, which I stamped on the inside of the card.
The back view of the gift card holder
Here's a view of the inside left panel where I stamped the "Calm Christmas" dove in Soft Suede ink.  The sentiment from Floral Phrases is stamped in Early Espresso.The Whisper White panel is mounted on a layer of Champagne Foil and Soft Suede card stock. which really added a beautiful touch.
To make this card/gift card holder you need to start with a 5 1/2" x 12" piece of dsp.  For the front of the card I cut banners from Whisper White, Crumb Cake and Soft Suede card stock and attached them on the left side. The Soft Suede and Whisper White banners measured 1 1/2" x 4" and the Crumb Cake one measured 1" x 4".  

The sentiment is from the retired "Colourful Seasons" stamp set.  I super love the font which is stamped in Early Espresso Ink.  The flowers are from the Colourful Seasons Stamp set set and were cut out with the coordinating Seasonal Layers Thinlet Dies.  I stamped them in Soft Suede and Crumb Cake Ink and added medium sized basic pearls to their centers.  I also added medium pearls to the Soft Suede banner.  The ovals for the sentiment were cut from Soft Suede, Champagne Foil and Whisper White card stocks with the Stitched Shapes Ovals.

In this view of the inside of the card you can see the fold that holds the gift card.  Before gluing down the fold, I added a piece of Soft Suede card stock.  The sentiment is from the Floral Phrases stamp set.  I used the Stitched Shapes dies to cut out a 3" circle from the DSP and a 2 3/4" circle from Whisper White and they were mounted on the pocket with Dimensionals.  Before Stamping Wedding Wishes on the Whisper White layer I stamped the floral image from The For the New Two stamp set in Crumb Cake.  I stamped off before applying the image so I would just get a hint of flowers behind the sentiment.  The Wedding Wishes sentiment is from Floral Phrases.  Five pearls were centered below the sentiment and a small Crumb Cake flower was added with a Mini Dimensional.
In this view you can see the insert I created from a small scrap of DSP and Whisper White Card Stock.  
The sentiment is from the "For The New Two" stamp set.  I cut a piece of the DSP with a Lots of Label Thinlet die and added it to the back of the Whisper White card stock to create a tab for pulling the card out.  I forgot to take a picture of the back of this tag, but I incorporated a slot for the gift card to fit in to.
The card was hand delivered, so I thought it would be a nice touch to stamp "congratulations" to the bride and groom  on the front of the envelope.

I hope you have enjoyed my Wedding Gift Card Holder and I'd love to hear your thoughts on it.  This card comes together super quickly, so it's a great pattern to have on hand.   If you haven't already checked out the other WWC Design Team members cards here's a direct link to the Watercooler Home Page.  Until next time.............

Happy Stamping!
Penny Tokens Stampin' Spot

Wednesday, September 27, 2017

Watercooler Wednesday Challenge #138 - Marsha's "All About Christmas"

Welcome to this week's "All About Christmas Challenge" hosted by Marsha of the Watercooler Wednesday Challenge blog.  In my book, it's never too early to think about making Christmas cards.  So this week's challenge is right up my alley.  

Marsha Reed our very talented Assistant Coordinator is starting us off with a stunning gate fold winter scene. Just seeing Marsha's beautiful snowy winter scene put me in the Christmas spiritI know you're going to love Marsha's card too and be very inspired by the rest of the WWC Design Team who've also contributed inspiring designs.  Believe me when I say everyone's pulled out all the stops to bring you some great Christmas card inspiration!  

Before we get to my entry for this week, I just want to remind you that the Watercooler Wednesday Card Challenge DT welcomes new participants to join in our challenges. Don't be shy!

It's super easy to link up your entry and play along.  Just make sure to enter no more than eight challenges including this Watercooler Challenge, and link up your photo before 5:00pm MST on Monday October 2nd and you're good to go.  See, super easy! Who knows, your entry might "Rock the Watercooler" or join our "Rockers" who have received honourable mentions. No matter, we love having new participants join in our challenges. So, why don't you play along?

Here's My Card:
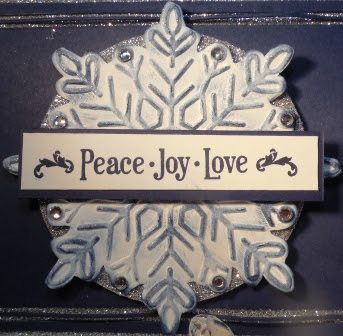
I seem to be hooked on Navy Blue, Silver and White for this holiday season.


Supplies:
Stamp Sets: Musical Season #144811
Card Stock:  Whisper White, Night of Navy, Silver Glimmer Paper
Ink: Night of Navy
Accessories: Big Shot, Paper Trimmer, Card Front Builder Thinlet Dies #144674, Circles Thinlets, Winter Wonder Embossing Folder #144686, Dimensionals, Tom Bow Glue, Basic Rhinestones.
Card Front Builder Thinlet Dies # 144674 coordinates with the Carols of Christmas stamp set.
Musical Season Stamp Set #144, 811, coordinates with the
Musical Instruments Framelits Dies
Winter Wonder Embossing Folder #144686

Details:
1.  The 8 1/2" x 5 1/2" card base is cut from Whisper White card stock and was scored at 4 1/4".

2.  The 1st layer is Silver Glimmer Paper and measures 5 3/8" x 4 1/8".  Note: to reduce the bulk and not waste my glimmer paper, I cut away the center with a rectangular die cut.  I made sure I left a half an inch on all sides, so that the die cut in the next layer covers the glimmer paper. 

3.  The 2nd layer is Night of Navy card stock that measures 5 1/4" x 4".  I lined up the Card Front Builder Thinlet die on each side to add the cut work design.  

 4.  For the next layer I used my old circle die cuts to make a  3 1/2" circle from Silver Glimmer Paper for the base of the snowflake. 

5.  I embossed a 4" x 4" scrap of Whisper White card stock with the Winter Wonder Embossing Folder and then fussy cut around the embossed image with my detail scissors. I sponged over the embossed image and around the edges with Night of Navy ink.  Basic Rhinestones were attached to the circles between each of the snowflake points. The snowflake was glued flat to the Silver Glimmer paper circle with Tom Bow glue.  This piece was mounted to the center of the card front with Dimensionals. 

6.  I stamped the Peace.Joy.Love sentiment from Musical Season on a 3 3/8" by 3/4" piece of Whisper White and then mounted it on a piece of Night of Navy that measured 3 1/2" x 1".  The sentiment was adhered with Dimensionals to the center of the snowflake.  

7.  For the inside of the card I kept it simple by stamping on the card base instead of adding a layer.  The beautiful sentiment and mandolin from the Musical Seasons stamp set was enough to enhance this panel.  I simple stamped them in Night of Navy Ink.  

I hope you liked my snowflake Christmas card.  It certainly was an easy one to do and is very pretty to look at with all the sparkle.  How do you like the inside of the card? Does it's simplicity offset the outside, which was my intention?  I hope you'll leave me a comment as I really enjoy receiving your feedback and your ideas. 

If you came to my site first and haven't had a chance to check out the rest of the WWC138 Christmas Anything Goes DT cards just click here to return to the home page.  See you next time....
Happy Stamping!
Penny Tokens Stampin' Spot
Paper Pumpkin Alternatives April 2024 and Sketch Challenges

The past week was so busy that time literally flew by.  I have a number of projects on the go, including working on my April 2024 Paper Pump...