This week's delightful colour challenge WWC26 is brought to you by Jean Fitch a long time member of the Watercooler artists group..
 Jean's selection of Marina Mist, Daffodil Delight and Crumb Cake evokes fond memories of the lazy hazy summer days of my youth. When school was out we'd head for the hills and play for endless hours among the buttercups, bachelor's buttons, and waving grasses. And of course there were butterflies flitting on the breeze. Ahhhh, summer. Those great memories and great colours gave me special motivation to ink up my new Floral Wings stamp set.
Here's My Card:
 Supplies:
Stamps: Floral Wings and Butterfly Basics
Ink: Marina Mist, Daffodil Delight and Crumb Cake
Cardstock, Whisper White, Daffodil Delight, Marina Mist and Crumb Cake
Accessories: Butterfly Framelits, Basic Pearls, Spring Flowers Embossing Folder, Elegant and Bitty Butterfly punches, trimmer, big shot.

When I began making this card, I envisioned what my finished card would look like, however, things just didn't go as planned. As I progressed, my earlier image changed and began morphing into something else, and by the time I finished, my card looked nothing like it's beginnings. Have you ever had this happen to you?
I didn't have any particular sketch in mind when I started on this card. I originally planned to start with a whisper white card base, then add layers of Marina Mist and Daffodil Delight followed by a stamped image of the large butterfly on a Whisper White layer. I was thinking of adding some small butterflies of other accent with the Crumb Cake card stock.

In the end, I wasn't happy with my stamping and decided to use the Butterfly Framelit die to cut out two of the butterfly images I'd stamped on Whisper White. This was a good decision as they turned out so soft and lacy looking and added a whole different dimension to this card. These butterflies look like they were cut from a beautiful designer series paper.
By punching out smaller butterflies with the Elegant and Bitty butterfly punches and layering them in the center of the card I totally changed the layout. I'm happy with all the changes and how the card turned out in the end.
 If you look closely at the card base you'll hopefully see the honey comb images stamped as
a watermark in Crumb Cake ink around the edges of the card base. I also cut down the size of the original mats and embossed them with the Spring Flowers Embossing Folder
(retired).
If you look closely at the card base you'll hopefully see the honey comb images stamped as
a watermark in Crumb Cake ink around the edges of the card base. I also cut down the size of the original mats and embossed them with the Spring Flowers Embossing Folder
(retired).
 I also stamped the honeycomb image and the Happy Birthday sentiment from the Butterfly Basics stamp set on the inside card piece. Here you can see what the original butterfly stamping looked like before I cut out the butterflies with the Butterfly Framelit. Aren't those yellow flowers pretty?
I really enjoyed stamping with the Floral Wings stamp set. TIP: Start off by stamping the flowers first, then layer in the leaves and finally center the butterfly over the images. You'll get a nicer result. When you mount the stamps on your clear block make sure the tabs are all facing or lined up the same, and you will have perfect results every time.
Here's another card I made with this stamp set and two of the challenge colours, Marina Mist and Daffodil Delight. This 10 piece photopolymer stamp set gives a two-step stamped image that is very versatile. I'm sure there are endless possibilities.

 For these cards I used the Marina Mist and Daffodil Delight combo to create a warm and inviting scene. The Whisper White background is embossed with one of my favourite embossing folders this year called Lovely Lace.
I stamped the vase in Marina Mist on both the Whisper White card stock for the actual vase image as well as on Marina Mist for the butterfly background. By using a combination of the multiple flowers and a single flower I was able to create the abundant bouquet image.
Do you recognize the little bow on the vase? It comes from the Mini Treat Bag Thinlits set. Isn't it cute? TIP: I have a small Xyron for making stickers, so once I cut out the bow with the thinlit die, I ran it through the Xyron. It was perfectly glued with no excess oozing out on the sidelines.
 For my third and final card using Floral Wings, I worked with last week's Colour Me Subtle Colour Challenge although I missed the cut off to the link by just a few minutes. Here's my card:
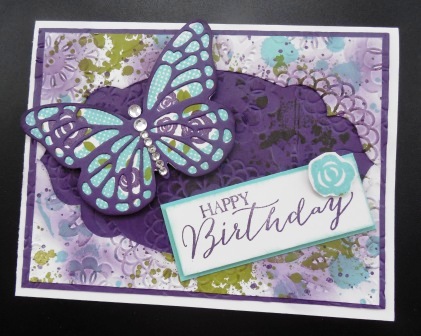
I loved this colour mix too. So soft and beautiful and absolutely perfect for the card I planned.


The card base is Whisper White with a layer of Elegant Eggplant that's been embossed with the Lovely Lace Embossing Folder, and then stamped with the splatter from Gorgeous Grunge in Elegant Eggplant ink.

This was followed by a layer of Whisper White that was first cut with the Apothecary Framelits die and then stamped with three of the splatter stamps from Gorgeous Grunge that had been inked up with Old Olive, Coastal Cabana and Eggplant inks. To distress this layer further I ran it through the Big Shot with the Lovely Lace Embossing folder, and then used a sponge dauber and Elegant Eggplant ink to highlight the embossing.
The beautiful butterfly was first stamped in the challenge colours and then using the Butterfly thinlit I cut out the butterfly image in Elegant Eggplant cardstock and glued it over top of the stamped butterfly. I love that veined look...........so beautiful. To finish off the butterfly I used a combination of medium and small basic rhinestones, and then attached it to the card with dimensionals.
For the sentiment I used the Happy Birthday from the Butterfly Basics stamp set stamped in Elegant Eggplant on Whisper White. This piece was layered with a 2 3/4" x 1 1/8" strip of Coastal Cabanna cardstock. For the final touch I fussy cut one of the flowers and added it with a dimensional.
Well that's it for this week's post folks. I hope you enjoyed it. I think you're going to be seeing a lot more of this Floral wings set, especially since Stampin' Up introduced a new set of butterfly framelits that works perfectly with this set. It's called Bold Butterfly Framelits. It's on my wish list.

Happy Stamping!
Penny Tokens
Here's My Card:

Stamps: Floral Wings and Butterfly Basics
Ink: Marina Mist, Daffodil Delight and Crumb Cake
Cardstock, Whisper White, Daffodil Delight, Marina Mist and Crumb Cake
Accessories: Butterfly Framelits, Basic Pearls, Spring Flowers Embossing Folder, Elegant and Bitty Butterfly punches, trimmer, big shot.

When I began making this card, I envisioned what my finished card would look like, however, things just didn't go as planned. As I progressed, my earlier image changed and began morphing into something else, and by the time I finished, my card looked nothing like it's beginnings. Have you ever had this happen to you?
I didn't have any particular sketch in mind when I started on this card. I originally planned to start with a whisper white card base, then add layers of Marina Mist and Daffodil Delight followed by a stamped image of the large butterfly on a Whisper White layer. I was thinking of adding some small butterflies of other accent with the Crumb Cake card stock.

In the end, I wasn't happy with my stamping and decided to use the Butterfly Framelit die to cut out two of the butterfly images I'd stamped on Whisper White. This was a good decision as they turned out so soft and lacy looking and added a whole different dimension to this card. These butterflies look like they were cut from a beautiful designer series paper.
By punching out smaller butterflies with the Elegant and Bitty butterfly punches and layering them in the center of the card I totally changed the layout. I'm happy with all the changes and how the card turned out in the end.


I really enjoyed stamping with the Floral Wings stamp set. TIP: Start off by stamping the flowers first, then layer in the leaves and finally center the butterfly over the images. You'll get a nicer result. When you mount the stamps on your clear block make sure the tabs are all facing or lined up the same, and you will have perfect results every time.
Here's another card I made with this stamp set and two of the challenge colours, Marina Mist and Daffodil Delight. This 10 piece photopolymer stamp set gives a two-step stamped image that is very versatile. I'm sure there are endless possibilities.


I stamped the vase in Marina Mist on both the Whisper White card stock for the actual vase image as well as on Marina Mist for the butterfly background. By using a combination of the multiple flowers and a single flower I was able to create the abundant bouquet image.
Do you recognize the little bow on the vase? It comes from the Mini Treat Bag Thinlits set. Isn't it cute? TIP: I have a small Xyron for making stickers, so once I cut out the bow with the thinlit die, I ran it through the Xyron. It was perfectly glued with no excess oozing out on the sidelines.
 |
| The Mini Treat Bag Thinlits are currently on sale in the Weekly Deals. Purchase before June 29th and you'll save 15% off on this great framelit die. Click here to see the Weekly Deals. |
 For my third and final card using Floral Wings, I worked with last week's Colour Me Subtle Colour Challenge although I missed the cut off to the link by just a few minutes. Here's my card:
 I loved this colour mix too. So soft and beautiful and absolutely perfect for the card I planned.


The card base is Whisper White with a layer of Elegant Eggplant that's been embossed with the Lovely Lace Embossing Folder, and then stamped with the splatter from Gorgeous Grunge in Elegant Eggplant ink.

This was followed by a layer of Whisper White that was first cut with the Apothecary Framelits die and then stamped with three of the splatter stamps from Gorgeous Grunge that had been inked up with Old Olive, Coastal Cabana and Eggplant inks. To distress this layer further I ran it through the Big Shot with the Lovely Lace Embossing folder, and then used a sponge dauber and Elegant Eggplant ink to highlight the embossing.
The beautiful butterfly was first stamped in the challenge colours and then using the Butterfly thinlit I cut out the butterfly image in Elegant Eggplant cardstock and glued it over top of the stamped butterfly. I love that veined look...........so beautiful. To finish off the butterfly I used a combination of medium and small basic rhinestones, and then attached it to the card with dimensionals.
For the sentiment I used the Happy Birthday from the Butterfly Basics stamp set stamped in Elegant Eggplant on Whisper White. This piece was layered with a 2 3/4" x 1 1/8" strip of Coastal Cabanna cardstock. For the final touch I fussy cut one of the flowers and added it with a dimensional.
Well that's it for this week's post folks. I hope you enjoyed it. I think you're going to be seeing a lot more of this Floral wings set, especially since Stampin' Up introduced a new set of butterfly framelits that works perfectly with this set. It's called Bold Butterfly Framelits. It's on my wish list.

Happy Stamping!
Penny Tokens


