Tuesday, February 11, 2014

Sans and Stripes Photopolymer Stamp Set

If you like your ABCs there's a new photopolymer alphabet stamp set in town and it's sure to be a big hit!  

This new set is called the Sans and Stripes Photopolymer Stamp Set.  It's a fantastic value as it comes with 58 stamps for only $16.95.  This trendy must-have set offers bold and striped options that will look great on their own or used together!  This past week I saw some really cute cards that combined this set with the Pennant Banners and Banner Punch from the Sale-A-Bration catalogue..... think "happy birthday" on banners.  Oh so cute!


Sans And Stripes Photopolymer Stamp Set 136796 Price: $16.95
Stampin' Ups! photopolymer stamps offer a versatile all-clear stamping option. You'll find these photopolymer stamps to be of top-quality and they'll give a perfectly stamped image every time. You'll be sure to have tons of enjoyment with all these images and for such a low price!  Stamping doesn't get any better than that.

When Stampin' Up! first released Photopolymer stamps in 2013, they weren't sure if they would be a product that would continue, so they were offered on an "as available" basis.  Well I have some great news for you that's just been released about the longevity of these stamps.  Stampin' Up! is so happy with this product line that come June when the new catalogue is released, they will be included and there will be more options available for purchasing them, for instance, they will be coming out in the plastic DVD Cases so no more dilemmas about how to store them.  

Penny 

Stampin' Up! Promotions 
and Specials 

PCCCS Challenge #79 -

One of my 2014 New Year's Resolutions was to participate in card sketch and colour challenges on a more regular basis.  Sketch and colour challenges are a fun way to rejuvenate your creativity and challenge yourself to do something different and exciting.  

So with that in mind, I was drawn to the Paper Craft Crew Card Sketch #79 this week and had fun making my first "challenge" card of the year.  Hope you like it!
Paper Craft Crew Card Sketch Challenge # 79 - February 5,2014

My Card:
I really liked all the layers and the colour mix.  


Supplies Used:

Stamp Set:  Starburst Sayings Item # 133185 (cm) $18.95 or #133182 Wood $25.00 from the Occasions Catalogue pg. 34
Cardstock:   Baked Brown Sugar, Crisp Cantaloupe, Island Indigo, Very Vanilla
DSP:  Venetian Romance
Ink:  Baked Brown Sugar, Crisp Cantaloupe

Accessories:  
  • Big Shot- Starburst Framelits, Circle Framelits, Beautiful Wings Embosslits and Fancy and Fan Embossing Folder
  • Trimmer, Dimensionals, Snail Adhesive.
  • Candy Dots Brad Bases and Candy Dots in Island Indigo
  • Linen Thread  

Get Free Markers Promo Extended


Wow, this doesn't happen often, so I'm excited to share the news about the extension of the Paper Pumpkin promotion for new subscribers. That's right, Stampin' Up! has just announced they are extending the Free Marker promotion until March 31st, 2014.


The Details:
New Paper Pumpkin subscribers who sign up at Paper Pumpkin between January 11 and March 31, 2014, will receive a FREE set of In Color Stampin' Write Markers -a $19.95  value-with their Welcome Kit.

The Fine Print:
This special offer is only valid for new subscribers. To sign up go to http://www.mypaperpumpkin.com/.  Your markers will be sent with the your Welcome Kit.  No coupon code's or special promo numbers are required, but I'd appreciate it when you sign up, that you name me as your demonstrator. In that way I'll be able to help you with any questions or samples related to your monthly kits.

Any new subscribers who sign up for a Paper Pumpkin membership during the promotion dates (through March 31) will receive a FREE set of In Color Stampin' Write Markers.
Paper Pumpkin 
Penny 

Stampin' Up! Promotions 
and Specials 

Weekly Deals - February 11 to 17th, 2014


Tuesday is here again, and it's time to check out what's available in Stampin' Ups! "Weekly Deals".  

I was excited to see another one of my favourite die cuts, the "Floral Frames" being offered this week.  This set coordinates with the Day Dream Medallions stamp set on page 115 of the Annual Catalogue.  If you haven't got this one in your framelit collection, now's a great opportunity because you'll be saving 25% off the regular price.  

It's also a great time to order the Artisan Label Punch which coordinates perfectly with the Label Love stamp set (available in French, English and Spanish). You can stamp with six pre-created sentiments or design one of your own with this fun 7-piece stamp set featured on page 33 of the Annual Catalogue.


If you're interested in any of this week's great sale items, you can purchase them at my on-line shop by clicking here. 

Oh, and don't forget, that purchases from Weekly Deals qualify during Sale-A-Bration too.  That's right, if you purchase $60.00 in Stampin' Up! products (before shipping and taxes) during the Sale-A-Bration time period, you're entitled to your choice of a FREE item from the Sale-a-bration catalogue.

If you have any questions, I'd be happy to help you out.  

Thursday, February 6, 2014

Circle Thinlet Cards Using Stippled Blossoms

In the past few weeks, Stippled Blossoms  a ten piece Two-Step stamp set from the Idea Book and Catalogue has become one of my favourite stamp sets.  

I really like the old fashioned rose and its many petals and leaves. Every time I stamp with this set I get "wows", and that's pretty special.

Today I'm going to show you two Get Well cards I made with this set and then I'll give you a little primer on the techniques I used to create these beautiful cards.  
Stippled Blossoms Clear-Mount Stamp Set #126747(cm) Price: $22.95 or #132076(w) Price $32.95  Set Quantity: 10

Masculine Get Well Card:  Version One
The first card was designed for a male friend recovering from surgery. Because his surgery was of a serious nature, I wanted a card that conveyed our get well wishes in a masculine fashion but showed how heartfelt we were about his recovery.  I think I captured that with this card which is made with the Circle Card Thinlet.


I used a 51/2 x 8 1/2 piece of  Crumb Cake card stock to make an extended card base for this get well card.  You can see the technique I used in this previous post.  The "Fresh Prints" Designer paper I've used has a wonderful geometric clean masculine design which co-ordinates well with the rose pattern.
Supplies:
Stamp Sets:  Stippled Blossoms, Sincere Salutations (retired)
Card Stock:  Crumb Cake, Early Espresso, Whisper White 
DSP:  Fresh Prints Designer Series Paper Stack from the Occasions Mini #132996
Ink:  Crumb Cake, Early Espresso
Accessories:  Stamp-a-ma-jig, Big Shot, Circle Card Thinlets Die, Basic Pearls, Circle Framelits 2 1/2 Circle Punch, Sponge Dauber, Scissors, Adhesive, Dimensionals.
Circle Card Thinlits Die #133480 Price: $40.95  The amazing Thinlits Card Dies create your card that flips in just one step.


I like the extended card base when using the Circle Card Thinlets.  It gives me more room to write a  message.  I stamped the Get Well sentiment in Early Espresso Ink.  

Supplies:
Card Stock:  Crumb Cake, Real Red, Whisper White 
Stamp Sets:  Stippled Blossoms, Sincere Salutations (retired)
DSP:  Fresh Prints Designer Series Paper Stack from the Occasions Mini #132996
Ink:  Crumb Cake, Real Red and Cherry Cobbler 
Accessories:  Stamp-a-ma-jig, Big Shot, Circle Card Thinlets Die, Basic Pearls, Circle Framelits 2 1/2 Circle Punch, Sponge Daubers, Scissors, Adhesive, Dimensionals.

Feminine Get Well Card:  Version Two


For the feminine version of this card I used a different patterned paper from the Fresh Prints DSP Paper Stack.  I simply love this pattern which incorporates Coastal Cabana, Crumb Cake, Real Red and Whisper White inks. The beautiful vines and flowers really make my rose pop off the page.  This is the perfect card for a girlfriend who is recovering from minor day surgery and needing a cheery little greeting.  


These smaller flowers were also made with the Two-Step Stamping technique and then cut out by hand.  To give them some dimension I used my bone folder to curl the petals and leaves and adhered them to the card front with dimensionals.  The single pearls in the are the perfect touch.

By masking the rose with a cut out of the image, I was able to place the leaves where I wanted them around the main image.  I used the smallest sized basic pearls in the center of the rose.  Don't they look pretty?

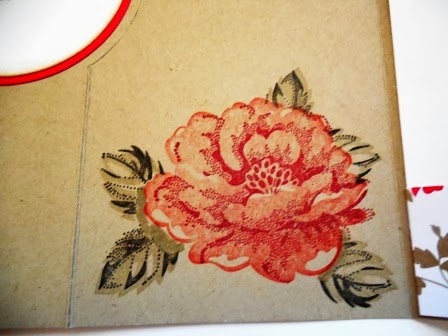
I love how the rose on the inside panel of the card stamped out on the Crumb Cake cardstock.  Very  vintage looking. 


This is what the card looks like from the back.

Note:  I didn't realize I had a smudge on my camera lense, so unfortunately in these last couple of photos and in the masculine ones it looks like a red smudge on the cardstock.  Not so, luckily. All is good!

Techniques:
To achieve the perfect rose image I've used a couple of techniques.  One is called Two-Step Stamping and the other is called Masking.

Two-Step-Stamping:
If you've never used a Two-Step Stamp or are unfamiliar with the technique, don't worry because it's pretty straight forward. When you get your stamp set it will have two of each image that is two step.  One will be a flat surface and the other will be a line image.  All you need to do is:

1]   Stamp the base image (solid image) with a lighter ink. 
2]   Position and stamp the overlay image (line image) with a darker ink.  This will provide the details on the image.  

To make sure that everything line's up correctly use a Stamp-a-ma-jig.  I think the Stamp-a-ma-jig is one of the best stamping tools in my tool kit.  It helps me line up sentiments perfectly or work with a mask and have total accuracy.  
Stamp-A-Ma-Jig #101049  Price: $15.50 This is the perfect tool to keep you from ever ruining a whole project with one crooked image! The stamp positioner gives you the ability to place an image exactly where you want it, every time. Allows for fast and precise stamp placement.  The Stamp-a-ma-jig is perfect for word and letter placement.  The kit includes a washable plastic sheet, sturdy plastic construction, non-skid base and instructions.
Masking:
1]   Stamp image on card stock.
2]   Stamp it again on a piece of scratch paper (post it notes work well   because of adhesive on back).
3]   Cut carefully around the scratch paper image, cutting just inside the lines; this will be your mask.
4]   Place the mask on top of the card stock image.
5]   Stamp another image over a portion of the mask to create layered, interacting images.
6]   Remove the mask to see the finished look. 
7]   To stamp a partial image, use tape to cover the part of the stamp you don't want to appear, ink the stamp, remove the tape, and stamp the image.


QUICK TIP 

  • To ensure that the mask stays in place, stamp image on a Post-It® note, making sure that you retain some of the sticky part of the note with your image. If you don't have a Post-It note you can use repositioning glue or tacky glue.  
  • When you're finished, don't throw away your masks, keep them in your stamp case for future use. You can use them many times.

Penny 
Promotions and Specials 

2 Awesome Stamp Club Cards

I'm not big on night driving but I chose to attend Cheryl LeFore's monthly stamp club last night, and I'm so happy I did.  We made two awesome cards which I'm delighted to share with you, using products from the new Occasions Catalogue.

Cheryl attended Stampin' Ups! Leadership meeting last month in Houston Texas and brought back some wonderful sample cards which she shared with us and some new techniques. 

Water Colour Card:
The first card we made featured two water colour techniques.  To begin with, we used an acryllic block to create a backdrop.   This was achieved by inking up Clear Block "C" with Pool Party ink and then spritzing the block with water, before dragging the block half way down a 2 by 4 1/4" strip of Whisper White cardstock.   This process was repeated with Pistachio Pudding ink down the remaining strip of cardstock.  You have to make sure the cardstock is thoroughly dry before you add it to the card base.  


Here you can see the blend of Pool Party and Pistachio Pudding inks in the background behind the flower.  Note:  This is a technique I would like to practice on some scrap paper to get the proper flow of ink to paper, before doing it on my main card. Why? Because I had a little bit of difficulty getting the second block to glide down the paper without sticking.  I think this was because I didn't spritz enough water on the block.  Regardless, I liked the outcome. 
The second watercolour technique was colouring the flower with Aqua Painters. The flower image from the "Happy Watercolour" stamp set, was stamped in Black Stazon Ink on Watercolour paper and allowed to dry before we began the watercolouring process.  
Happy Watercolor Stamp Set #133188(w) $29.95 or #133191(cm) $21.95. Eight piece two-step stamp set.  Perfect for watercolouring.  

Using Aqua Painters, we coloured the flower with Crisp Cantaloupe, Starfruit and Pistachio Pudding re-inkers. The Aqua Painters allow you to diffuse the colour of the ink so you can achieve different shades in your painting.  

Aqua Painter #103954 Price: $20.95   This wonderful tool is versatile and easy to use, and works great with Stampin' Up! Watercolor Pencils, Watercolor Wonder Crayons, Classic Stampin' Pads, and other mediums to pull and blend colors. Two-painters included per package in 12 mm and 15 mm brush sizes. Portable and easy to use.  The reservoir holds 8 cc of liquid


Once we coloured the flower, we fussy cut around the image and mounted it with dimensionals to the background piece.  A piece of Pool Party Seam binding was tied around the strip before the lace edge was added. 
Finishing Touches Framelits add a perfect finish to your cards.  Item #127010 in the Idea Book and Catalogue.


The Pool Party layer of the card was embossed with the new Decorative Dots Embossing Folder.  I love the soft look this achieves and it coordinates so well with the beautiful Sweet Sorbet Designer Series Paper. 

The Pistachio Pudding lace edge was achieved with the Finishing Touches Edgelits.  Tip: When using these edgelits it's recommended to use wax paper or parchment paper as a shim so all the little window pieces pop out when the piece is run through the Big Shot machine.  


Look at the beautiful  finish on the inside of this card. The Whisper White insert piece measures 3 3/4 x 5.  The flower image was stamped in Crisp Cantaloupe and then only the bottom 1 1/2" of the insert was run through the Big Shot with the Decorative Dots embossing folder.  


I really enjoyed making this card.  It's quick and easy to assemble and I had a lot of fun with the watercolouring.    

During Sale-A-Bration you can earn the Decorative Dots Textured Impressions Embossing Folder for free by simply placing a $60.00 order (before shipping and handling).

Our second card for the evening is called "You Make Me Happy", and was made with the Perfect Pennants stamp set and Banner Framelit Dies.  


I was simply blown away by the look of this card and how genuinely easy it was to assemble.  In fact, there was no waste in any of the products we used.  
The base of this card is made with a 4 1/4" x 11" piece of Strawberry Slush card stock that is scored at 5 1/2" resulting in a top fold card.  The first layer is made with a piece of basic black cardstock, followed by a layer of Bermuda Bay card stock that was embossed with the new Arrows Textured Embossing folder, from the Occasions catalogue.   


To be truthful, I wasn't overly impressed with this folder when I saw it in the new catalogue.  However, I changed my mind after using it.  This design adds a really nice texture to the cardstock and it's got a real masculine look to it.  You can bet I'll be adding this embossing folder to my wish list.

The large and medium sized banners were cut out of 
Kaleidoscope Designer Series paper with the new Banner's Framelit Dies.  They look perfect!  The sentiment "You Make Me Happy" is from the Perfect Pennants stamp set.

Note:
 When overlapping the banners it's easier if you adhere a small piece of card stock to the back of the banners to reinforce them.  In this case we added a 1" x 2 7/8" scrap of whisper white.  To finish the card three stars were stamped in Crushed Curry ink and cut out with scissors.  Basic Rhinestones were added to the centers and a piece of 1/8" Bermuda Bay Taffeta Ribbon was tied around the banner piece before it was adhered to the card face. Dimensionals were used to mount the stars and the banner.    
The Banners Framelit Dies can be purchased as a bundle with the Perfect Pennants stamp set.  See page 27 of the Occasions Catalogue.  Item # 13416(clear) $41.50 or #134815 (wood) $48.50.  This is a 15% savings off the regular price. 
This 10 piece stamp set comes  in wood or  clear mount and is available in English, Spanish or French languages. 

Just looking at this cute card face makes me happy! How about you?  This is just such a great color combo and design.  

Oh, remember when I said that we used all the supplies to make this card?   Well I wasn't kidding, we actually did.  The cute decoration on the inside panel of the card was made using the two triangular pieces of DSP left over from cutting out the banners.  A 1/4" x 3 14" strip of basic black card stock offsets them.


Here's the finished card and envelope.  What fun I had with this one!  I hope you like both cards, and leave me a comment on which one is your favourite. I'd love to hear from you.


Tuesday, February 4, 2014

Weekly Deals Feb 4 - Feb 10

It's time for the Tuesday Weekly Deals and there are some good buys this week.  I was thrilled to see the Delicate Doilies Die Cut on this week's special because I've been wanting that for some time.  I'll be ordering it for sure.   

This offer runs until February 10, 2014.   Place your order through my on-line store. 
Penny 


Promotions and Specials 

2024-2025 Annual Stampin' Up! Catalogue has launched!

 HAPPY MAY 1ST| Today I'm celebrating and  sharing the launch of the much awaited Stampin' Up! Annual Catalogue which will run from ...