Sunday, February 4, 2024

Little Baby - Big Love and Cradled With Love

Baby Cards: 


It's been a while since I've updated my collection of baby stamp sets so when I saw the Little Dreamers Bundle on page 57 of the Stampin' Up! Annual Catalogue (2024) I knew I had to order it.  The line art images are beautiful and the sentiments are large and timeless. 

The Little Dreamers Bundle which can be purchased in English or French includes the Little Dreamers Stamp Set and matching dies. There are nine cling stamps - three sentiments and six adorable characters and elements and the Little Dreamer Die set has ten dies. 

Whether you need a card for a birth announcement, a baby shower invite, shower thank you cards, congratulations, or toddler cards this set would be perfect. The line images are easy to colour with blends, pencil crayons, pastels, paper piecing or watercolor pencils. 


I used Rocco Rose (retired) cardstock for the standard A2 base. I combined two different patterned papers from the In-Color designer series patterned papers. The third layer is a 3 1/2 x 5 3/4" piece of Whisper White.  I used the Stitched With Whimsy (155314) dies to add a meandering stitched design to this layer.  


The inside Whisper White mat measures 5 1/4" x 4" and I added a 1" x 4" piece of the dsp to the bottom leaving a 1/16" space between the dsp and white mat. The Congratulations sentiment was stamped in Rocco Rose ink.  

Although I love all three of the animal images I find the lion is simply adorable.  Such a cute little face.  The lion was easy to color using Crumb Cake and Pecan Pie stampin' blends. Small rosy cheeks were added with Rocco Rose blends. Several clouds were die cut and mounted  with dimensionals.  Pearlized sequins and Wink of Stella added some sparkle. The sentiment "little baby Big Love" is stamped in Rocco Rose ink.   

Another stamp set I recently added to my baby collection is the Cradled In Love photopolymer set from page 7 of the Sale-A-Bration flyer. The  stamp set has twelve stamps and is available for FREE with a $60 qualifying order from any of the current catalogues or online exclusives until the end of February 2024. 


For the boy's card, I began with a Whisper White card base followed by a layer of Soft Seaspray designer series paper (retired) and a layer of Whisper White.  On the last layer I used blending brushes and Soft Seaspray ink to lay down a very pale grid design in the background.    

I stamped the rug onto a piece of Soft Seaspray then fussy cut and adhered it towards the bottom of this layer.  The bassinette was stamped in Momento Black ink and then coloured with light and dark Crumb Cake blends.  The star and moon were coloured with Daffodil Delight blends. 


The baby girl card was constructed similarly to the boy card using Rocco Rose.  Two different patterns from the retired Ombre dsp pack were used as mats and on the bottom of the inside mat.  

The sweet little baby elephant was attached with dimensionals to the floor mat, and some pink sequins were randomly placed for some sparkle.  

Both cards have sentiments from the Little Dreamers stamp set on the covers and inside.    


Well there you have it. These cards were a great way to use up retired card stock and paper and were very quick and easy to make.   I hope you enjoyed these three cards and will come back for another visit or leave me a comment.  I'd love to hear which is your favourite card.  

HAPPY STAMPING!
PENNY TOKENS STAMPIN' SPOT 
Penny Hanuszak, CDN Independent Stampin' Up! Demo 


Thursday, February 1, 2024

Make Good Use of your Designer Series Papers - Accordion Fun Fold

I think I'm  obsessed with the Stampin' Up!s Flight & Airy DSP in the Sale-a-bration Flyer and the Everyday Details Dies in the new Mini 2024 catalogue.  I've used one or the other or a combination of the two on almost every card I've made in the past week.  

Here  are some of the latest cards I've created with these wonderful paper crafting tools.  


This is a very quick and easy birthday card that's sure to get rave reviews from the recipient.  This fancy fold is called an Accordion Fold.  What makes it unique and fast to assemble is the one layer base and designer paper body.  It's a great card style to have in your bag of tricks especially if you're looking to use up your stash of designer series papers. I've used circles for the focal element on the front and inside the card, but really any die or punch shapes can be used.  to tailor the card to suit the occasion.  


For this card I wanted to focus on the beautiful paper and use it as the background for my sentiments and focal points. 

Whisper White Cardstock: 
Cut 1 piece to measure 5 1/2" x 4 1/4" for the card base. 
Cut 1 piece of to measure 2 3/4" x 5" for the inside panel. 
Cut 2 circles for the inside and outside focal points with a stitched circle die.
Note: for my card I added a full A2 card base, because I wanted to write a note to the recipient and I cut the Highland Heather layer down to 5 3/8 x 4 1/8".  I also cut a 1" x 5 1/2" strip of the dsp to go on the left hand side of the card.  

Highland Heather Layer: 
Cut 1 piece of Highland Heather to 5 3/8" x 4 1/8" for the first layer. Before adhering this piece to the card base use the large circle die from the Everyday Details dies to cut a circle for base of the card front focal point.

Designer Series Paper Layer:
Cut a piece  of dsp to measure 5 1/4" x 11 3/4" ande score it at 1 3/4", 4 3/4" and 7 3/4.  Note: Choose a piece that has images or a pattern on one side and a plain background on the reverse, then decide which side to use on the inside before scoring it. 


Embellishments:
Fussy cut various bird, branch, and floral images from the designer series paper to adhere to the focal points.   Mother of Pearl sequins are used on the front of the card.  

Sentiments:  
The sentiment "Enjoy Your Day" is from the Heartfelt Hellos stamp set featured on page 10 of the Sale-a-bration flyer.  It's stamped in Highland Heather ink.  The "best wishes" stamp set on the inside of the card is from the Artistically Inked  stamp set which can be found on page 114 of the Annual Catalogue.  It's also stamped in Highland Heather Ink. 


I hope you'll try out this fun fold and would love to hear from you about your design.  So much fun to make! 

Happy Stamping!
Penny Token's Stampin Spot

Penny Hanuszak, CDN Independent Stampin' Up! Demo 


February Hostess Code:  


FEBRUARY HOSTESS CODE SAVINGS

 HAPPY HEART MONTH - HELLO FEBRUARY!  

My February Hostess Code 4BNSH4RX  starts today and runs through to February 29th at noon. 

Every papercrafter needs stuff, but not everyone can afford to place orders over $200 or host workshops to accumulate sales, so offering my monthly hostess code for smaller orders, is my way of saying "thanks for supporting my business".  

If you're planning on placing an order valued from $60 to $199.00 (before shipping and tax) during the month of February add this code at the end of your order to receive a small token of my appreciation and thank you card. 

The benefits of shopping at my online store and adding my monthly Hostess Code are:

  • You never have to go to a workshop or party. 
  • If you need help with your product choices I'm always here to help. 
  • You get to decide when to place your order and my online store is available 24/7.
  • Your new products are shipped directly to your front door and generally arrive within 5-7 days of placing your online order.
  • After you've  placed your order and applied the current hostess code you'll receive a free surprise gift from me and thank you card  generally within 2-3 weeks.  

Here's How It Works:  

My monthly Hostess Code/free gift offer is only available for orders placed on-line and you must add the hostess code before the order is finalized.  If you don't already have an online account with me, you'll need to set one up. It's fast and easy.

Once you've got your account set up you simply type in the monthly hostess code at checkout to any qualifying order valued from $60 to $199.00 (before shipping, tax and handling). 
Before you finalize your order at checkout you must add my hostess code to the circled area.  Make sure before you place your order to have the current code because once your order has been finalized, I can't add the code for you, and unfortunately you will not qualify for my free gift although you'll still receive a thank you card from me.   

If your order totals more than $200, no worries, you'll automatically receive Stampin' Rewards at the checkout based on your order total and will be prompted to enter products adding up to the qualifying amount before you proceed to checkout.

NOTE:  My February Hostess Code promo closes at noon on February 29th, 2024.  A brand new hostess code will be available on March 1st, 2024. Your free gift and thank you card will be sent to you by the 3rd week in March.

Last Month of Sale-a-bration:
There's another 28 days to take advantage of Sale-A-Bration and get free products. During that time any order over $60.00 (before shipping & handling) qualifies for a FREE product from the SALE-A-BRATION sale flyer or the new add-on that starts today.  So, if you place an order for $60.00 before shipping and sales tax you'll be able to choose one free product from the Sale-a-bration flyer, and if your order totals $120.00 (before shipping & handling) you'd earn two free items and so on.  


Penny Hanuszak, CDN Independent Stampin' Up Demo

Sunday, January 21, 2024

Watercolor Melon

I liked this sketch challenge from Freshly Made Sketches so decided to make a card featuring the Sale-a-bration stamp set Watercolor Melon.  

Here's The Sketch: 

Freshly Made Sketches #619

Here's My Card:


Stamp Sets:     Watercolor Melon

Cardstock:        Whisper White, Sweet Sorbet

DSP:                 6 x 6 Designer Series Paper 2021-2023 Series (Sweet Sorbet,                            Lemon Lime)

Ink:                  Garden Green, Granny Apple Green, Momento Basic Black 

Hope you enjoyed this card 


HAPPY STAMPING!
PENNY TOKENS STAMPIN' SPOT
Penny Hanuszak, CDN Independent Stampin' Up! Demo


Trusty Tools and Toolbox Fun

Although Father's day isn't until mid June, Stampin' Up! usually releases some kind of  masculine stamp set during the launch of the Spring Mini and the Sale-A-Bration sales period.  

This year's release is called Trusty Tools # 163274 and is featured on page 56 of the Mini Catalogue.  This stamp set which includes 16 photopolymer stamp images is a two-step stamp set and comes in English and French versions.   This stamp set can be purchased individually or as a bundle #162723. 


Two-step stamping allows you to layer two or more images to create one final image for extra texture and dimension. The tool images are open line-art which is great for colouring with  blends, watercolour pencils or paper piecing.  

The Trusty Tools Dies #162722 includes 20 dies which coordinate well with both the stamp set and the Trusty Toolbox DSP (Sale-a-bration #162978).

Trusty Toolbox DSP  Get it for Free with a $60 purchase during Sale-A-Bration.

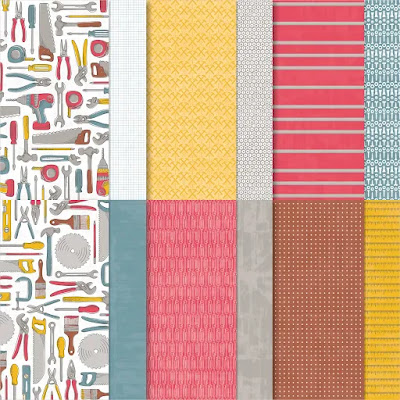
The Trusty Toolbox 12" x 12" (30.5 x 30.5 cm) Designer Series Paper has tool designs on one side of each sheet, including hammers, saws, wrenches, drills, and more. It's great for card backgrounds or scrapbook pages. Individual images can be die cut with the Trusty Tools Dies or they can easily be fussy cut.  There is a nice variety of color coordinated all-purpose patterns on the reverse side of the papers.  

HERE ARE MY CARD SAMPLES: 

The tool box dies are easy to assemble, and can be popped up with dimensionals to give a 3-D effect.  I cut out the peg board from Smokey Slate card stock to use as a backdrop for the tools.  The card base is a standard 8 1/2" x 5 1/2" scored at the center. I added a 4 x 5 1/4" layer of Basic Gray after I'd dry embossed it with the Metal Plate 3D embossing folder.  I loved the effect!  All of the tools in the tool box were fussy cut from the Trusty Toolbox designer paper. Some of the folks I stamp with don't like or do die cutting, so I chose to fussy cut these tool images, just to see if they would have any difficulty..... and the answer is "no", they were very easy to cut out. 

I really liked the sentiment "I think it's time for a CELEBRATION", which  is from the Beautiful Balloons (161450) stamp set on page 15 of the Annual catalogue.  I embossed it on a piece of basic black cardstock with white embossing powder.  It fit perfectly on the toolbox front. 

This card features one of the beautiful background papers.  The images are screwdrivers.  I fussy cut a few of the tools from the designer paper and adhered them to the background before adding my focal point.  I added some Rustic Metallic adhesive-backed dots #159082 A/C to the focal point on both card faces.  They worked beautifully.  Somewhere in my stash I know I have some metallic ones that look like screws, so I'm going to dig those out for the next cards I make.  

I always do the insides of my cards and here is the horizontal one.  The saw image was taken from the side of one of the dsp papers and although it's not a full image of the saw blade it worked perfectly in the bottom corner of the inside layer.  

I'll have some more of these cards to share with you over the next little while so please come back soon.  

Happy Stamping!
Penny Token's Stampin' Spot 

Penny Hanuszak, CDN Independent Stampin' Up! Demo 

Friday, January 19, 2024

Sale-a-brate with Watercolor Melon

Welcome to my blog.  It's been a snowy week here in Abbotsford British Columbia with record breaking low temperatures and the most snowfall in a one day period since 2008.  Last week I could see my daffodils popping through the soil and this week they're buried under a huge mound of snow.  

I like to head to my craft room as much as I can during these cold spells and cozy up with some hot chocolate, my favourite tunes and some stamping.  And this week has been the perfect opportunity to try out some of the stamp sets from the Sale-a-bration 2024 flyer and Mini.  

On page 4 of the Sale-a-bration flyer there's a set called Watercolor Melon (162962).  I got it for free when I placed my last order.  And, you can too, with any $60.00 purchase (before s&h & tax) from Jan 4th to February 29th during the Sale-A-Bration (SAB) promo.

162962  WATERCOLOR MELON PHOTOPOLYMER STAMP SET

When I first looked at the SAB flyer I was not impressed with this stamp set but I decided to order it anyways.  I'm so glad I did.  

This 9 piece photopolymer stamp set is a two-step stamp set which allows you to layer two or more of the images to create one final image.  That means you can create fun images that have extra texture and dimension in the colours you want.  

This stamp set is also a Stampin' Up! Distinktive stamp set, so the image itself adds texture, added depth and dimension in a single step.  Images made with Distinktive stamps are photo-realistic. You can use the the Modern Oval Punch (#162234), to cut out the large watermelon but IMHO you don't need the punch because the images are super easy to fussy cut. 

Tip:  You can stamp the melon in two shades of green for a more realistic look, starting with a darker green ink like garden green and then rotate the image 180 degrees and add a lighter color like Granny Apple Green. The seeds are solid, so you can simply stamp them in a dark colour right over the top of the watermelon.  

Here Are My Card Samples: 

I've only made two cards with this set so far.  They're nothing fancy, I was just doing a test run to see how I liked it.  I definitely did and have lots more ideas that I'll share with you soon. 


For the Garden Green layer I randomly stamped the large melon and leaf image on a 5 1/2" x 8 1/2" sheet of Garden Green cardstock.  I stamped the same full melon and slice for each of the inside layers.  The last card features some of the beautiful large black check ribbon from the Holiday Mini which has been carried over.  The top slice of melon is popped up on dimensionals.  Here are the supplies I used to make these cards. 

Supplies:

Stamp Sets:

  • Watercolor Melon 162962, Perennial Postage 162598

Cardstock:    

  • Whisper White, Early Espresso, Garden Green
Ink:
  • Sweet Sorbet, Garden Green,l Momento Black 
Accessories: 
  • Black and Very Vanilla Large Check Ribbon (carried over from Holiday Mini. #161982
  • Scalloped Contour Dies (AC) 
  • Iridescent Adhesive Backed Discs (161954
  • Tombo Glue, Dimensionals, Acrylic blocks (a,c,d)
I hope you enjoyed these Watercolor Melon cards.  Let me know your thoughts on this set.  

HAPPY STAMPING!
PENNY TOKENS' STAMPIN' SPOT

Penny Hanuszak, CDN Independent Stampin' Up! Demo

Click here to visit my web page: 


Wednesday, January 10, 2024

Flight & Airy- Sale-a-bration Designer Series Paper

Today I opened my FREE Sale-a-bration 2024 Designer Series Paper (DSP) called Flight & Airy 

Flight & Airy DSP #162977 

This spring-themed designer series paper features little song birds and floral designs as well as watercolour washes and greenery patterns which offer a variety of creative options for projects that are more feminine and nature oriented.

There aren't any dies that coordinate with this DSP however I found the fussy cutting of the birds and flowers both soothing and easy to do. Here are the sheets I used for my first cards. 


TIPS:  

  • Just cut small sections of the designs and start fussy cutting the images, it will go faster. 
  • Use dies to out out focal points on the paper. Templates of your die cuts or punches help with selecting the right tool.
  •  The watercolour washes work beautifully as card backgrounds, or focal points the twig and flower designs.
  • It's easy to mix and match the pattern designs.

Each package which is FREE with any Stampin' Up! purchase of $60.00 (before shipping and handling) of products comes with 12 sheets of 12" x 12" (30.5 x 30.5 cm) patterned paper, 2 each of 6 double-sided designs.  This paper is acid and lignin free so is great for scrapbooking and archival purposes. 

The suggested product colours this paper coordinates with are:  Boho Blue, Bubble Bath, Calypso Coral, Crumb Cake, Daffodil Delight, Flirty Flamingo, Fresh Freesia, Garden Green, Lost Lagoon, Misty Moonlight, Pecan Pie, Soft Sea Foam.  

Here Are My Card Samples: 

I've been having fun making a variety of cards featuring both the patterned designs and the watercolour wash papers.  I made this card for one of my friends who is currently going through chemo treatments. 


 I began this layered card by creating a 4" x 5 1/4" template on a piece of cardstock.  Three circles were randomly punched on the template using a 1 3/4" punch being careful not to overlap or go to close to the edge of the template.

Next I lined up the template on a 5 1/4" x 4" piece of Whisper White cardstock and drew an outline through the circles, and punched the outlined circles out. Keep the circles for another project.  A 5 1/4" x 4" piece of dsp was then cut in the same way.  The white layer was run through the Big Shot and dry embossed with the Exposed Brick 3D (#161600) embossing folder. This layer was adhered to the card base with dimensionals.  Adhesive was added to the back of each of the three circles and they were lined up with the holes and pressed through so they would adhere to the card base.  To finish the card I fussy cut bird and branch images and adhered them to two of the circles with glue and dimensionals.  The third circle was stamped with "Big Hugs" in Sweet Sorbet ink, before it was adhered to the base.  The sentiment is from the Perennial Postage (162598) stamp set in the new Mini.  I also stamped the inside of this card with the "I know you will get through this" stamp from the same set.    


This card features two of my favourite dies.  I used the second largest Scalloped Contours die (155560) to cut a layer from the watercolour wash dsp and layered that onto a 5 1/4 x 5" piece of Whisper White.  I cut a stitched circle from this  layer before adhering it to the Bubble Bath card base.  The second favourite die is the Everyday Details dies (162864 pg 69 new mini) and I used it to cut the rectangle from the Flight and Airy patterned dsp as well as the Bubble Bath circle for the focal point. Love it! 


I added a second patterned piece of dsp to the base of the inside layer as a finishing touch.  The sentiment is from  an old stamp set but I love it. 

This next card is a fancy accordion fold card which really highlights the beauty of this designer series paper. 


Well that's it for today, but I've made a lot more cards with this paper since I began writing this note, and will share those over the coming days.  Being creative doesn't involve a lot of products, all you need is some great paper, some dies or punches and your favourite sentiment stamps.  

I'd love to have your comments on these cards and whether you like them.  They have a really old fashioned look which makes me happy.    Look forward to hearing from you. 

HAPPY STAMPING!
PENNY TOKEN'S STAMPIN SPOT 

Penny Hanuszak, CDN Independent Stampin' Up! Demo


Don't forget to add my January Hostess Code to orders under $200.00 before shipping and handling and I'll send you a free gift for your loyalty.  This hostess code closes on January 31, 2024. 


Last Free Shipping of the Year - December 9, 10 11, 2024

Heads up, it's time for the last FREE SHIPPING promo of the year! From December 9–11, you can shop and save on all qualifying orders of...