Tuesday, November 26, 2013

Cyber Monday December 1st - Holiday Sale Update


CYBER MONDAY
DECEMBER 2, 2013
HOLIDAY SALE EXTRAS


Stampin' Up! has just announced that the Holiday Sale is going so well that they've decided to add a few 24-hour items for Cyber Monday (December 2)

The Holiday Sale flyers are not being updated, but all you need to do to find out what's been added to the already great holiday sale items, is to look for the 24-hour category in the Holiday Sale section of my online store for the deals. 

Holiday Card Classes - Sneak Peak

I've been going to Holiday Card Classes with Cheryl Lefore the past couple of Mondays and I've had a great time making 10 of 3 different cards.  Over the next few days I'm going to share these cards and some tips and pictures on making them.  Here are some sneak peaks just to get you going! 


Tuesday, November 19, 2013

HOLIDAY SALE - STARTING AT MIDNIGHT TONIGHT!


When:             November 20-December 2, 2013

Details:
It's time for online holiday shopping! During these 12 days only, you can get incredible discounts of up to 50 percent, on some of your favorite products! 

This is the perfect time for you to stock up on some of your favorite items. It's also a perfect time  to get all your "must have" supplies if you're new to stamping.  Now's the time to give Stampin' Up! a try!

Don't miss out on the 24-hour-only door-busters happening on the first day of the sale.  You'll save 30 percent off: 


The 24-hour sales period on these three products ends at 11:50 PM (MT), November 20.
You can visit my Online Store to see all discounted products or view the flyer right now.

The Fine Print
This sale is the same as the annual Online Extravaganza sale of years past--just with a simpler name.

  • Discounts range between 20 and 50 percent-awesome!
  • Discounted products are available on all order types (customer, demonstrator, workshop, and online).
  • Hostesses who have earned a 50%-off item may not apply that discount to an already-discounted product.
  • There's no minimum purchase required to participate in this promotion. Sale on!
  • VERY IMPORTANT!  For product bundles, you need to use the bundle item numbers provided. If you use individual item numbers, you won't get the discount-bummer.
  • You can buy additional products from any of our current catalogues  on the same order. And don't forget the Weekly Deals - some good buys there this week:  Subtles Markers, Colour Coach.......awesome prices! 


Deadlines:
Phone: Monday, December 2, 2013; 6:50 PM (MT)
OEX and Online Store:  Monday, December 2, 2013; 11:50 PM (MT)


November 19 to 25th, 2013

Monday, November 18, 2013

HOLIDAY CLOSURES AND SHIPPING:

HOLIDAY HOURS AND SHIPPING:

CLOSED FOR THANKSGIVING (US)
The Stampin' Up! offices are closed for several holidays throughout the year. However during those times, orders can still be placed through me or ONLINE, and shipping will resume the following business day. 

Just a reminder, the next scheduled holiday is Thanksgiving Day (US) and the day after Thanksgiving (US) on Thursday and Friday, November 28-29.

The remaining holidays in 2013 are:
  • Christmas Day on Wednesday, December 25
  • Boxing Day* on Thursday, December 26
HOLIDAY SHIPPING TIME FRAMES
Stampin' Up! has just sent out a notice to it's demonstrators recommending that holiday orders be submitted by the following dates to receive them by December 24:
  • My Digital Studio print products: December 1
  • Traditional products: December 10 by 6:50 PM (MT) via phone or 11:50 PM (MT) via OEX
You don't want to be disappointed!  Since delivery times can vary from place to place, I'd strongly urge that you base your time frame to order on your past personal personal experiences.  For example if in the past it's taken longer for your packages to reach you then you should allow a little extra time for shipping during the holidays. As you know, we cannot control delivery times. 

Holiday mail volumes are high, and Stampin' Ups! delivery services encourages all its customers to ship as early as possible to avoid disappointment.

Saturday, November 16, 2013

Save the Date - Holiday Sale Coming Soon


Hey ladies hold the date and hang on to your orders for just a few more days. Why?  Because the Stampin' Up! Annual Holiday Sale (previously known as the Online Extravaganza) is just a few days away.  

Check back with me on November 19th when I should have all the details on how you can take advantage of this fun event! You won't want to miss out on this event which will be kicked off with a 24-hour doorbuster sale!  

The sale starts November 20th and runs through December 2nd, 2013.

Tag It Bundles and MDS Get Em' While You Can

TAG IT BUNDLES  - ONLY AVAILABLE FOR THREE MORE DAYS

Stampin' Up!s  two new holiday bundles are only available until November 19 that's just three more days! These bundles are excellent for packaging treats and small gifts this holiday season. 

The Holiday Tag It Decorative Box Bundle (item 135811) includes:
Stamp a Tag Kit

  • Cherry Cobbler 1" Stitched Edge Grosgrain Ribbon (10 yards)
  • Decorative Window Gift Boxes (6 boxes)
  • The Holiday Tag It Extra-Large Box Bundle (item 135812) includes

Stamp a Tag Kit

  • Cherry Cobbler 1" Stitched Edge Grosgrain Ribbon (10 yards)
  • Extra-Large Gift Boxes (3 boxes)

Click here to find out more

MY DIGITAL STUDIO SAVE WITH 30% OFF DIGITAL - 
ONLY AVAILABLE UNTIL NOVEMBER 30, 2013
Whether you're designing Christmas cards, gifts for friends and family, decorations for your home, or your 2013 photobooks—Stampin' Up!s got what you need with 30% off of a variety of downloads. 

And, once you've designed your projects, don't forget to place your orders before November 30. You can get 30% off photobooks, swatchbooks, cards, tags, and individual pages.

Need a little inspiration check out MyDigitalStudio.net  they've been posting projects and ideas all month long.  You can post your samples to the gallery too! But, hurry, the sale ends November 30.

Friday, November 15, 2013

JOYFUL CHRISTMAS

Yesterday I shared this sneak peak of the second project I made at Cheryl LeFore's Friday Night Stamp Club.

Wanna know what it is?  Well I won't keep you in suspense any longer. This is the beautiful poinsettia  from the "Joyful Christmas" stamp set.  If you have a love for this Christmas icon, then this set is for you. 


Joyful Christmas in the Holiday Catalogue 


Our second project was a Pop n' Cut Gift Card Holder that comes together in a flash and is topped with this great poinsettia.  Here's a shot of the completed gift card:
I love the Joyful Christmas wishes sentiment on this card front, it's simply perfect.  
Supplies:
Stamp Set:  Joyful Christmas
Ink:  Crumb Cake, Stazon Black Ink
Reinkers:  Cherry Cobbler, Starfruit, Pear Pizzazz
Card stock:  Cherry Cobbler, Whisper White, Season of Style DSP Paper Stack, Window Sheets
Diecut:  Pop n' Cut Base
Punch:  Word Window 
Framelit:  Apothecary Accent Framelits
Miscellaneous:  Dimensionals, Crystal Effects, Dazzling Diamonds Glitter, Paint Brushes or empty Aqua Painter 

Cutting Directions for Gift Card Holder:

  1. Cut a piece of Cherry Cobbler card stock to 4 1/4 x 11 and place on the Pop n' Cut base.  Score this piece at 3 1/2", 5 1/2" and 7 1/2".
  2. Cut a piece of Whisper White card stock to 2 1/2 x 4" for the inside of the card, and a 2 1/4" x 3 1/4" piece for the sentiment "Joyful Christmas Wishes" which is stamped in Crumb Cake ink.  Cut out the sentiment piece with the Apothecary Accent Framelits, and layer on Polka Dot dsp.
  3. Cut a piece of the Crumb Cake/ Polka Dot paper from the Season of Style Paper Pack to 2 1/8" x 4 1/4" and attach this across the center of the card. 
  4. Stamp the poinsettia in Stazon Black Ink and then cut out with scissors. See instructions below for painting both the poinsettia and leaves on the acetate sheet.  
Inside verse stamped in Crumb Cake ink

Outside verse, stamped in Crumb Cake ink on Whisper White card stock and then cut out with Apothecary Accents framelit. 

The Pop N' Cuts card base is perfect for making gift cards, because when folded the end tabs help to keep the card closed and hide the gift card inside. Cut out the card stock with this die and then score at 3 1/2", 5 1/2" and 7 12".  Fold in a valley, mountain, valley fold style with the mountain in the middle.  This piece will be in the center or inside of the gift card holder. i Glue this part together with a thin strip of sticky strip on the outside bottom edge.  Cut out a section from the mountain part with the Word Window Punch. This is where the gift card will slide in.  Tip:  Before punching use your gift card to line up where you want to begin cutting so that the slot is even on both sides of this piece.  You'll have to make two cuts with the Word Window punch.
The Pop n' Cuts Die Cut Base is very versatile and can be used for making boxes, gift cards, and of course pop up cards.  

Painting the Poinsettia and Leaves: 
The poinsetta and three leaves were stamped on an acetate window sheet with Stazon Black ink. Let the ink completely dry before you begin painting. 

You'll need three small containers to mix the Crystal Effects with each of the reinker colours.  Simply mix a small amount of Crystal Effects with a couple of drops of re-inker until the desired colour is reached. Using a paint brush pick up some of the mixture and paint it on to the stamped image side of the window sheet. Use a dabbing motion as opposed to a stroking motion to fill in the flower or leaf images and make sure all the acetate in the design is
covered.  Try to stay in the lines and not overlap outside of the image. 

Once you've painted all the acetate images and you're happy with the paint coverage sprinkle Dazzling Diamonds Glitter over the wet surface.  Shake off any excess glitter and set aside to dry completely (this will take some time and don't try to dry with your heat gun or you'll warp the acetate).  

Once the images are completely dry, then cut them out with scissors.  
finally, attach the flower and leaves to the front of the gift card holder with dimensionals.  

Make sure when you're painting the images that the paint is thick enough and bold enough that you wdn't see any gaps through the acetate. When it's finished all you should see is the colour and glimmer of the glitter as per this closeup.

So here's one last look at the finished card.  Believe me the pictures just don't do the card justice.  In real life the colour is just dancing off the images.  


I hope you enjoyed these projects.  Leave me a comment if you like this one and the instructions.  You'll find it a very simple and fun technique and it really delivers that WOW factor that so many of us love!   I'm so happy Cheryl taught us how to make these. 


Here are a few more Joyful Christmas creations from other Stampin' Up! Demonstrators and Publications:

On Saturday, November 2, a variety of projects created by Stampin' Up! demonstrators Anne Granger and Susan Bruyn were posted on the Scrapbook and Cards Today on-line magazine, using the Joyful Christmas Stamp Set. They are in the Stampin' Up! Saturday section on the right hand panel of the on the Scrapbook & Cards Today blog.  Here's the link: http://www.scrapbookandcardstodaymag.typepad.com 
.  
Joyful Christmas Gift Bags


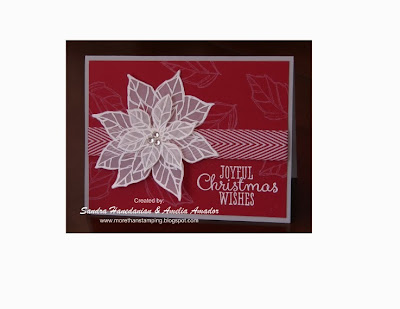
This beautiful gift card set by Sandra Hanedamian and Amelia Amador of www.morethanstamping.blogspot.com is called Bedazzled Poinsettia.


Last Free Shipping of the Year - December 9, 10 11, 2024

Heads up, it's time for the last FREE SHIPPING promo of the year! From December 9–11, you can shop and save on all qualifying orders of...