
Yesterday I shared a sneak peak of three of the cards I made at Cheryl LeFore's stamp a stack Holiday Card Class. I had such fun making these cards and so thought you might like some of the details on how they were made.
This first card is made with two of my new "fun to have" stamp sets from the Holiday Mini Catalogue, Santa's List and Very Merry Tags.
 |
| Santa's List available in wood mount (131808) or clear mount (131811). |
 |
| Very Merry Tags available in wood mount ( 132609) or clear mount (130402). with the Artisan Label, Decorative Label, Extra Large Oval, Mosaic, Petite Curly Label, 1 3/4" Circle, and 7/8" Scallop Circle punches. It's available in English as noted above as well as Spanish and French. |
Supplies Used:
Stamp Sets: Santa's List, Very Merry Tags
Card Stock: Whisper White, Cherry Cobbler, Early Espresso
Designer Paper: Season of Style DSP
Inks: Whisper White, Early Espresso, Cherry Cobbler
Dies/Punches: Decorative Label Punch, Label's Collection Die Cuts, Oval Framelits
Accessories: 3/8" Whisper White Taffeta Ribbon, White Embossing Powder,
Heat Gun, Dimensionals, Glue Dots, Sticky Strip and Adhesive.
Here's the Full Card

1. For this card I cut a piece of 5 1/2 x 8 1/2 Cherry Cobbler card stock and scored it at the center.
2. I topped this with a piece of Early Espresso Card stock measuring 4 1/8" x 5 3/8". Adhere this piece to the card base with adhesive. Before gluing this piece down I used the Labels Collection die and cut out a piece from the center. Tip: When you're doing this make sure you've left enough space around the die cut image for your adhesive.

 |
| Since this piece of card stock will be covered with DSP why waste it. By cutting out the center with the Labels die I've conserved card stock and lightened the weight of the card. |
4. At this stage I made a decision to make 5 of my ten cards with a side fold 5 cards with a top fold. This was purely a personal decision, but one I'm happy with as I like the way both cards came out.
 |
| Side fold |
 |
| Top Fold |
5. From the Whisper White Card stock I cut a 3 3/4" x 5" piece of card stock for the inside of the card. I also cut a 2 7/8 x 3 1/4" piece of Whisper White for the Oval that Santa is stamped on. Once the Oval was cut I stamped the image of Santa in Early Espresso Ink and then sponged the edges.
The Santa image was adhered to the Early Espresso label and then I used sticky strip to make sure that it was firmly stuck to the card base because of the weight.
I have to tell you that I loved the way this stamp took the ink! It was like silk and for a large stamp the image was clear and perfect. That's why Santa's List is now one of my favourite new stamps!
6. For the Naughty Nice label I stamped the image on Cherry Cobbler card stock with Whisper White ink and then sprinkled it with White Embossing Powder and heat set the image.
I cut out the image using the Decorative Label punch. To get the shadow frame around the Cherry Cobbler one I cut out a piece of Early Espresso Card stock with the decorative label punch and then cut that in half across the widest part of the label. These pieces were adhered to the back of the Cherry Cobbler label to create the shadow on the top and bottom. A 3" piece of White Taffeta Ribbon was folded in half and added to the back of the completed label before it was mounted to the card with dimensionals. Here's a look at how I did that.
 |
For the shadow piece cut a label from a scrap of Early Espresso card stock, and sponge around the edges to give it a darker effect. |
 |
| Cut the Early Espresso Label in half across the width of the label. I clip off the pointy ends on each piece so they don't stick out when I attach it to the back of the Cherry Cobbler label. |
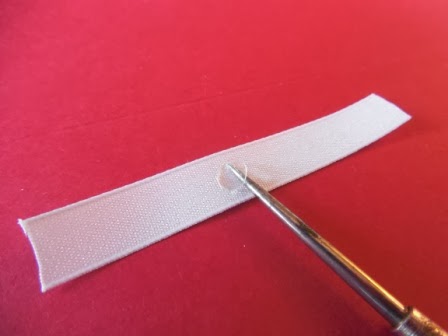 |
| Add a glue dot to the center of the ribbon piece. |
 |
| Fold the ribbon overlapping to the side. The glue dot will keep it together. Trim the ends of the ribbon on an angle. |
 |
 Here you can see the Early Espresso pieces layered onto the Cherry Cobber label. The ribbon was attached with another glue dot and then I added some dimensionals to the back before adhering it to the card. |
 |
| Here is the finished label. |


