Showing posts with label Freshly Made Sketches. Show all posts

Monday, January 25, 2021

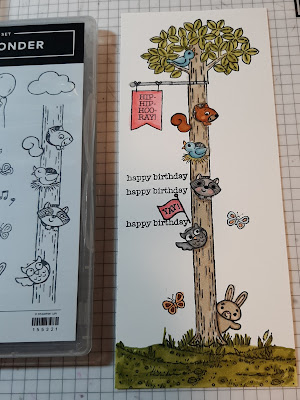
Woodland Wonder Slimline - #FMS469

I liked the layout of Kim's Freshly Made Sketches #469 design and all the great samples by the FMS Design Team this week, so decided to give it a go.

FMS#469

My original plan for this sketch was to create a thank you card using a large font "thank you" instead of the three lines in the sketch.  My "any shape" image was going to be a floral image.  

Well that was the plan when I started out but somewhere along the line it morphed into a slimline birthday card.  That's the fun thing about creativity, you're not always sure where the path will lead.    

Here's My Card:  

My slimline card featuring stamps from the Woodland Wonder stamp set measures 9 x 4 inches.  I cut a piece of Cinnamon Cider card stock that measured 8" x 9" for the card base and scored it at 4".  The first layer is a 7 3/4" x 3 3/4" piece of Old Olive and the Whisper White layer measured 7 1/2 x 3 1/2".  

The Woodland Wonder Stamp Set #155321 includes balloons, animals from the forest, pieces of a tree that you can put together, and great sentiments to let someone know you're thinking of them on their special day. This set features 16 photopolymer stamps, that work well with either the Stamperatus stamp platform or with acrylic blocks a, b, d, i.  This stamp set doesn't have coordinating dies  but at $23.00 CDN it's a terrific value and it's super easy to fussy cut out the images.  This stamp set is available in the January to June Mini catalogue from now until June 2021.  

I stamped "happy birthday" three times on the left hand side of the card, leaving a gap in between number two and three so I could fit in the little "yay" flag. 

I stamped all the images on the card stock using my Stamperatus stamping platform. The platform made it so easy to line up the images.  All of the images were stamped with Momento Tuxedo Black ink and then coloured with Stampin' Blends. Inks used to colour the animals, tree and grasses at the base included light and dark shades of: Old Olive, Crumb Cake, Gray Granite, Smokey Slate, Balmy Blue, Flirty Flamingo, Pumpkin Pie, and Basic Black. 

I re-stamped all the images on masking paper, fussy cut them and applied them over the original images before sponging in the sky with Pool Party ink.  I was so excited to do this step because I purchased the new blending brushes from Stampin' Up and this was my first try with them.  I was not disappointed!  

I stamped all my images on Stamping Masking Paper by Inkadoodle.  This works better than post it notes for me, because they sheets stay tacky for a long time and you can fit a lot of images on them to cut out. Another great thing about this masking paper is the full coverage of the image which makes it easier to sponge over. 

This picture isn't quite right though, because in my eagerness to start sponging, I stamped on the wrong side of the paper. Fortunately I had only cut out one image before discovering the error or my ways.  

Okay, error corrected and everything is masked properly in this photo.  I started blending at the top of the panel and the new blending brush was easy to move around and gave me the exact colouring I was looking for.  I think I am in love!  


To create the grass look at the base of the tree I used a stamp from the By The Dock stamp set. I applied the stamp in various directions to create the uneven ground effect and coloured it with light and dark Old Olive blends.  

By The Dock Stamp has a number of great stamps but the one I've used the most is the little patch of grass.  So versatile.

For the inside of the card I again began with a 8 3/4"x 3 3/4" piece of Old Olive card stock and an 8 1/2" x 3 12" piece of Whisper White. 

I stamped the sentiment "hope your day stacks up to be one good thing on top of another" in Momento Tuxedo Black ink and added the rabbit and balloon to the right side.  The "Happy Birthday"  sentiment is from the Here's A Card stamp set and was  stamped in Old Olive ink.  

It wasn't my intention when I started stamping the inside of this card to have balloons across the bottom, but my inky fingers left some marks that I had to cover up.  The cover-up worked except for the green balloon which seems to be flying a little higher..... oh well.

Well that's it for my post today.  I'm really enjoying the slimline card and glad that I switched gears and made this card.  It gave me an opportunity to try new things like the blending brushes and the Woodland Wonder set.  What fun!  

Cheers and as always, 

Happy Stamping!
Penny Tokens Stampin' Spot
Penny Hanuszak, Independent Stampin' Up! Demonstrator 

JANUARY HOSTESS CODE:

Sale-A-Bration Is On - January 5th to February 28th, 2021
For every $60 and/or $120 you spend from either the Annual Catalogue or the January-June Mini, you’ll earn an exclusive Sale-A-Bration item for free! Depending on the amount you spend, you’ll be able to mix ‘n’ match the Sale-A-Bration items you earn. Stampin' Up! has provided a stunning variety of stamp sets and Designer Series Paper for you to choose from—take a look.


Shop My 24/7 On-Line Store:  Click Here

Monday, December 7, 2020

Don't Get Your Tinsel in a Tangle

Hi Stampers!  I've been stamping and working on Christmas projects this week, and having  a great time playing with some of the stamps I purchased from the Stampin' Up! Holiday Mini.  

I set a goal to make at least five projects with each one.  Today I'm going to showcase a card I made using stamps from the "Don't Stop Believin'" set for Judy's Freshly Made Sketches #464 challenge.     

Here's the Sketch Challenge: 

Freshly Made Sketches 464
Here's My Card: 

This is the first time I've stamped with the Elf image in this set.  I have to admit, I was a bit intimidated by all the lights and colouring on this image, and so I left it until the last.  All the fear disappeared though as soon as I began colouring in this sweet little guy's face.  It's magical!   

These are my Elf Labels I made several of them.  As you can see the colouring in each one is a bit different as I experimented.  

Here's how it came together:

1.  I stamped the image in Momento Black ink on a scrap of Whisper White card stock and then I cut it out using the Stitched Nested Labels dies.

2. I began by colouring the Elf's face, ears, and hands with Ivory Stampin' Blends, and I added some sweet rosy cheeks with Light Flirty Flamingo. To make sure they didn't look too harsh I coloured over his cheeks again with Ivory.

3. Next I started colouring his clothes. I began colouring his leggings and hat with Light and Dark Garden Green Stampin' Blends. Then, I coloured his shirt with Dark and Light Poppy Parade Stampin' Blends. The boots were coloured with Light and Dark Cinnamon Cider Stampin' Blends.

4. I wasn't sure what to do with his hair, so I made him a blonde using Mango Melody. I like multi-coloured lights at Christmas time, so I coloured the lights with Misty Moonlight, Poppy Parade and Mango Melody Stampin' Blends.

5. The card base was an 8 1/2 x 5 1/2" piece of Garden Green card stock and it was scored at 4 1/4". The first layer is a piece of 5 1/4" x 4" Gold Foil. Note, before adhering this layer I cut out the largest label in the Tasteful Labels die from the center of the layer and embossed it with the Winter Snowflakes Embossing Folder.

6. The second layer was cut from a piece of retired plaid designer paper. This layer measures 3 3/4" x 5".

7. To finish the card I adhered the Gold Foil label to the center top of the card. This label represents the bottom square in the sketch. Next I added dimensionals to the back of the Elf label and attached that to the left of the gold foil label. I added three coloured rhinestones in the top right hand corner of the Elf label to represent the coloured lights. 
In this photo you can see the beautifully embossed snowflakes on the Gold Foil label.  

8. I stamped the sentiment "Don't get your tinsel in a tangle" on a scrap piece of Whisper White and then cut it out with the label die from the All Dressed Up die collection. I glued this label to a scrap of Garden Green card stock and fussy cut around the label. Four rhinestones were added to the center of the label.

9. The inside of the card has a 5 1/4" x 4" panel of of Whisper White card stock that was stamped with one of my favourite sentiments and the small Elf from last year's Elfie stamp set. He's so cute.

I hope you enjoyed today's card and were able to follow the steps I took to create it. I'm glad I was able to overcome my intimidation of this Elf stamp as it is so darned cute.  I know I'll be using this stamp again and again. 

Happy Stamping!
Penny Tokens Stampin' Spot
Penny Hanuszak, Independent Stampin' Up Demonstrator

DECEMBER HOSTESS CODE:  SRMEMX7U

Planning on placing an order in December?  If so, and your order is less than $200 before s&h/tax and you apply my December Hostess Code at the end of your orderyou'll receive a special gift and a thank you card from me. 

If you're planning on placing an order over $200.00 you'll receive a thank you card from me and you'll receive Stampin' Up Rewards for free product, based on the total of your order. 

December Contest - Win a Stamperatus Platform

Click here to view the Stamperatus - 

I'm having a draw for a brand new Stamperatus Platform during the month of December.  To be eligible to win just place a minimum $50.00(before s&h and tax) order and your name will be entered in my Christmas Day draw. Winner will be notified on Christmas Day!  What a great present!  Value $67.00.  Note:  Canadian orders only.  

Monday, November 16, 2020

Freshly Made Sketches #461

I'm back today with a rather intimidating sketch by Karen at Freshly Made Sketches.  This is definitely a clean and simple sketch, but one that sends shivers down my spine and causes sweat on my brow.  Not really, but I do find these plain sketches some of the hardest to do because the sky is the limit in terms of decision making and that field is just too vast for me.  

Here's the FMS #461 Sketch:


Since I'm trying to get caught up with making Christmas cards my focus for this card will be on one that's easily mail-able.  You know the type, one layer, lays flat without too much dimension and can be mass produced.  I chose a cling stamp set from Stampin' Up! called "Don't Stop Believing".

Here's My Card: 

One of my most loved and used bundles from last year's Holiday Catalogue was the Christmas Gleaming Bundle which included the stamp set, Brightly Gleaming Specialty Designer Paper and two ornament punches. I probably made 45-50 cards using just that bundle.  I was so enamored with it I bought two additional packages of paper thinking it wouldn't be around any longer, so imagine my delight when it was part of the Christmas lineup for this year's Stampin' Up! Annual catalogue. 

Because I love this paper so much, I started with a designer paper strip which features copper foil stars on a Night of Navy background. I adhered the strip to a 5" x 3 3/4" piece of Very Vanilla card stock. From there I dug out my Copper Foil and made a 5 1/4" x 4" layer, that I adhered to a Night of Navy A2 card base.  

Originally I visualized using a cluster of the ornaments from the Christmas Gleaming set for my focal point, but when I was grabbing the set, I spied my "never been inked yet" Don't Stop Believin' stamp set.  From there my ideas morphed into this card.


I added some glue to the tassel, hat brim and cuff of Santa's suit and sprinkled Iridescent Ice Glitter over them.  Unfortunately because I didn't stamp the Santa in a permanent ink, the Night of Navy ink on the jacket ran a bit into the cuff.  Oh well live and learn.  The next one of these cards I make I'll use Momento Black Ink - run proof when using blends or glue.   The sparkle just brought this card alive. I also added some Nuvo Crystal Drops to Santa's specs so they've got the appearances of glass lenses.  The small stars are from the Curvy Christmas stamp set.  


Supplies:
Stamp Sets: Don't Stop Believing #15332, Curvy Christmas (small stars)
Ink: Night of Navy ink, Blends: Night of Navy Light and Dark, Smokey Slate Light and Dark, and Ivory
Specialty Paper: Copper Foil, Brightly Gleaming DSP #150429 

Card Stock: Night of Navy, Very Vanilla
Embellishments: Iridescent Ice Glitter, Nuvo Crystal Drops

This was a fun and super easy card to do.  My non-traditional take on Santa worked out okay and I might try him in some other unconventional colours.  I know I'll be using the Don't Stop Believin' stamp set a lot now as it's really peaked my interest.  So many great images and sentiments, especially Frosty the Snowman.

Don't Stop Believin' #153332


HAPPY STAMPING!

PENNY TOKENS STAMPIN' SPOT
Penny Hanuszak Independent Stampin' Up! Demonstrator


November Hostess Code:  ZZ49FQKS 

Don't forget to apply the November Hostess code if you order is under $200.00 before shipping and handling. You'll get a free gift from me. If you place an order over $200.00 before shipping and handling, you will automatically earn Stampin' Rewards and can pick out your own free gifts. Everyone who orders from me will received a thank you card as I so appreciate your orders.

Click here to shop in my 24/7 Online Shop


Monday, October 19, 2020

Nature's Beauty Masculine Thank You Card

After several days of rain and being forced to stay in doors, I enjoyed a round of golf last Wednesday at the Surrey Golf Course. It wasn't overly warm but the sun was out periodically and the winds were mild. As the day progressed it got a little cloudy, but nothing could take away from being outdoors with great friends and having fun.   


After spending a day in the great outdoors, I managed to fit in some stamping time, and it was a no-brainer when it came to selecting a stamp for today's card. I chose Nature's Beauty a nine image cling rubber stamp by Stampin' Up! and I'm following along with Linda Callahan's great sketch at Freshly Made Sketches #457. *

Note:  As sometimes happens, life gets in the way and sadly my card was not linked to the FMS #457 challenge this week.  Regardless I hope you'll use the link and visit their site to look at all the great cards by the Design Team as well as the participants.  Awesome - some real inspiration.   


Here's My Card:

The card I made is a masculine thank you card for a neighbor who gave me a hand with some work the other day.   I chose the deer as the main focal image and scattered some trees and grasses in the background.  It was stamped in Momento Black ink on a 3" x 5" piece of Whisper White card stock.  Very plain and simple.  I layered this on a 3 1/8" x 5 1/8" piece of gold foil.


The card base is a 5 1/2" x 8 1/2" piece of Whisper White card stock, scored at 4 1/4".  I added a 5 1/4" x 4" layer of Basic Black. For the next layer I decided to stamp the  large tree image from Rooted in Nature in Momento Black Ink to create a background. This is not a large layer it measures 3 3/4' x 3 3/4", and so you don't really see a lot, but it seemed to tie everything together.

The sentiment "To Thank You For All You Do" is also from Rooted in Nature and I embossed it with gold Embossing Powder on a 1/2" strip of Basic Black card stock.  I fancied up the edges with the new Lovely Labels Pick a Punch.  


Lovely Labels Pick a Punch #152883

The inside of the card is finished with a layer of Basic Black card stock that measures 5 1/4 x 3 3/4" and I added a strip of gold and black on the right hand side.  I wanted to write a thank you note on the inside panel so left it plain and didn't add a sentiment.


I hope you enjoyed today's card and take the time to leave me a comment.  I love to hearing from my viewers and getting your impressions of the cards and projects I make.   


Happy Stamping!

Penny Tokens Stampin' Spot!

Penny Hanuszak, Independent Stampin' Up! Demonstrator 


Hostess Code for October  MM72ZKPM


Sunday, October 4, 2020

Freshly Made Sketches #455

I like square cards but I don't make a lot of them, so when I saw this week's Freshly Made Sketches #455 square sketch designed by Jen Mitchell I was hooked.  I really like the clean lines of this sketch and it certainly is open for interpretation.  

Here is my card: 


How it's made:

  • The card base is cut from Night of Navy card stock and measures 10 x 5 and is scored at the 5" mark.  I chose to have the fold at the top of the card. 
  •  I've added a 4 7/8" x 4 7/8" mat in Cherry Cobbler followed by a Whisper White mat that measures 4 3/4" x 4 3/4". 
  •  For the DSP layer I chose Stampin' Ups! Brightly Gleaming paper from last holiday season. I cut a piece 4 1/2" x 4 1/4" and then cut a 1 3/8" x 4 1/2" strip to form the two panels.  
  • I stamped the sunflower from the retired Painted Harvest stamp set in Night of Navy ink on a piece of Whisper White card stock.  I cut this out with the Stitched Shapes 3" circle die.  I layer this on a 3 1/2" Night of Navy die cut circle.  
  • I stamped the sentiment "A Joyful Christmas" from the Signs of Santa stamp set (retired) in Cherry Cobbler ink on a scrap of Whisper White and cut it out with a 3/4" circle punch.  I attached this circle to a scrap of Cherry Cobbler and fussy cut around the circle.  The sentiment circle was glued to the center of the wreath.  
  • I added some Stampin' Up! red rhinestones and a small die cut copper foil bow to finish off the wreath and mounted it in the bottom left corner of the card front with dimensionals. 
  • Stamp sets  used are the Painted Harvest, Snowflake Sentiments (inside), and Signs of Santa (retired) 
  • The inside of the card  has a 4 3/4" x 4 3/4" Cherry Cobbler layer and a 4 1/2" x 4 1/2" layer of Whisper White.  The sentiment "Wishing you A Season of Joy, A Season of Cheer, But Most of All A Wonderful Year" and three snowflakes are from the Snowflake Sentiments stamp set which is retired. 


I hope you enjoyed this card.  I'd like to know what your favourite card shapes or types are, so I can design cards around those in future.  I'm quite partial to this square Christmas card and plan to make a few more in this style using this sketch.  What fun!  

Comments are .... always appreciated.  

Happy Stamping!
Penny Tokens Stampin' Spot
Penny Hanuszak, Independent Stampin' Up! Demonstrator 

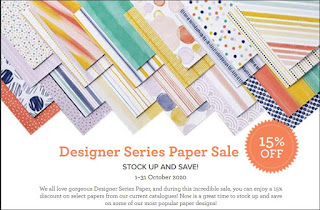
Don't miss out on this current promotion.  A savings of 15% on select DSP ordered during the month of October.  Click here for all the details. 


OCTOBER HOSTESS CODE MM72ZKPM
Add the October Hostess Code to orders under
$200 and you will receive a gift from me.  

Click here to go to my 24/7 Online Store


Words of Comfort FMS Challenge 634

Sometimes you just need some comforting words and to know that someone's thinking of you.  I felt that this week's Freshly Made Sket...