I love having small note cards on hand that I can tuck into a gift, and when I saw a video by Deb Valder featuring a box and matching 3 x 3 note cards made with the Envelope Punch Board, I knew I had to make some for hostess gifts.
My Version:

Once again my investment in the Envelope Punch Board has paid off. Not only was I able to make this cute little box, but I also made four lined envelopes to go with the note cards. Now that's value! Here's how they were made.
The Box:

1. I wanted enough room in my envelope to hold the four cards and envelopes so chose a card size of 4 x 4 on the Envelope Punch Board. For this selection the card stock is cut to 6 7/8 X 6 7/8.
2. Line up your card stock at the 3 1/2" measurement on the punch board and then punch and score. Note: for the next few steps I will be using a sheet of white card stock instead of the gumball green so I can show the measurements.

3. For your second, third and fourth score lines, simply line up the first scoreline with the pointer on the punch, punch, score and rotate to the next side and repeat this process until all four sides are punched and scored.

4. Now move the card stock to the 2 5/8" mark on the punch board and score a line (do not punch). Repeat the scoring from the 2 5/8" mark all the way around the card stock until all four sides are scored.
5. Using the criss-crossed score lines at the corners of each flap as your guide cut away the scored pieces. What you cut away will resemble a V and your flaps will now be longer and the square on the inside of the card stock will measure 3 1/4 x 3 1/4".
6. Using your bone folder crease all score lines to make them crisper. Round the top flap with the corner rounder. Put adhesive on the two inside flaps and then glue to bottom flap. Your envelope box is now complete except for decorating. See below.

1. Cut 4 pieces of white card stock each measuring 5 1/4 x 5 14".
2. Starting with the first envelope line up one of the pieces of card stock at the 2 5/8" mark on the board's measuring guide.
3. Press down on the punch and score a line across paper. Rotate paper to the next side and line up the pointer on the punch with the scored line. Punch again and score a line. Repeat this step until all four sides are punched.
4. Place one of the points in the corner punch and punch to round corner.
This flap will be the top flap.
5. Using your bone folder crease all score lines.
6. Fold up bottom and side flaps and add adhesive. Your envelope is now ready for a liner.
Liner:
I watched a couple of Youtube videos explaining how to make envelope liners but the one that impressed me the most and was quick to follow was one produced by Mary Fish. I suggest you take a look at her great video. Here is a link.
1. To determine the size of the liner and not waste a lot of DSP simply measure from the top point of the envelope flap (before you round it out) to the notch. For my 3 x 3 envelope when I measured this distance it came to
2 1/2 so I cut a piece of DSP to 21/2 x 2 1/2".
2. Put this piece of DSP in Envelope Punch so that the piece extends to the
2 1/2" measurement then decrease that measurement by 1/8 of an inch. That meant my paper was now sitting at 2 3/8" on the ruler. Now press the punch.
3. Remove the piece of DSP and flip it to the reverse side and put it back in the punch at 2 3/8" and punch again. You should now have two rounded corners that will match the rounded lines of your envelope flap.

4. Round the tip of the liner in the Corner Rounder punch. Put adhesive on the side of the paper you want to stick down and adhere it to the envelope.

5. To make sure the flap closes nicely with this additional piece of paper, fold the flap the opposite way and then back again and use the bone folder to crease along the score line. Voila! You're done.

3 x 3 Note Cards:
1.Cut 4 pieces of card stock to measure 3" x 6" and score at 3". These are your four note card bases. Go over score line with bone folder for a crisp fold.
2. Cut four of each of the following layer pieces:
1st Layer (DSP) 2 1/2 x 2 1/2"
2nd Layer (Cherry Cobbler) 2 1/4 x 2 1/4"
3rd Layer (Whisper White) 2 x 2"
3. Adhere the 1st layer to the card base. Adhere the second layer to the first layer.

4. Stamp the tree image from the Warmth and Wonder Hostess Set #131883 in Gumball Green on 3rd layer piece. The tree is a two step stamp, so once the tree is stamped then stamp the ornament stamp in Cherry Cobbler ink on top of the tree image. Tip: If you're using wood mount stamps I recommend you use a Stamp-a-ma-jig so you are able to place the ornament stamp in the right position on the tree.


5. Adhere the stamped whisper white layer to the Cherry Cobbler layer.

6. Cut a piece of 2 1/2 x 2 1/2 Whisper White card stock for the inside of the card. Adhere with adhesive.

Box Front:

1. Cut the following layer pieces:
1st Layer (DSP) 2 3/4 x 2 3/4"
2nd Layer (Cherry Cobbler) 2 1/4 x 2 1/4'
3rd Layer (Whisper White) 2 x 2"
2. Adhere 2nd Layer to the 1st layer with adhesive. Attach 3rd Layer to Cherry Cobbler layer with dimensionals.
3. For my lid image I coloured small basic rhinestones with a Red Scripto Marker and positioned them over each of the ornaments to add a little Christmas sparkle.
4. Cut a 20" piece of 3/8" White Taffeta Ribbon and loop it around the box so the loose ends are at the top and ready to be tied into a bow. Add dimensionals to the back of the DSP piece only on the sides so there is a channel for the ribbon to go through and then adhere to the box top.
5. Add your finished cards and envelopes to the box and tie the ribbon in a bow at the top of the box. You're done!


Supplies:
Card Stock:
Whisper White #100730
Cherry Cobbler #119685
Gumball Green #126840
Season of Style Designer Paper Pack #131883
Note: For the envelopes I used a non Stampin' Up lighter weight card stock from Staples, to reduce the bulk of the envelopes.
Ink:
Cherry Cobbler #126966
Gumball Green #126840
Accessories:
3/8" White Taffeta Ribbon #109070
Basic Rhinestones #119246
Red Scripto Marker (non SU)
Envelope Punch Board #
Stampin' Trimmer #126889
Well I hope you enjoyed this tutorial. Please leave me a comment if you liked it, and let me know if you make one yourself. I can't wait to hear from you!
My Version:

Once again my investment in the Envelope Punch Board has paid off. Not only was I able to make this cute little box, but I also made four lined envelopes to go with the note cards. Now that's value! Here's how they were made.
 |
| Envelope Punch Board #133774. The Envelope Punch Board includes: An easy-to-use chart to create up to 66 different envelope sizes (including standard sizes). The measurements are provided both in inches and centimeters. A scoring tool in a convenient storage slot. Two punches designed right into the tool itself: one to make the envelope and one to round its corners. |
The Box:

1. I wanted enough room in my envelope to hold the four cards and envelopes so chose a card size of 4 x 4 on the Envelope Punch Board. For this selection the card stock is cut to 6 7/8 X 6 7/8.
2. Line up your card stock at the 3 1/2" measurement on the punch board and then punch and score. Note: for the next few steps I will be using a sheet of white card stock instead of the gumball green so I can show the measurements.

3. For your second, third and fourth score lines, simply line up the first scoreline with the pointer on the punch, punch, score and rotate to the next side and repeat this process until all four sides are punched and scored.

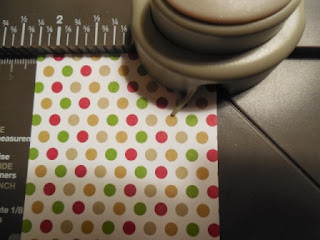
4. Now move the card stock to the 2 5/8" mark on the punch board and score a line (do not punch). Repeat the scoring from the 2 5/8" mark all the way around the card stock until all four sides are scored.
 |
| Oops...... this picture should show 2 5/8 not 2 3/8....... don't worry I changed it before I scored so my sample is correct. |
 |
| This picture shows the two score lines and how they intersect at the corners. The center of your box should measure 3 1/4" x 3 1/4" |
5. Using the criss-crossed score lines at the corners of each flap as your guide cut away the scored pieces. What you cut away will resemble a V and your flaps will now be longer and the square on the inside of the card stock will measure 3 1/4 x 3 1/4".
 |
| Cutting away the V in each corner. |
 |
| After the corner's have been cutaway your box should look like this one and the actual box in the picture below. |
 |
| Okay this is the real meal deal, and we're back to Gumball Green pictures from this point on. |
 |
| Use bone folder to crease all the score lines. This makes your box look more finished. |
 |
| When I closed the two side flaps I used a glue dot on the bottom flap at the point and then lined both flaps up flush before taking the sticky strip off the bottom flap and overlapping the side flaps. Be really careful and make sure everything is lined up so your box sides and back are flush and square. Trust me, take your time and you won't have to redo it. |
 |
| When you close up the flaps really make sure they are in alignment or you will get a slight overlap like I did on the next picture. That bummed me out so much I had to make a replacement. |
 |
| Round off the pointed end of the card flap using the corner rounder punch on the Envelope Punch Board. It's awesome this board comes with two punches! |
 |
| Having that flap rounded really makes a difference. Don't you think? 3 x 3 Envelopes: |

1. Cut 4 pieces of white card stock each measuring 5 1/4 x 5 14".
2. Starting with the first envelope line up one of the pieces of card stock at the 2 5/8" mark on the board's measuring guide.
3. Press down on the punch and score a line across paper. Rotate paper to the next side and line up the pointer on the punch with the scored line. Punch again and score a line. Repeat this step until all four sides are punched.
4. Place one of the points in the corner punch and punch to round corner.
This flap will be the top flap.
5. Using your bone folder crease all score lines.
6. Fold up bottom and side flaps and add adhesive. Your envelope is now ready for a liner.
Liner:
I watched a couple of Youtube videos explaining how to make envelope liners but the one that impressed me the most and was quick to follow was one produced by Mary Fish. I suggest you take a look at her great video. Here is a link.
1. To determine the size of the liner and not waste a lot of DSP simply measure from the top point of the envelope flap (before you round it out) to the notch. For my 3 x 3 envelope when I measured this distance it came to
2 1/2 so I cut a piece of DSP to 21/2 x 2 1/2".
 |
| Sorry I didn't do a coloured example so you could see the measurement better, but if you look really close you can see that the measurement is 2 1/2" from the tip to the score line. |
2 1/2" measurement then decrease that measurement by 1/8 of an inch. That meant my paper was now sitting at 2 3/8" on the ruler. Now press the punch.

3. Remove the piece of DSP and flip it to the reverse side and put it back in the punch at 2 3/8" and punch again. You should now have two rounded corners that will match the rounded lines of your envelope flap.


5. To make sure the flap closes nicely with this additional piece of paper, fold the flap the opposite way and then back again and use the bone folder to crease along the score line. Voila! You're done.

 |
| The little 3 x 3 note cards slide easily into these cute little envelopes. |
1.Cut 4 pieces of card stock to measure 3" x 6" and score at 3". These are your four note card bases. Go over score line with bone folder for a crisp fold.
2. Cut four of each of the following layer pieces:
1st Layer (DSP) 2 1/2 x 2 1/2"
2nd Layer (Cherry Cobbler) 2 1/4 x 2 1/4"
3rd Layer (Whisper White) 2 x 2"
 |
| All the card components cut and ready to assemble. |

4. Stamp the tree image from the Warmth and Wonder Hostess Set #131883 in Gumball Green on 3rd layer piece. The tree is a two step stamp, so once the tree is stamped then stamp the ornament stamp in Cherry Cobbler ink on top of the tree image. Tip: If you're using wood mount stamps I recommend you use a Stamp-a-ma-jig so you are able to place the ornament stamp in the right position on the tree.
 |
| Warmth and Wonder Hostess Stamp Set #131883. You can find this at the back of the Idea Book and Catalogue. It has 7 stamps . This is a great value at $12.00 or it can be earned for free if you book a $200 workshop. |


5. Adhere the stamped whisper white layer to the Cherry Cobbler layer.

6. Cut a piece of 2 1/2 x 2 1/2 Whisper White card stock for the inside of the card. Adhere with adhesive.

Box Front:

1. Cut the following layer pieces:
1st Layer (DSP) 2 3/4 x 2 3/4"
2nd Layer (Cherry Cobbler) 2 1/4 x 2 1/4'
3rd Layer (Whisper White) 2 x 2"
2. Adhere 2nd Layer to the 1st layer with adhesive. Attach 3rd Layer to Cherry Cobbler layer with dimensionals.
3. For my lid image I coloured small basic rhinestones with a Red Scripto Marker and positioned them over each of the ornaments to add a little Christmas sparkle.
4. Cut a 20" piece of 3/8" White Taffeta Ribbon and loop it around the box so the loose ends are at the top and ready to be tied into a bow. Add dimensionals to the back of the DSP piece only on the sides so there is a channel for the ribbon to go through and then adhere to the box top.
5. Add your finished cards and envelopes to the box and tie the ribbon in a bow at the top of the box. You're done!


Supplies:
Card Stock:
Whisper White #100730
Cherry Cobbler #119685
Gumball Green #126840
Season of Style Designer Paper Pack #131883
Note: For the envelopes I used a non Stampin' Up lighter weight card stock from Staples, to reduce the bulk of the envelopes.
Ink:
Cherry Cobbler #126966
Gumball Green #126840
Accessories:
3/8" White Taffeta Ribbon #109070
Basic Rhinestones #119246
Red Scripto Marker (non SU)
Envelope Punch Board #
Stampin' Trimmer #126889
Well I hope you enjoyed this tutorial. Please leave me a comment if you liked it, and let me know if you make one yourself. I can't wait to hear from you!


