Showing posts with label Christmas Hostess gifts. Show all posts

Sunday, December 22, 2013

Christmas Hostess Gifts - Day Six Treat Boxes


I love giving treats for hostess gifts and having these cute little boxes to package them in works really well during the Holiday season.  They are absolutely the perfect size for holding little bags of goodies.   

I use 4.75 x 6.5 clear envelopes and just trim off the sticky end and then fill them with all kinds of things.  Make sure you don't overfill these treat bags and it's nice to tie them up with a little ribbon and tag before sealing them in the box.  Here ae some gift ideas you may not have thought of:  Some fancy tea bags, chocolate covered pretzels or homemade Rolo pretzels, chocolate covered espresso coffee beans, Keurig K cups for fancy brews, hot chocolate packages, small round bars of specialty soap, to name a few.   I hope you'll drop me a comment at the end of this post and let me know what you'd like to pack in one of these boxes.  I'm sure you can think up some of your own!  

Supplies:

Stamp Sets From the Holiday Catalogue:
Santa's List #131181
Very Merry Tags #130401 

Cardstock: 
Cherry Cobbler 1 sheet#119685
Season of Style Designer Series Paper Stack - 1 sheet #132181

Ink:
Cherry Cobbler #126966
Whisper White Craft Ink #101731

Accessories:
Pop N' Cuts Card Base Die #130099
Big Shot Machine #113439
Extended Cutting Pads #113478
Chevron Striped Ribbon Cherry Cobbler #130012
Circle Collection Framelits #130911
Large Oval Punch #119855 
Decorative Label Punch #120907
Dazzling Diamonds #102023
Clear Embossing Powder #109130
Basic Rhinestones #119246

Assembly:
1.  Cut a piece of Cherry Cobbler Cardstock at 5 1/2" x 11 and two small pieces at 2 1/2" x 3".

2.  Place the long piece of cardstock on the Pop' N Cuts Card Base and run through the Big Shot Machine.  This piece is your box base.

Card Base Pop' N Cuts #130099 cuts a card base. It's magnetic, so you can insert the magnetic Pop ‘n Cuts Dress Form Die or Label Pop' N Cuts die cuts inside this base to cut a fun pop-up card. Card base: 4-1/4" x 11". Use with Extended Cutting Pads.

Too bad I had this sitting on a red table cloth.............. looks kind of confusing.  Tip:  Try to focus on the black Pop' N Cuts frame.  I added some markers with white sticky strip to the  card base. You could actuall add Washi Tape around the outter rim.  Anyway, these markers help me line up card stock so I get a precise cut without wasting paper.  
3.  Starting at square end of box base score at 1 1/2", 2 1/2" 4 1/2" 6 1/2" 8 1/2" and 9 1/2".

4.  Slip the tabs into the top of the box base being careful not to fold cardstock and then use the Large Oval Punch to punch out a handle for the box. 

5. For the sides of the box score the two 2 1/2 x 3" pieces of Cherry Cobbler card stock at 1/2" on the 2 1/2" side, then rotate and score at 1/2" on the 3" side,   rotate and score again on the last 3" side.  


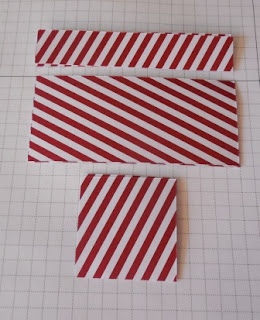
The three pieces you need to make this cute little box. 
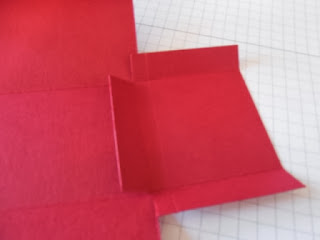
6.  Snip off corners on both of the side pieces. Crease on score lines and then apply sticky strip along tabs.

7.  Cut DSP as follows and adhere to box front, sides and lid before assembling box:
  • Cut 2 pieces 1 3/4 x 1 3/4" for side panels
  • Cut 2 pieces 4 x 3/4 for lid panels
  • Cut 2 pieces 4 x 1 3/4" for front and back panels


8.  Crease all fold lines on box base and fit tabs into slots, this will assist with assembly.  


9.  Starting on one side of the box line up the short-sided tab from side panel with the inside bottom edge of box and adhere.  Bring in both side tabs one at a time and line up with sides of box and adhere.  Make sure edges all line up otherwise your box will be tippy.  Repeat for second side.  


10.  Decorate the box as per your wishes.  

I added a Santa image from Santa's List and a sentiment from Very Merry Tags.  The ribbon is the Cherry Cobbler Chevron Ribbon.

This box is decorated with the Winter Frost Designer Series Paper Stack paper.  The snowflake embellishment is made with the Festive Flurry Stamp set and matching framelits and a Frosted Finishes embellisment.  I've tied the box with a strip of Smokey Slate Chevron Ribbon.
I put life savers in this treat box. The others have chocolate covered pretzels and truffles.  

This treat box is tied with the gorgeous Cherry Cobbler Tulle ribbon which is still available at last check in the Clearance Rack Blitz.  It is so awesome to use.  The sentiment is from the Warmth and Wonder  Hostess Stamp set.


I hope you enjoyed this tutorial and would love to hear your comments.  

Christmas Hostess Gifts - Day Five Wine Bottle Toppers

Wine Bottle Toppers:


Whenever I visit friends and take wine I like to bring it in a wine bag or box, but on occasion I've been caught short without either.  The easiest solution is to make a Wine Bottle Topper or Tag.  These are so easy to make and you can keep a supply on hand to quickly decorate for the occasion.  

Here's My Wine Topper:


Supplies For Cherry Cobbler Wine Topper:
Card Stock:
Cherry Cobbler
Early Espresso
Whisper White 

Ink:
Gumball Green
Coastal Cabana
Early Espresso 

Accessories:
1 3/8" Circle Punch
Apothecary Framelits
Oval Framelits
Basic Rhinestones
Dazzling Diamonds
Dimensionals
2-way Glue Pen
Big Shot
Trimmer 

Assembly:

1.  Cut Cherry Cobbler card stock to 2 7/8”x 8”.

2.  Score at 2 ¼" and use bone folder to crease at score line. 

3.  Cut a piece of Season of Style DSP to 2” x 5” and adhere to middle of Cherry Cobbler piece.

4.  Punch 1 3/8” circle out of top portion of Cherry Cobbler card stock.


5.  Using the large die from the Apothecary Framelit set cut a 3 x 5" piece of Early Espresso cardstock.  Then place the rectangular framelit in the center of this piece and run through the big shot. 

Apothecary Framelits Item #127003

6.  Stamp a scene using the images from the Warmth and Wonder 7 piece hostess stamp on a 3 1/2 x 3 1/2 piece of Whisper White Card stock.  Lay the rectangular die over the stamped image to make sure the image will be visible through the window frame you created in step 5.  Finish details on picture and then adhere behind the Early Espresso frame.  Mount finished frame to center of dsp piece. 
This cute little stamp set features 7 stamps.  It has a 2-step stamp (dots) that stamps on the tree to create ornaments.  It also coordinates with the Extra Large Oval Stamp (bird image).  This stamp set is part of the Hostess set of stamps in the Holiday Mini and is only available until January 3rd, 2014 when it will be retired.  

The tree is stamped in Gumball Green, the stars are in Coastal Cabana and the deer is in Early Espesso inks.  I used the 2-way glue pen to add lines around the base of the tree and between the deers legs and then sprinkled on Dazzling Diamonds, so it looks like snow glistening on the ground.  You can't see that in this picture, but if you look closely at the finished tag you will see it.  I also added another star and placed small basic rhinestones in each one. 


7.  Stamp the sentiment "Wishing you......" onto a piece of Whisper white cardstock and cut it out with the smallest oval from the Oval Framelits die cuts.  Using the next size of framelit cut out a piece from Cherry Cobbler and mount the sentiment on this piece with dimensionals and then add the finished sentiment to the tag with dimensionals.
Place the wine bottle topper over your bottle of wine and you are done!  How easy was that?

Another Sample:

I made another wine bottle topper that includes a Christmas Ornament.  The base of the wine bottle topper is cut from Brushed Silver cardstock.  I made the ornament with the Festive Flurry Stamp Set and matching Framelit die cuts, and stamped it in Coastal Cabana, Island Indigo and Night of Navy inks.  Two layers of snowflakes were cut out of Silver Glimmer paper.  I put a Silver 1/8" Ribbon on for the ornament tie and added a Frosted Finishes Embellisment for the center piece in the ornament.  


I used dimensionals between all the layers on the ornament, however because dimensionals won't stick to the glimmer paper when I added a large glue dot on top of the dimensional. Works like a charm.  I attached the ribbon to the back of the ornament with tape and then used an additional large snowflake to cover this. 


The ornament was added to the wine topper with repositionable glue so it can be removed and used as an ornament on the tree.  
 Here's a final look at the two wine bottle toppers I made. 


Note:  The following products used to make these tags will be retiring on January 3rd and no longer available.

Festive Flurries Stamp Set and Framelits - can be purchased as a bundle.
Warmth and Wondeer Stamp Set
Frosted Finish Embellisments 
Silver 1/8" Ribbon

Thursday, December 19, 2013

Christmas Hostess Gifts - Day Four A Tea Light Box Card

I had extra tea light candles left over from my first project so I decided to make a tea light candle card.  This project could easily be adapted for any occasion not just Christmas, to hold small cards or other trinkets or candy in the box.  So even if you're not a fan of tea lights there is still a reason to make this box.   

My Version:
   

Supplies:

Stamp Sets:
Santa's List #131811
Very Merry Tags #130402

Ink:
Early Espresso #126974
Cherry Cobbler #13002
Whisper White Craft Ink #101731 or Staz on White Ink

Card Stock:
Early Espresso #119686
Cherry Cobbler #119685
Whisper White #100730
Season of Style Designer Series Paper Pack 
Window Sheets #114323

Accessories:
Chevron Ribbon Cherry cobbler #130012
Basic Rhinestones #119246
Labels Collection Framelits #125598
Clear Embossing Powder #109130

Assemble The Card Shell:

STEP 1:  Cut a 9 x 4" piece of Cherry Cobbler card stock to measure and score at 4" and 5". Crease and fold on the score lines. This will form the spine of the gift card.


Step Two: The inside and the outside of the box are layered with card stock and designer series paper. Do step 2 before assembling the tea light candle box.

Front, Inside and Back Panels:
1st layer:  Cut 4 pieces of 3 7/8 x 3 7/8" Early Espresso card stock.
2nd layer: Cut 4 pieces of  3 1/2 x 3 1/2" Season of Style Designer Series Pack paper. Apply adhesive to the back sides of the card stock and DSP and adhere to the card base front, inside and back panels.  

Spine Outside and Inside Card Base:
1st layer:  Cut two pieces of 7/8 x 3 7/8" Early Espresso card stock.  Adhere to the spines on the front and inside of the card base. 
2nd Layer:  Cut two 2 pieces of 3/4" x 3 3/4" DSP and adhere to Early Espresso pieces on inside and outside of the card base.
  
Outside view of the card base.  The inside should look the same.  When using striped DSP make sure the stripes are all running in the same direction before assembling. 

Assembling the Tea Light Box: 

STEP 1:  Cut a piece of Early Espresso 5 1/2" x 5 1/2 card stock. Score this piece at 1/2" and 1 1/4" on all four sides.  

Step 2:  When you've score this piece you'll see squares in each corner. Trim away the corners on these score lines as indicated in the diagram below. need to be trimmed as per diagram. 

Step 3:  Cut the flaps to the 1 1/4" score line on all four sides before forming your box.  See arrows on box diagram.
Step 4:  Fold in the sides to form a box and secure the flaps with a glue dot or sticky strip.  Trim the opening of the box flap by snipping the corners.


Step 5: Cut a 3 x 3 piece of designer series paper and adhere it to the top of the box. 


Step 6: Using the smallest size of Label Collection Framelit dies to make a cut out in the center of the box top.  Flip over and cover with a square of acetate or window sheet to ensure the contents of the box don't fall out.  Use glue dots in the four corners of the accetate to secure.  
Apply sticky strip to the two sides and the bottom of the box.  
Note: If you want to keep the contents of the box a surprise then omit step 6 and just decorate the top of the box.
STEP 7:  Attach the box to the card base with sticky strip.  

Finishing Touches:

Step 1:  I decorated the front of the box with a stamped image from the Santa's List stamp set. It's one of my favourite sets this year.  I stamped the Santa image in Early Espresso on Whisper White card stock and then cut it out with an Oval die from the Oval Framelits set.  I distressed around the oval's edges with Early Espresso ink and a sponge  dauber.   
Santa's List # 131811 - One of those great classic stamp sets.  Only available in the Holiday Mini until January 3rd, 2014.
You can easily cut stamped images from the Oh, Hello Stamp Set with these framelit dies. Largest scallop oval measures 4-1/4" x 5-1/8". There are 6 dies in the set and they cut single sheets of paper with your Big Shot, Standard Cutting Pads, and Multipurpose Platform. 

Step 2:  I added a layer beneath the Santa in Early Espresso Card stock cut out with a Labels Collection Framelit die.  This additional layer really makes the stamped image pop.
 
Labels Collection framelits coordinate with the Apothecary Art Stamp Set. The largest label is approximately 5-7/16" wide. The set includes 6 dies in a sturdy envelope for easy storage in SU's Big Shot Die Storage.


Step 3:  The "Naughty or Nice" sentiment from the Very Merry Tags stamp set was stamped in Whisper White craft ink on Cherry Cobbler card stock and then heat embossed with Clear Embossing powder.  I added two medium sized Basic Rhinestones to the checklist on the sentiment for a bit of sparkle.
Very Merry Tags Stamp Set #130402

Step 4:  To keep the box closed when it's completed, I added a piece of the beautiful Chevron Striped Ribbon in Cherry Cobbler that I adhered to the top, spine, and back of the card base with Glue Dots.
Chevron Striped Ribbon is elegant and smooth and ties so easily.  You'll love it! 

I used over 20 inches of ribbon so I could tie it on the side.  Tip:  Before cutting ribbon strip measure from the spool how much you'll need to tie either a box or just a double bow knot like I did.  

Once the ribbon was attached I mounted my two images by adhering Stampin' Dimensionals to the back sides and then adhering them over top of the ribbon strip.  

Step 5:  Add your candles to the box.  The box will hold 4 was tea light candles, but you could easily substitute other little trinkets or goodies to this box such as "chocolate".  


This view of the box shows the candles inside.  They fit perfectly!

Side view of the box opening.  You could also turn the box so this faces the top but I chose to put it on the side for easy access and also in case the box opened the tied ribbon will hold in the contents.  


Well that's it for today's tutorial.  I hope you enjoyed it and will leave me a comment.  Thanks for stopping by.


Paper Pumpkin Alternatives April 2024 and Sketch Challenges

The past week was so busy that time literally flew by.  I have a number of projects on the go, including working on my April 2024 Paper Pump...