Showing posts with label "Monday Monster Mash Halloween Blog Hop". Show all posts

Wednesday, September 21, 2011

Monday Monster Mash Halloween Count Down Blog Hop - Week Six

It's my most favourite time of the week again, time for the Monday Monster Mash Halloween Countdown (MMMHC ) and it's week six.  That's right week six .........the halfway mark!  I'm ecstatic as I basically have only two Halloween sets to work with right now and I've actually made six cards.  Whoo Hoo! 

So, if you'd like to play along and have been too shy or haven't had time yet or whatever reason, don't worry there's still time to join in.  Hop on over to Shirley Pumpkin's awesome site and see all her wonderful Halloween creations and other projects. Leave her some love while you're there.  Her projects are awesome. 

This week she's combined her MMMHC with the Scaredy Cat Swap that she recently attended over at Terry Blais's place.  What fun!  She's got all the rules for her MMMHC on her fun blog hop, so check them out.  I can't wait to see what you'll make so get card making!

Okay so here's my entry for week six, hope you like it.  I decided since I really like making circle cards to use that format for my entry this week. Circle cards are so easy to make and they are such a fun wow in a class.  They're also awesome to receive.  I've made this one in traditional Halloween colours of Concord Crush, Pear Pizzazz, Basic Black and Pumpkin Pie cardstock.  No DSP is used.

I've used the cute little halloween girl from the "Greeting Card Kids" stamp set as my focal point.  I've coloured her with blender pens on watercolour paper.  She has a little bit of bling added to her great pumpkin with glitter glue and a shiney purple rhinestone on her witchy hat (see tip below). 

The Best Witches (don't say that fast...lol!) sentiment is from "Halloween Hoot" and I've stamped off some little bats from SU's "Wicked Cool" set.  The image is stamped on Pumpkin Pie, and the large oval punch was used to punch out the sentiment.  It's mounted on a scalloped oval punched out in basic black.  A few purple rhinestone complete the sentiment.  This sentiment is popped up on dimensionals so that when the card is opened it has a prop or anchor to hold it open.  The inside of the card is made with layered circles in corresponding card stock and lots of room to leave a message.  

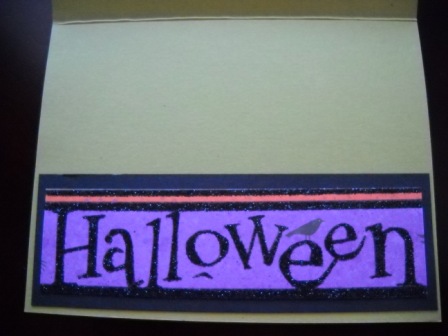
View of the card opened up. I've used basic black ink to distress around the entire scalloped edge of the card to give it some extra detail.

I've used the bat image from "Wicked Cool" to stamp around the scalloped circle.  I stamped it in versa mark, basic black ink and then heat embossed it with clear EP.  I could have used Black embossing powder too.  It gives a kind of shiny look to the background of the card.

I added a bit of green glitter glue around the Pear Pizzazz layer to add some additional sparkle. 

Okay so here's my economizing tip of the week:
Did you know you can colour your own basic rhinestones inexpensively with any permanent alcohol based marker  (Sharpies work well because they let the colour sparkle through).
That's right your can now have red, green, blue rhinestones...........even black to match your favourite coloured cardstocks.  So no more searching for matching bling, just colour your Stampin' Up basic rhinestones yourself!

All you have to do is j=-0[st colour over the rhinestone with your marker pen and voila! instant colour. Go over it until you get the shade you want.  If it's too dark you can take a cute tip swab to lighten the colour by dabbing a bit of rubbing alcolhol (90% or more works well) on a Q-Tip swab and lightly dab it on the basic rhinestone.  You can also use an alcohol blending solution but be careful as both solutions will remove the colour. 
Okay bye everyone.  Happy card making.

Thursday, September 8, 2011

Monday Monster Mash Halloween Count Down Blog Hop - Week Four

Another week has whizzed by and now it's time once again for Shirley Pumpkin's Monday Monster Mash Blog Hop.  I thought I would share the rules with you today so you can play along.  So here's Shirley's rules:

 Do you want to Play along with the Monster Mash Blog Hop.?
Here are the rules:

1. It has to be Halloween, card or 3D item.
2. It does not have to be 100% SU 80% is ok.
3. Yes using Retired is OK...
4. Use Shirley's her Monster Mash Badge/Graphic in your post (see above)  and a link back to her blog (http://lookatmycutestuff.blogspot.com.)
5. Add your card to the blog hop then put the code on your post.
6. You can enter as many times as you like, just has to be a new card and post.
The Blog Hop is every Monday for 12 weeks. Shirley is picking a favorite every week for 12 weeks and then out of the 12 picking a Grand Prize winner. The Prize is $25.00 in new cool stuff from the new Holiday Mini. The winner will be announced on Halloween.

Okay so here's my entry for this week:
For this card I added some no-name DSP for the background and stamped the Scroll from the "Bliss" set in Versa Mark ink and them embossed it with Black Embossing Powder.  Love the feel of it on the card front.  Lots of texture.  The pumpkins are from a retired stamp set called "Autumn Harvest ".  I Stamped the small pumpkin on the bottom and then created a mask from a post it note, to protect the pumpkin before I stamped the other two pumpkins.  I loved being able to pile these guys together.  I used an aqua painter and Old Olive, Pumpkin Pie, and Parfait Peach inks to colour the  pumpkins. The pumpkins are mounted to the card with dimensionals.  The "Spooky" sentiment is from the "Wicked Cool" set.  It's stamped in basic black and distressed with Concord Crush ink and mounted on a Concord Crush decorative label punch out.  The teenie rhinestones I've used to add some bling are non-stamping up.  If you want to make coloured rhinestones to match your designs, simply use the blender pen to colour over your basic rhinestones.  I would have done this, but I use them so much I've run out!  LOL!

The crystal effects on the pumpkin's mouth adds a great effect, with little effort.  It pops the black ink up to a new level, just make sure you let it dry well.  The webs in the background were embossed with clear embossing powder and then I added one of Stampin' Ups! new bling products called "Dazzling Details" (#124117 pg 41 Holiday Mini $3.25).   This is an irridescent glitter glue that adds a dazzling effect to the webs.  Warning............ you only need a little to get that beautiful shimmer.  

Inside of card. 
It's not too late to join this week's blog hop.........but don't wait too long!  You could be next!

Thursday, August 25, 2011

Halloween Hoot ........... Monkey 70: Halloween + Sketch


Have you checked out the Halloween Challenge at A La Card Monkey this week?  What a great sketch. I don't have a lot of Halloween stamps but I liked this sketch so much I thought I'd join in the fun.  I resurrected a retired Stampin' Up! set called "Halloween Hoot".

Frogs are stamped in Basic Black on Old Olive cardstock.  I restamped the frog's head  3 more times in Pumpkin Pie, Concord Crush and Old Olive so each frog would have a different colour hat.  The hats were glued on and the frogs were mounted with dimensionals to the Old Olive "lily pads".  The larger circle images and the bands across the card are in the same colours.  The black band was embossed with the Web Embossing folder.  A bit of green glitter was added for some bling. 

Inside layer of the card. 


If you're looking for some more Halloween ideas, challenges and fun  check out Shirley's blog where she's counting down the 12 weeks to Halloween.  Here's her blog address: Monday Monster Mash Halloween Blog Hop


Zany Birthday FMS#628

Well another week has flown by and there's a promise of Spring between the rain drops.  I'm thrilled to see all the cherry trees sta...