The "Be The Difference" Convention has come and gone, but sharing my experience with you is just beginning. Over the next few days I want to share some before, during and after experiences with you.
To start, I'd like to share some pictures of my card prep for the awesome swap organized by Lori Souter and friends. This was a 64+1 card swap and the theme was "New Catalogue Stamp Sets". We were to receive one card for each new stamp set in the 2013-2014 catalogue. That's right 64 new stamp sets including hostess sets and wheels.
Unfortunately it didn't quite go as planned because of a mix-up in swapping times, due to a change in the Convention schedule. It was unfortunate because I was really looking forward to being able to share all 64 cards with you.
Regardless I'm blown away by the talent demonstrated in the cards I did receive. And if over the coming weeks the ones I'm missing are posted, I'll provided some links so you can catch up on those ones too.
So buckle your seat belts and come along for the ride, because I have some awesome swaps to share with over the coming week. You're going to love them!
Here's My Tea Party Swap Card:
 I made a total of 70 of these cards. The numbers in the supply list below in brackets show the number of sheets of card stock it took to make these cards.
Supplies List:
Let me know what you think.
To start, I'd like to share some pictures of my card prep for the awesome swap organized by Lori Souter and friends. This was a 64+1 card swap and the theme was "New Catalogue Stamp Sets". We were to receive one card for each new stamp set in the 2013-2014 catalogue. That's right 64 new stamp sets including hostess sets and wheels.
Unfortunately it didn't quite go as planned because of a mix-up in swapping times, due to a change in the Convention schedule. It was unfortunate because I was really looking forward to being able to share all 64 cards with you.
Regardless I'm blown away by the talent demonstrated in the cards I did receive. And if over the coming weeks the ones I'm missing are posted, I'll provided some links so you can catch up on those ones too.
So buckle your seat belts and come along for the ride, because I have some awesome swaps to share with over the coming week. You're going to love them!
Here's My Tea Party Swap Card:

Supplies List:
- Card stock: Very Vanilla (35), Crumb Cake(19)
- Ink: Early Espresso and Crumb Cake
- Stamp Set: Cup of Tea
- Accessories:
- Stripes, Modern Mosaic Embossing Folders and Beautiful Wings Sizzlet, Big Shot Machine
- Ovals Framelits
- Large Tag Punch
- Crumb Cake Taffeta Ribbon
- Basic Rhinestones
- Adhesive, Sponge Dauber
- Sharp scissors for fussy cutting (a lot of that!)
 |
| I tied 70 of these teeny little Crumb Cake Taffeta bows using the "fork method". There is virtually no waste when tying ribbon this way and you ensure all bows are uniform. |
 |
| The little butterfly only needed a small scrap of card stock so I cut out some 1" x 8 1/2" strips of Crumb Cake and then cut these down into 1" strips. As you'll see in the photo below, I adhered these butterflies to the tags using glue dots. A small basic rhinestone was added for a little sparkle. |
 |
| I punched out 70 of the Large Tags from Crumb Cake card stock. I stamped 70 of the Thank you stamp images on Very Vanilla, then fussy cut them out and mounted them to the Crumb Cake with adhesive. I re-stamped the Thank You image in Early Espresso Ink on Very Vanilla and then cut out just the "Thank You" banner and adhered these pieces to the tag. Everything was then sponged with Crumb Cake ink. |

 | |
| I stamped the Cup of Tea image in Crumb Cake ink onto the center of each of the Very Vanilla Layers using the Stamp-a-ma-jig to ensure the ovals were centered on the card, and then removed the ovals with the Oval Framelits Die. |
 |
| Once the oval was removed this layer was embossed with the Modern Mosaic Embossing Folder. I did all the sponge daubing with Crumb Cake ink prior to embossing the layers. |
 |
| I loved the shabby chic look of this layer once it was embossed. |
 |
| I stamped the oval image in Early Espresso on Very Vanilla card stock and then fussy cut all the top and bottom designs away. I mounted these onto the Crumb Cake oval with adhesive. Basic Rhinestones were added to three of the circle flourishes on this element. I was carefully when cutting away these pieces and as a result will be able to use the Cup of Tea images on another project. |
 |
| I broke all the tasks into 7 groups of 10 pieces, so I could check to make sure I had enough of each element when I began to assemble the cards. This photo shows a grouping of 10 tags, ovals, butterflies, ribbons and embossed pieces ready to be put on the cards. |
 |
| This picture shows my seven piles of card pieces. Each pile consists of 10 of every layer and element used on the card. |
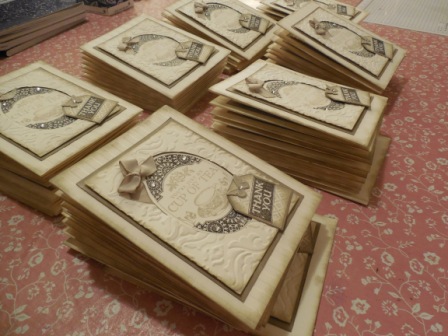 | ||||
| This picture shows the 10 piles of completed cards prior to being placed in their plastic sleeves. |
 |
| Here you can see a closeup of the detail in the finished card. |
 |
| The finished card. Ta Da! |
Let me know what you think.


5 comments:
I LOVE your finished card!!! I also love that you are sharing your convention swap photos with all of us!
How wonderful!
Sherrill Graff Late Night Stamper
Thank you for the instructions Penny! This card is truly one of my favorite swaps that I received at convention and I would love to be able to make another for my precious grandmother. Hugs!!!
Thank you for the instructions Penny! This card is truly one of my favorite swaps that I received at convention and I would love to be able to make another for my precious grandmother. Hugs!!!
Penny,
So many beautiful cards and I really love your swap card. Your information on the convention is very informative. Felt like I was there. Great information on your blog Penny,
Lots of love, Your Sister!
Heather H.
Penny,
So many beautiful cards and I really love your swap card. Your information on the convention is very informative. Felt like I was there. Great information on your blog Penny,
Lots of love, Your Sister!
Heather H.
Post a Comment