Showing posts with label Chalk Talk. Show all posts

Tuesday, August 26, 2014

Paper Craft Crew Sketch Challenge #106

Today was my Stampin' on Tuesday fun day and I was joined by my two stampin' buddies, Sheri and Debby. 

Sheri and I started the morning with a 2 mile walk.  We're trying to combine some exercise with our weekly stamping routine.  Debby joined us for salad and chicken quesadillas and then we did some stamping.  Such a great day when you can share it with your friends!

My project for today is a sketch by the Paper Craft Card Crew Sketch #106 PCCCS06.   Here is the sketch outline:

 
Isn't this a great sketch.  There's a lot going on  with all the different elements so I really had to put my thinking cap on.  Make sure you check out all the great entries from the Paper Craft Crew Design Team and from the participants.  You can vote for your favourites later tonight and voting is open until September 2nd.  You can also check out PCCC on Facebook or on Pinterest.

Here's My Card:
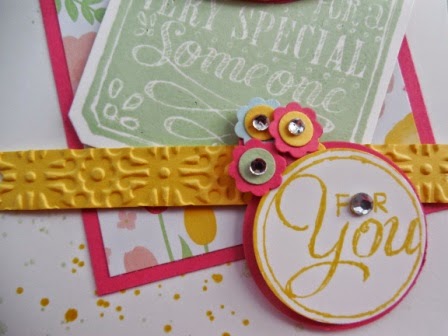
I took my colour inspiration from the beautiful All Abloom Designer Series Paper pack.  I chose a design with flowers in soft sherbet colours that reminded me of chenille housecoats and soft slippers.  A real throwback in colour, and I think that's what's so great about these little designer paper packs.  

The All Abloom stack is like going back in time, mostly old fashioned prints and designs and soft colours - Blushing Bride, Daffodil Delight, Island Indigo, Lost Lagoon, Mossy Meadow, Pistachio Pudding, Strawberry Slush, Whisper White.  With each paper pack you get 48 sheets of 4 12 x 6 1/2" designer paper, including 4 each of 12 double sided designs.  The colours and the patterns all mix and match.  Who can go wrong!

The card base is an 8 1/2 x 5 1/2" piece of Strawberry Slush In Colour cardstock scored at 4 1/2".  I've added a layer of Pistachio Pudding measuring 5 1/4" x 4" followed by a Whisper White layer measuring 5 x 3 3/4".  Unfortunately you can just barely see the spots on the Whisper White layer but they were made with Daffodil Delight and Pistachio Pudding Ink and the spotted image from Gorgeous Grunge, a retired stamp set.

I kept the inside of the card plain and simple just adding some small punched flowers and a sentiment from the Chalk Talk stamp set. 
Supplies:
Stamp Set:  Chalk Talk, Gorgeous Grunge
Card Stock:  Strawberry Slush, Pistachio Pudding, Whisper White and Daffodil Delight and All Abloom Designer Series Paper Pack
Ink:  Pistachio Pudding, Strawberry Slush, Daffodil Delight
Accessories:  Chalk Talk Framelits, Basic Rhinestones, Delightful Designs Embossing Folder, 1/4", 1 1/4" and 1 3/8" circle punches, Itty Bitty Punch Pack flower punch, dimensionals, trimmer, big shot machine.


Happy Stampin'!
Penny Tokens

September 3, 2014 Post Script:  Just a note to let you know this card was one of the Featured Artisans for the Paper Craft Crew Challenges today.  What an honour.  Thanks so much Paper Craft Crew. http://www.papercraftcrew.com/pcccs-106-featured-artisans/

Sunday, May 18, 2014

Scalloped Tag Topper Punch Gatefold Card

Do you like flowers and butterflies?  How about fancy fold cards?  Do you like learning new techniques?  

Well today I've got all that and more for you, because I want to share a fun gate fold card made with Stampin' Ups! Scalloped Tag Topper Punch

My stamping friend Sheri and I made this card on Tuesday when we were trying out some new techniques.  

We based ours on one made by Linda Bauwin of Stamping With Linda. She called it a "landscape scallop tag topper card" because it is done width wise as opposed to the Scallop Tag Top card that's been around for awhile. Linda has included a video on her post.  

Here's one that is made features the Scalloped Tag Topper Punch on the length of the card or in portrait mode.  I made this one during Sale-a-bration, using the Flower Shop stamp set and the Sweet Sorbet DSP:

Tag Top Closure Card made with the Flower Shop stamp set.
Measurements for this card are:
1.  Card base 8 1/2 x 5 1/2 in basic black
2.  Cut panels for front - Cranberry Crisp measures 2 1/2 x 5 1/4" and DSP panel (Sweet Sorbet) measures 2 1/4 x 5". 
3.  Inside panels measure - Whisper White 3 3/4" x 5" and Cranberry Crisp measures 5 1/4 x 4.  
4.  On 5 1/2" side mark with a pencil 2 3/4" from the top and the bottom.
5.  Pull cardstock through Tag Topper Punch and line up pencil mark with the center of the scallop on the punch and punch.  Repeat on the other side of the card.
6.  Cut off the excess tabs at the top and the bottom of each side by lining up the end of the tag in the channel of the trimmer and then sliding the cutting blade up to the top to remove the little tab and then repeating to remove the bottom tab.  On the right hand side of the card you will need to score the scalloped tag topper and crease.  
7. Once you have removed the tabs on both sides of the card put the card base back in the trimmer with the creased scallop tag topper on the left hand side and line it up with the 4 1/4" line and score.  This will create your front panel.  


Here's My Card:  
   
Here is the front of our beautiful card.  I love the mix of Gumball Green, Island Indigo and Smokey Slate.  You'd think that might be a gloomy colour mix, however it looks so soft and cheerful in this card.   

The inside of the card is stamped in Island Indigo with the Papillon Potpourri stamp set.  Tip:  I like using Clear Mount stamps and acrylic blocks because they offer me more options than wood block when I'm stamping.  For instance, Sheri mounted all four butterflies on Block F (118483) Stampin' Ups! 4 7/8" x 6 inch Acrylic Block, instead of stamping them individually.  This comes in really handy if you're making several of the same card and you want them all to look the same. It allows you to set up the layout exactly as you want it.  Mounting more than one stamp on the block also works well when you're working with multiple two-step stamp images, such as the ones in the Too Kind stamp set.    

In this view you can see the full inside of the card.  There's plenty of room for writing a note or adding an additional sentiment stamp. 

SUPPLIES:
Designer Series Paper (DSP):  Watercolour Wonder DSP Occasions Cattie*
Card stock:  Whisper White, Smokey Slate, and Island Indigo
Ink:  Island Indigo
Stamp Sets: Papillon Potpourri and Chalk Talk
Accessories:  Tag Topper Punch, Chalk Talk Framelit Dies, Beautiful Wings Embosslits, Smokey Slate Taffeta Ribbon, Dimensionals, Basic Pearls, adhesive.
Papillon Potpourri is a 7-piece two-step stamping set featured on page 90 of the IB&C.  It comes in wood mount #132058 $22.95 or clear mount #123759 $17.95.  This set coordinates with the Elegant Butterfly and Bitty Butterfly punches sold on pg. 183. 
Chalk Talk is available in English, Spanish, French and Germany languages.  It coordinates with the 1 3/8" Circle, Extra Large Oval punches on pg 182 of the IB& C and with the Chalk Talk Framelits seen below. 

Chalk Talk Framelits and the Chalk Talk Stamp set can still be purchased as a bundle until the end of May 2014.  By purchasing as a bundle you automatically save 15% of the regular price.  The wood mount bundle #132731 is $53.50 and the clear mount bundle #132730 is $45.75.


* The Occasions Catalogue will be finished it's sales period on May 31st so if you need any of the products used to make this card (with the exception of the Scalloped Tag Topper Punch) you'll have to order by then or they'll no longer be available.  

HOW I MADE IT: 

1.  To make card base cut a piece of Smokey Slate card stock to measure 4 1/4 x 10 3/4".  
2.  Score this piece at 2 3/4" and 8".  Crease score lines.
3.  On 4 1/4" side measure to 2 1/8" and put a mark in pencil.  This will be your punch guide.  Repeat on both sides of the card.
4.  Insert the 4 1/4" side of the card into the Tag Topper Punch and pull all the way to the top of the punch.  Center the middle of the Tag Topper over the pencil mark and punch.  
5.  Insert in paper trimmer and cut away from top edge to the tag and repeat on the bottom half cutting away from the side of the tag to the end of the card.  Repeat on other side of the card. 
6.  To finish inside of the card cut a piece of Island Indigo card stock to measure 4 1/8" x 5 1/8" Adhere to card base.  
7. Cut a piece of Whisper White card stock to measure 4 x 5.  Stamp with butterflies in Island Indigo and adhere to Island Indigo card stock.
8.  To finish outside panels of the card cut two side panels from Island Indigo to measure 1 3/4" x 4" adhere to the card front.
9.  Measure two pieces of DSP to measure 1 1/2" x 3 3/4" and adhere them to Island Indigo panels.  
10. Using Beautiful Wings Embosslits run a scrap of Island Indigo through the Big Shot and attach to either side of the front panels.  I attached the largest butterfly die cut with dimensionals and added four basic pearls down its spine.  
11.  Stamp the "happy Big day" image from Chalk Talk in Island Indigo on a scrap of Whisper White card stock and cut it out with the corresponding die from the Chalk Talk framelits set.  Adhere to the right panel with dimensionals. 
12.  Cut a 10" piece of 3/8" Smokey Slate Taffeta ribbon and fit an end through each of the tabs on the Tag Top punch pieces and tie a box.  
13.  Now stand back and admire your card, it's all done and it was easy peasy! 

I hope you enjoyed this card and find the instructions easy to follow.  Please leave me your comments if you like making these type of cards.  I think this is a design I'll be using often as it gives such a WOW look.  

Thanks for dropping by I sure appreciate it. 

Saturday, November 2, 2013

Fall Thank You and Birthday Cards from One Sheet Wonder

A few weeks ago I participated in a colour challenge with Pals Paper Challenge #175 using ink and paper in So Saffron, Cajun Craze and Always Artichoke to create this fun fall thank you card. 


I designed a One Sheet Wonder backdrop using these colours and some of my favourite stamp sets to create this card and 7 others.  Because I've been on the move, I haven't had an opportunity to share the other seven cards until now.  I hope you like these.

This is the One Sheet Wonder (OSW) backdrop I created using the stamps, inks and embossing powders listed in the supply list below.  When you don't have DSP for your projects this is one of the easiest ways to add some zip and creativity to your pages. I was able to make eight cards using the One Sheet Wonder Template I had, although I could easily have make more by switching up how I cut or tore the individual card fronts.  One Sheet Wonders are such a great way to let your imagination go wild and see what you can come up with! 
 
Here are my Fall Birthday and Thank You Cards: 
Here are the eight cards I made. Each card features elements of the One Sheet Wonder paper and leaves from the Wonderfall Stamp set.  Check out the details below.

Card No. 1:  This is the card I created using the Pinwheel design for the center medallion. I entered this card in the Pals Paper Colour Challenge #175 see link above for all the details and to see the Design Team and other entrants wonderful cards using the colour combination of So Saffron, Cajun Craze and Always Artichoke.... classic fall colours! 
Card No. 2:   This fall birthday card features the Top Note Die and the Chalk Talk Framelits to show off the sentiment. I embossed the card front with the Perfect Polka Dots Embossing Folder before layering with my OSW paper.  I stamped the "it's your day celebrate" image from the Tag It* stamp set with Early Espresso Ink on a piece of So Saffron card stock and then used a coordinating framelit from the Chalk Talk framelits** to cut out the tag.  I sponged the edges of the tag with Always Artichoke.  To dress up the balloons I punched out three small circles out of champagne glimmer paper using the eye circles from the Owl Builder punch.  I mounted the circles over the balloon shapes with dimensionals.  I used the Top Note Die to cut out a piece of Always Artichoke card stock and then cut the top note piece in half - point to point.  I sponged the outside rim of the Top Note piece with Always Artichoke ink and then mounted the sentiment tag onto it with dimensionals.  
Card No. 3:  It's too bad this image is so faded, because it's really a stunning card when you see it under normal lighting.  Anyway  for this Fall Birthday card I stamped a random grid pattern in Cajun Craze ink on the card front base using the Off the Grid background stamp. I then layered two torn pieces of OSW card fronts that had their edges sponged with Cajun Craze ink to the top and bottom of the card front.  I stamped the "Something Special for a Very Special Someone in Always Artichoke ink on a piece of So Saffron card stock.  Because I wanted to emphasize the word "something" I cleaned and then re-inked this stamp with Cajun Craze ink and stamped again on So Saffron Card Stock and fussy cut out the "something banner" and mounted it with dimensionals over top of the Always Artichoke tag.  I used Dazzling Details around the end of the banner to give it some sparkle.  The large tag was mounted with dimensionals on the card face.   
For the leaf detail on this card I used Early Espresso, Always Artichoke and Cajun Craze markers to colour the plaid stamped leaf.  The acorn was coloured with Early Espresso and Cajun Craze markers and the third leaf was cut from Champagne Glimmer paper.  All three leaves were cut out with the Autumn Accents  bigz die.  Tip:  Cut out your leaves first and then stamp on them by laying the stamp on it's back, applying the ink with the markers or an ink pad and then carefully place the leaf image over top of the stamp making sure it fits the image.  Then place a scrap of card stock over top and gently rub to transfer the stamp image to the leaf.  I clustered the leaves together and mounted them with glue dots and dimensionals to the card front and tag.  A small bow tied with Linen threat was added to the acorn. I applied Dazzling Diamonds sparingly to the plaid leaf and to the design on the corners of the large tag to add some extra dazzle.  In the picture above you can see parts of the grid that were embossed on the original OSW using Versa mark ink and Gold Embossing Powder.  I love how it shows up on this card front. 


Card No. 4: For this Fall Thank You card I embossed the card front using the Honeycomb Embossing Folder.  A piece of the OSW card front was sponged with Cajun Craze ink and then glued to the card front leaving a 1/8 around the outer edges.  The Thanks So Much sentiment from the Oh Hello stamp set was inked up with Early Espresso ink and stamped on a piece of So Saffron card stock.  I cut this out using one of the tags from the Chalk Talk Framelits.  
I cut a second tag using Champagne Glimmer paper and cut this tag in two and then mounted it to the outside edges of the Thank You tag. Before mounting the tag to the card front I punched three holes below the "so much" wording and added three 3/8" glimmer brads in Early Espresso. The tag was mounted to the card front with dimensionals.


Card No. 5:   This birthday card was so much fun to make.  The first layer of the card is a piece of 4 x 5 1/4" Always Artichoke card stock that was embossed with the Houndstooth embossing folder before being attached to the card front.  The next layer is a piece of Champagne Glimmer paper measuring 3 1/2 x 5".  Tip:  Before adhering the glimmer paper I cut some images from the center of it.  This cuts down on the weight of the layers as well as saves some of that expensive specialty paper from being wasted. When you're doing this just make sure that none of the punched images show beyond the exposed edges of the card stock. This layer was topped with a piece of the OSW that had been sponged with Cajun Craze ink around the edges.  Before adhering this piece I wrapped one side with Linen thread.
Once again I stamped the "celebrate the day" image from the Tag It stamp set in Early Espresso.  I added a couple of glimmer brads on top of the balloons before attaching the tag with dimensionals to the card front. 

For the inside of this card I added a piece of So Saffron card stock measuring 5 1/2" wide by 3 3/4.  A 1/4" strip of Always Artichoke was adhered an 1/8" from the top of this layer and the Happy Birthday sentiment from the You're Amazing stamp set was stamped in Early Espresso.  


Card No. 6:  The Always Artichoke card front was embossed with the Stripes embossing folder.  For the next layer I  embossed a piece of Cajun Craze card stock measuring  3 1/2" x 4" with the Perfect Polka Dots embossing folder and then cut this piece into 4 blocks, each measuring 1 3/4 x 2". These blocks were spaced and adhered to the card front so that a 1/4" border runs around  them. Next I added a band of Champagne Glimmer paper across the center.  This piece measured 1" x 4".  On top of this I attached a piece of the OSW paper that had been torn from the center of one of the OSW card fronts with dimensionals.  Three leaves were die cut using the Autumn Accents die cut in Cajun Craze, Cherry Cobbler and So Saffron card stock.  They were embossed with the Beautiful Baroque embossing folder and then adhered in a cluster with dimensionals.  the edges of the leaves were all sponged with a coordinating ink.  To finish the card off the sentiment "you make me happy" from the Hello Lovely stamp set was stamped in Early Espresso on So Saffron and then hand cut and adhered to the card.  A basic rhinestone covers the "o" in the word "you" and dazzling diamonds were added to the rectangle around the words.  
Card No. 7:  This Happy Thanks Giving card features the triangle from the split OSW card front, this time extending from the top left to bottom right of the card.  I sponged the edges with Always Artichoke and added three Early Espresso Glimmer Brads before attaching this layer to the Always Artichoke card front that had been embossed with the Honeycomb embossing folder. Next I cut out some leaves using the Autumn Accents die cut - two acorns and one plaid shaped leaf in So Saffron and the large Maple leaf from Champagne glimmer paper.  The leaves were coloured with markers as in Card No. 3 and layered to the card front with glue dots and dimensionals. The Happy Thanksgiving sentiment from the Tags 4 You stamp set was stamped in Pumpkin Pie on a piece of Whisper White card stock and then punched out with the Bracket punch and adhered on top of the leaves with dimensionals. 

Card No. 8:  The card front was randomly stamped with the large splatter from the Glorious Grunge stamp set in Cajun Craze ink.  A 2 3/4" x  4" piece of Cajun Craze card stock was glued to the left hand side of the card front leaving an 1/8" margin  on the top, side and bottom.  Next a 2 1/2" x 3 3/4" piece of the OSW card stock was sponged with Cajun Craze around the edges and wrapped with Linen Thread before being adhered to the Cajun Craze layer.  For the sentiment piece I stamped the floral frame from Chalk Talk in Always Artichoke on So Saffron card stock and cut it out with the corresponding Chalk Talk framelit.  I stamped the Happy Big Day image from Chalk Talk in Cajun Craze on So Saffron card stock and cut it out with the matching framelits die and mounted it on the floral frame with dimensionals. Two basic rhinestones were added to the ends of the floral frame.  I cut an additional frame from Champagne Glimmer paper and cut it in half and mounted it on the back of the floral frame extending just beyond the edges.  
Suppy List:

Ink:
So Saffron, Cajun Craze, Always Artichoke, Cherry Cobbler, Versa Mark
Markers:  
Early Espresso, Always Artichoke, Cajun Craze

Stamps: 
  • Wonderfall pg 84  IB&C  131949(w) or 128087(cm)
  • Tag It pg 45 IB&C 130300(w) or 130303(cm)
  • Hello Lovely pg 22 IB&C 130240(w) or 130243(cm)
  • Chalk Talk pg 12 IB&C 130631(w) or 130634(cm)
  • Gorgeous Grunge pg 109 IB&C 130514(w) or 130517(cm)
  • Off the Grid pg 108 IB&C 130736 comes in wood mount only
  • Clockworks pg 109 IB&C 131973(w) or 127292(cm)
  • Tags 4 You pg 37 Holiday Catalogue 131820(w) or 131823(cm)
  • You're Amazing pg 15 IB&C 132103(w) or 126722(cm)
  • Oh Hello pg 34 IB&C 131931(w) or 130733(cm)
Card Stock:
So Saffron, Cajun Craze, Always Artichoke, Natural Composition Specialty, Champagne Glimmer Paper (127885)

Accessories:  
  • Big Shot, Magnetic Platform and Clear Mats 
  • Chalk Talk Framelits (129983) (coordinates with Tag It)
  • Autumn Accents Bigz (127812)
  • Trimmer (126889),Paper Snips (coordinated with Wonderfall)
  • Basic Rhinestones (119246) and 3/8" Glimmer brads (121003)
  • Bracket Punch (Holiday Catalogue (132153), Owl Builder Punch (118074)
  • Top Note Bigz Die Cut (113463)
  • Embossing Folders:  Perfect Polka Dots (117335), Honeycomb (129378),  Stripes (123128), Beautifully Baroque (130917) and Houndstooth (123134)
  • Dimensionals, Linen Thread, Dazzling Details 

Paper Pumpkin Alternatives April 2024 and Sketch Challenges

The past week was so busy that time literally flew by.  I have a number of projects on the go, including working on my April 2024 Paper Pump...