This is my little creative get away spot in a very hectic world. I love to stamp, meet other stampers and share my inspirations. So come and, sit for a while, explore my site and leave a comment when you can.
In mid-August one of my wonderful stamping friends, Debby Evoy, came for a day visit. What fun we had! After catching up on our lives, and looking at lots of card samples, Debby showed me a new card technique she learned from one of her stamping groups. This fancy fold is called a "Faux Step Card".
This card was made using the Wonderful World bundle of dsp and stamps from the recent Sale-A-Bration promotion in July and August. OMG after working with this bundle I regret I didn't get it before the sale ended as the floral images are simply stunning and full of detail.
This weekend my dear brother and wife are celebrating their 30th wedding anniversary. Even though a 30th anniversary is very special all on it's own, it's extra special for them, as my brother has Alzheimer's Disease. I felt their continuing love story deserved a very special and meaningful card.
To achieve this I dissected one of the beautiful envelopes from August's Sweet Sunshine Paper Pumpkin kit for the designer paper panels. Generally I'm not fond of bright colours but when I paired Melon Mambo with Evening of Evergreen for the base and mats I was really pleased. These combined colours really were the perfect choice for highlighting this artistic envelope paper.
I combined a retired stamp set called Embrace Each Moment with a terrific new alphabet/number set called Alphabest for the focal point of the card face.
Alphabest is a 73 piece Photopolyer Stamp Set that includes, letters, numbers and symbols and come with a coordinating punch called Best Label when you purchase the bundle. So worth it.
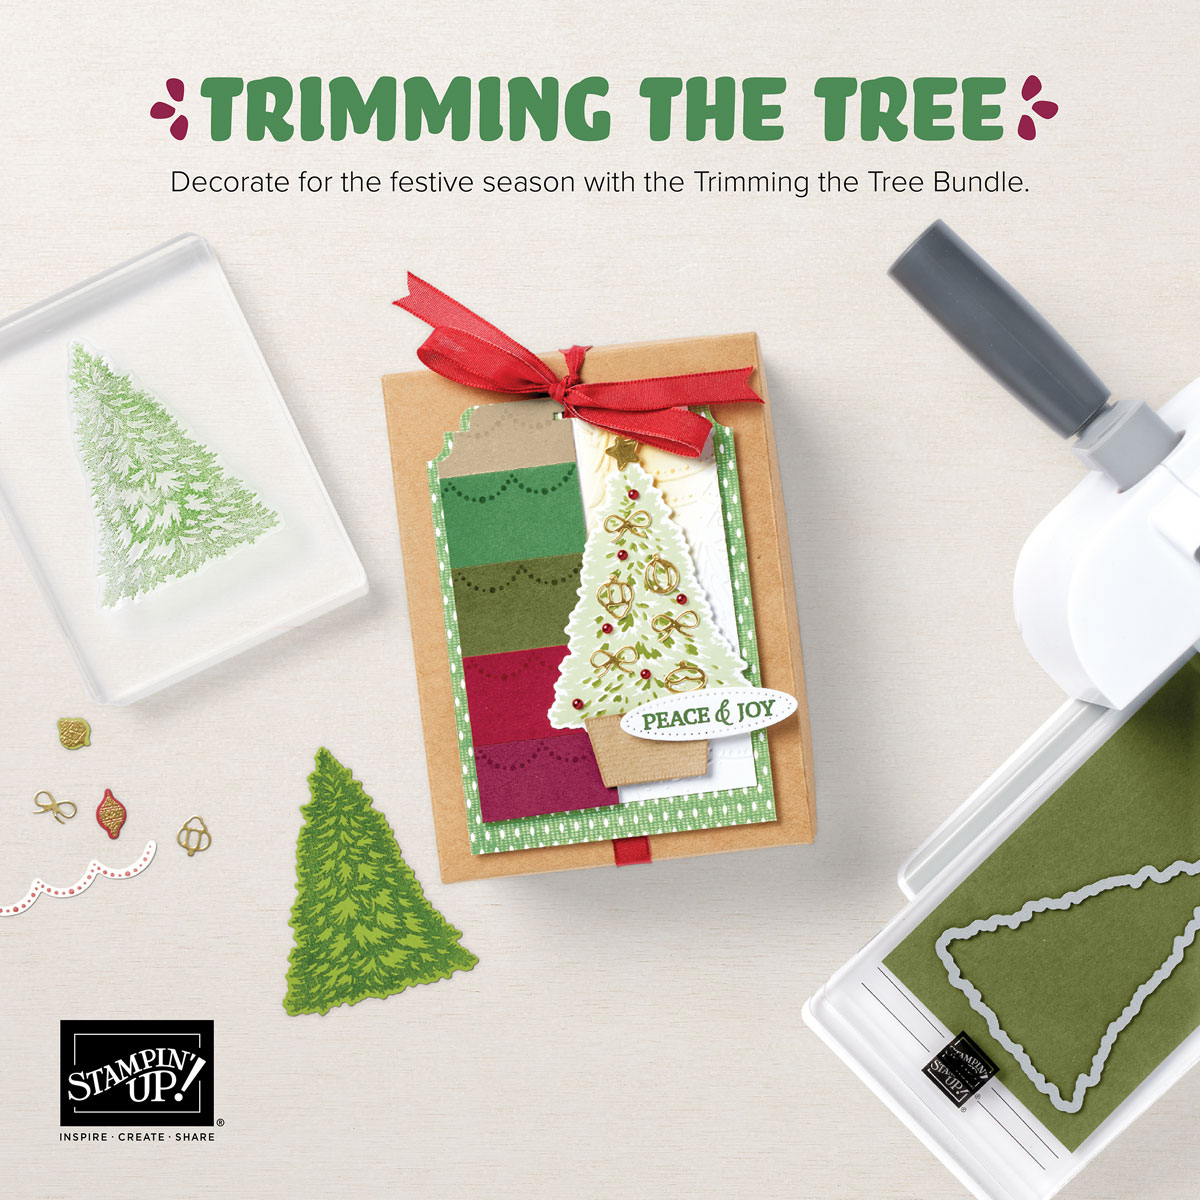
Because I'm currently working on de-stashing my Christmas supplies my third sample features a retired designer paper called Christmas Time is Here and a Cherry Cobbler base. I haven't added sentiments to this card yet, as I'm trying to make up my mind
Measurements:
Card Step Base: 4-1/4″ x 9″ cardstock scored on the 9″ side at 1-1/4″, 2-1/2″, and 5-3/4″. Use bone folder to burnish the folds. Front Mountain, Valley Mountain.
Center Step Panel: 2-1/2″ x 8-1/2″ scored at 5-1/2″, DSP 2-1/4″ x 5-1/4″. This piece is centered and glued flush at the bottom of the front mountain fold step, and to the back panel. Glue is applied to the inside.
DSP on bottom step: 1″ x 4″,
DSP on bigger step: 3″ x 4″,
Inside or Outside Back Panel: Whisper White 3″ x 4″
Note: I used mats on the first and second cards so I adjusted all the mat measurements by an eighth of an inch larger than DSP.
I hope you enjoyed these cards and thank you for visiting my site. I'd love to hear your comments and whether you've made the Faux Step Card.
For me the Faux Step Cardis a much simpler and faster way of creating a "Two Step or Center Step" card which involves some cutting and measuring. Before you leave, check out this Nautical Card I created several years ago, and one of my all time favourite card samples.
Stampin' Up! is offering a new promotion during the month of September and it's all about pairs. It's called Perfect Partners.
They've created six great new dies to coordinate with stamp sets in the 2022–2023 Annual Catalog and the July–December 2022 Mini Catalog. These coordinating dies will only be available during this promotion and/or while supplies last and will not be offered in any catalog or other promotion.
If you're interested in these dies but have already purchased the stamp set(s) no worries, the dies are available separately too. If you're buying as a bundle, you'll save 10% off the retail price so now's the time to put these wonderful stamp sets and dies together for more papercrafting fun! Order now!
I don't know how we got here so quickly this year, the last time I looked we were sweltering in summer sun and enjoying beach time. Now we're looking forward to fall and hopefully an extended sunny weather period (without the extreme heat).
I have a new Hostess Code to share with you for this month, it is TKSQCAYV.
Any online orders placed in my shop valued between $50 and $199 before S&H and sales tax will qualify for a FREE appreciation gift. Simply add my Hostess Code before leaving the shopping cart area on your order form and you'll automatically be added to my free gift list. Gifts are mailed or delivered within two weeks of closing.
If your order is over $200 no worries you will automatically earn "Stampin' Rewards" based on your total order that can be redeemed for free product.
Order from me during the month of September using my HOSTESS CODE and you'll receive this beautiful Red and White Glimmer Paper as my gift.
Click on this link and my September Hostess Code will automatically appear on your shopping cart. Can't get any simpler than that!
If you're into Halloween crafting you or want to have a fun kit to make with your kids or grandkids, you might be interested in the Spooky Treats Paper Pumpkin Kit.This month’s kit is extra special because you get enough supplies to make 18 absolutely adorable (and just the right amount of spooky) treat boxes—that’s 6 each of 3 unique designs! You can even mix and match the pieces to create your own spook-tacular designs.
The kit includes the following:
Printed box bases and tops,
die-cut paper pieces,
adhesives and
an Orchid Oasis Classic Stampin’ Spot!
This kit’s stamp set puts the TREAT in trick-or-treat with fun, Halloween-themed sentiments and designs. Embrace the spooky season with ghost, bat, spider, and star images.
This kit also includes a special peek-through box top on one of the box designs.
Finished box size: 2-1/2" x 3" x 1" (6.4 x 7.6 x 2.5 cm)
No need to let the season creep up on you; subscribe and order your kit today. It's easy, just click here for my direct demonstrator link and check out all the subscription/purchase options.
This kit is available to order from August 11th to September 10th, 2022.
WIN SOME AWESOME JBL SPEAKERS
Plus, Stampin' Up! is putting the TREAT in trick-or-treat with a special GIVEAWAY on social media starting 5 September at 9:00am (MT)!
Simply follow @PaperPumpkin on Instagram or the Paper Pumpkin page on Facebook, like either post, and mention three friends in the comments for your chance to win one of two personalized JBL speakers. What better way to listen to your Paper Pumpkin Halloween Playlist!
You’ll have to be quick because the giveaway closes 8 September at 4:00pm (MT). Don’t miss out on this fang-tastic opportunity!
PSSSSST........HOLIDAY CRAFTING BROUGHT TO YOU
Halloween Not Your Thing no worries. While the September Paper Pumpkin kit is all about Halloween, make sure your subscription is up to date because the October and November kits keep the holiday season theme going with Christmas cards and gift tags!
A little elf told me that these upcoming kits have even more exclusive, coordinating products to make holiday crafting a breeze! And, because the holiday kits are the most popular, they'll sell out quickly once they're released.
I'm a Paper Pumpkin Subscriber and I have to say I'm thoroughly impressed with the beautiful AUGUST Paper Pumpkin, called Sweet Sunflowers.
This Sweet Sunflowers kit included enough materials to create 9 cards, but I know I'll make far more than that. To start with it has 3 each of 3 card base designs and nine beautiful coordinating envelopes. The Sweet Sunflower photopolymer stamp set has sentiments that will express words of gratitude, friendship and greetings and beautiful wildflower designed images. Also included in the kit are some Vellum honeycomb shape pre-cut pieces and two Classic Stampin’ Spots in Crushed Curry and Soft Suede. I love collecting the Classic Spots as they are great for stamping on the Stamperatus. A free set of 8 Gold Foil Honeycomb Sheets came with this month's kit and I know I'm going to have fun dressing up my cards with these glossy accents.
Paper Pumpkin kits always co-ordinate with Stampin' Up!s vast array of coloured products, and this month's kit is no exception. Here are the colours that will work perfectly with the materials in this kit:Blackberry Bliss, Crushed Curry, Evening Evergreen, Melon Mambo, Mossy Meadow, Night of Navy, Pumpkin Pie, Soft Suede and Cherry Cobbler.
The five cards I've made are my own alternate ideas and I've included the supplies that I used to make them. I hope you'll enjoy them.
Card Number 1:
For this card I started with a Whisper White Base measuring 8 1/2" x 5 1/2" and scored at 4 1/4". Blackberry Bliss mat measures 5 1/4 x 4" and before I adhered it I cut out a large stitched square piece from the center. The dsp panel measures 3 3/4" x 5" and is cut from one of the kits card bases.
The sentiment is stamped in Blackberry Bliss ink on a smaller stitched square and then layered on the Black Berry bliss square. A few rhinestones were added along with a leaf image from the stamp set.
Card Number 2:
Essentially this card has the same dimensions and mat sizes as Card Number 1, however the card base is Blackberry Bliss followed by a Mossy Meadow layer. The dsp layer is simply beautiful in design.
I stamped the sentiment " Wishing You So Much happiness" on Whisper White card stock and then fussy cut all the words. I love how that turned out. The flower is one of the vellum accent pieces in the kit and I added three rhinestones for some glimmer.
In the kit you get several bumble bee images that can be mounted on mini dimensionals. I added two that were flying in the same direction. So sweet.
Card Number 3:
For this card I started with one of the green card bases from the kit and added this beautiful panel, which I mounted on a blackberry bliss frame. The ornate label was die cut from the center of the Blackberry Bliss panel along with the stitched circle used for the label in Card 2. No waste when you die cut elements from your mats. No one is going to see them once they are covered anyway.
Card Number 4:
The dsp in card number four is actually one of the decorative envelopes cut up and used as the layered mats. I used the scalloped rectangle die from the Scalloped Contour Die set to cut from the center of this 3 3/4 x 5" mat. I attached the scalloped mat with dimensionals over the space left when it was cut out.
The card base was cut from Mossy Meadow cardstock and the first mat layer is Calypso Coral. Loved the contrast it added. For the sentiment I once again fussy cut the words, but left the phrase "wishing you so much" in tact and mounted it on one of the small blackberry bliss element strips from the kit. I also added another velum flower and a small piece of the velum honeycomb to the sentiment piece. Love it!
Card Number 5:
This card is made with another of the beautiful honeycomb panels which I mounted on a piece of Mossy Meadow card stock. I cut the card base from Crushed Curry and loved the contrast that provided. The two flowers are from a recently retired stamp set called Friendly Hello and worked perfectly for adding some more dimension to the card.
Well that's it for today's post. I have lots more ideas for using up the products in this kit and I hope you've enjoyed what I've shown you so far. If you don't want to be bothered with having a lot of stamping tools and products kicking around purchasing kits like Paper Pumpkin is really a very simple way of being creative without a lot of material and costs.
Unfortunately Paper Pumpkin kits are always for sale until the 10th of the month, so if you missed out on this kit, you're really out of luck. My fingers are crossed that they'll offer a "refill" kit, and if so I plan to offer a class. You won't want to miss that.
If you'd like more information about subscribing to Paper Pumpkin on a monthly or annual basis, please call and I'd be happy to share that with you. Also I'm planning a Monthly Paper Pumpkin get together starting in September so if you're interested in that call me for the details.
All Paper Pumpkin subscriptions must be completed the 10th of the month to ensure you get the kit for the next month. Click here to set up a Paper Pumpkin subscription:
When I saw the cover photo on Stampin' Up!s new Annual Catalogue I instantly fell in love with the featured card. The cover card apart from the leaf stamps and sentiment is totally made up by combining designer series paper (DSP) and flower images cut from the Hues of Happiness designer series paper.
This DSP is simply beautiful and I can tell you it sure makes me smile every time I look at it. The paper is part of the Hues of Happiness Suite (158828).
This paper features illustrated and painted flowers on one side and a selection of coordinating all-purpose patterns on the other side. The concept artist(s) who designed Hues of Happiness chose the colours so they'd represent the Stampin' Up! colour spectrum. What wonderful art work. The repeating patterns can be used as focal images, accent pieces or elegant backgrounds and are terrific for card bases and scrapbook pages.
The Hues of Happiness DSP coordinates perfectly with the following Stampin' Up! colours:
Coastal Cabana
Daffodil Delight
Flirty Flamingo
Fresh Freesia
Gorgeous Grape
Granny Apple Green
Mango Melody
Melon Mambo
Mossy Meadow
Night of Navy and
Pool Party.
Here are Some Card Ideas I came up with:
I haven't purchased the Happiness Abounds Bundle (158824) which includes the Happiness Abounds stamp set and the Blossoming Happiness dies yet as I just wanted to get my hands on the DSP. In particular these two sheets:
While I was watching tv I fussy cut all the roses, leaf images and the small flowers that were in the background. Literally there was hardly anything in the scrap pile as everything was cuttable and useable.
While I was at it I pre-cut card bases and mats from the coordinating card stock colours and before adhering these mats I die cut stitched circles, squares and rectangles to use on the fronts of my cards from their centers.
I also used a variety of embossing folders to add designs to my 3 3/4" x 5" Whisper White mats, and left enough space for a larger type sentiment.
Card Bases: 8 1/2" x 5 1/2" scored at 4 1/4"
Mats: 1st mat for card front - 4" x 5 1/4" (1) and cut 1 for the inside
Whisper White layer 3 3/4" x 5" for front and one for the inside.
The card base for this card is Starry Sky, followed by a layer of silver foil card stock. The embossing was done on the top part of the whisper white mat with the retired Meadow Moments Embossing Folder. I stamped the "thanks" sentiment which is from the Artistically Inked stamp set in Starry Sky ink. The flowers were adhered directly to the white mat with adhesive except for the Fresh Freesia flower which was attached with dimensionals.
Here is another version of the thank you card. On this one I've used a Fresh Freesia mat for contrast and used a 3" Starry Skye stitched circle as a base for the floral arrangement. The embossing folder is called Greenery (Retired). embossing folder to
For this thank you card I didn't do any embossing in the background, choosing to leave it plain, but I changed up the mat and flower colours and added a double stitched circle mat in Fresh Freesia and Whisper White. The sentiment is from Plentiful Plants (155693). Basic Pearls add a touch of nostalgia to this card.
My final card is a fun fold flap card. I totally loved this as I was able to use a mixture of designs.
And because I love this Flap Card so much, I made another one featuring some bolder papers from the Hues of Happiness DSP. Let me know which is your favourite.
Well that's it for this post. I look forward to sharing some more cards made with this beautiful designer series paper. Next time around I'll share some Birthday and Thinking of You cards. Hope you enjoyed them, I'd love to hear which are your favourites.