Thursday, July 21, 2016

Wacky Watercooler Blog Hop - 3rd Anniversary Celebration

Hi and thanks for stopping by.  Hope you've been having a great time following the 3rd Anniversary Celebration of the Wacky Watercooler Blog Hop.  Yippee, let's party!!!!  

You know the saying the "Gangs All Here", well that certainly applies to this blog hop because we're fortunate to have all of the original design artists here to help us celebrate this very special occasion.  If you're interested in going back in time and seeing the original blog post from July 2013 here is the link: 

If you started at the beginning then you've probably arrived here from the incredibly talented Marie Green's blog.  Wasn't it fun? This is a circular blog so no matter where you started, if you continue going to the next blog, you'll wind up where you started from.  

For this special hop, the design artists were asked to feature an anniversary card, a project using one of the original stamp sets that has survived since 2013 and to CASE one of the original designer's projects.  What fun!  Let the games begin...............

Project One: An Anniversary Card
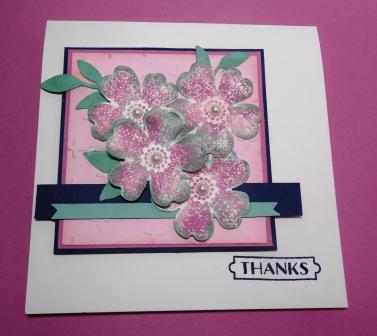
Since this is an Anniversary Celebration for the blog hop itself, I thought it would be fun to actually make a celebration card for the original "Wacky Watercooler Wednesday" crew.   It took some thinking about what needed to be in this card, but here's what I came up with:


This is a rectangle box style pop up card, that's super easy to assemble............what's hard is deciding how to dress it up with all the right stuff.   Where to start?   I made all my decisions based on the DSP I had on hand and that happened to be the new By the Shore. I've totally fallen in love with this DSP.  It is so much more versatile than one would think, simply by the name.  Don't be afraid to use it for other projects that aren't "beachy".  
Isn't this box card colourful and fun?  I had a wonderful time deciding what elements I would include.  You can see I've made some labels using  my computer and printed off a couple of the watercoolers.  I've also added lots of balloons and stars. 
From this view you can see the DSP I used on the bottom of the card as well as the banner for this anniversary celebration.
 

Supplies:
 Stamps: Number of Years, Celebrate Today 
Ink: Dapper Denim, Mint Macaroon, Calypso Coral 
Card Stock: Very Vanilla, Dapper Denim, Mint Macaroon, Calypso Coral 
Accessories: Big Shot, Trimmer, Balloon Bouquet punch, Medium Star Punch, Small Star from Itty Bitty Punch Pack (R), Basic Rhinestones, Balloon Framelits, Large Number Framelits, Dimensionals, Tom Bow Glue, Sponge Daubers, Computer

Project Two: Featured Stamp Set
For this project I chose to use two stamps from the original blog hop that have survived all the retirement cuts and are still current today.  The stamp sets are Wetlands and Gorgeous Grunge. You simply can't go wrong with these two sets.   Here is my card:  

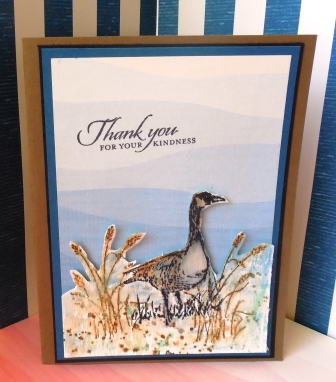
Once again I've used the By the Shore Paper this time as the background for my beautiful  Canada Goose.  The goose and reeds from Wetlands were stamped on Watercolour paper and I used my aqua painter to blend the colours.  I fussy cut around the image and adhered it to the DSP with dimensionals to give it some depth.


This is a not very clear view of the inside of the card.  The card base was cut from Soft Suede. 

Supplies:
Stamp Sets:  Wetlands, Gorgeous Grunge
Ink:  Momento Tuxedo Black, Soft Suede, Sahara Sand, Emerald Envy and Dapper Denim
Card Stock:  Watercolour Paper, Soft Suede, Dapper Denim, Basic Black, Very Vanilla
Designer Series Paper:  By the Shore
Accessories:  Trimmer, Acetate Blocks, Dimensionals, Tom Bow Adhesive, Scissor, Aqua Blender

Project Three: Case Project From Original Blog
While I loved all the projects from the design team in the Original Blog Post, one really stood out for me.  The project was designed by Jean Fitch and featured a box and belly band made origami style from a single sheet of designer series paper.  Jean CASED her box from Tanya B an Australian Demo, who created a youtube video showing how to make this origami box. 

Here is Jean's original version followed by my CASE.    

Here's my updated version 
Instead of making a birthday card I've made Christmas boxes, using the absolutely awesome Christmas Designer Specialty paper.   This is lightweight paper, so is ideal for all the folds required to make this box.  You get 24 sheets - 4 each of six double sided designs.  Love it! 


I loved making the belly bands for these boxes.  What fun!  Next week I'll do a post showing what supplies and some how too's on these fun bands.

Supplies: 
Stamp Sets:  Time of Year, Wonderous Wreath
Card Stock:  Garden Green, Cherry Cobbler and Very Vanilla 
Designer Series Paper:  Christmas Specialty Designer Series Paper #141628,
Gold Glimmer Paper  
Ink:  Garden Green, Cherry Cobbler
Accessories:  Trimmer, Simply Scored Board, Bone Folder, Big Shot, Mini Treat Bag Thinlets, Layering Squares Framelits, Perfect Pines Framelits


Well that's it for my projects today. I hope you enjoyed them. I'll be back in a day or so with some more information on how to assemble project 3.  Hope you'll return to see the instructions.  

If you're moving on to the next hopper you'll be going to the wonderful Marsha Reed's Coffee Pot Stamping Cafe  where I know she's going to simply wow you!  

Marsha Reed

 
Marie Green's My Tanglewood Cottage


Go To The Beginning of the Hop
 

Wednesday, July 20, 2016

WWC77 Marsha's Colour Challenge

July is half over and it doesn't even feel like summer has arrived yet.  We're having mostly rainy cloudy days, and lots of thunder and lightening drama.  Who'd think the time would be flying by so quickly?  And yet, another week's gone by and it's time for the Watercooler Wednesday challenge.  

Marsha is our host and she's presented us with a color challenge featuring four very cool colours and a neutral.  Are you up for the challenge?  If so get at 'er as I'd love to see you join in the fun! 

Here's My Card:  

I used the sketch from Create With Connie and Mary's Sketch Challenge CCMC415, and, I'm really pleased with how this card came together. 

Supplies Used:
Stamp Sets:  Flower Shop, Banners For You, Occasional Quotes (R)
Ink:  Night of Navy, Sweet Sugarplum, Mint Macaroon, Pink Pirouette 
Card Stock:  Night of Navy, Sweet Sugarplum, Mint Macaroon, Pink Pirouette and Very Vanilla
Accessories:  Baby Wipes, Big Shot, Acryllic Blocks, Trimmer, Basic Pearls, Dimensionals, Tom Bow Ink, Sparkle Embossing Folder (New), Wink of Stella, Sponge Dauber, Pansy Punch
The inside of the card shows the verse from a retired Stampin' Up! Stamp set called Occasional Quotes.  The flowers were cut out and pasted onto the card base. 
I used the Baby Wipe Technique building an ink pad with four baby wipes folded in half.  I used Mint Macaroon, Sweet Sugarplum and Pink Pirouette re-inkers to add colour to the baby wipes.  The back ground behind the flowers was embossed with the Sparkle Embossing Folder.  Although it's difficult to see in this picture, I used Wink of Stella around the edges of the flowers for a little sparkle.


Details:
  • Very Vanilla card base measures 5" x 10" and is scored at 5"
  • Night of Navy layer measures 3 1/2" x 3 1/2"
  • Sweet Sugarplum layer measures 3 3/8 x 3 3/8" 
  • Pink Pirouette layer measures 3 1/4 x 3 1/4 and is embossed with the new Sparkle Embossing Folder.  The edges are sponged with Pink Pirouette ink. 
  • I used a 1/2" strip of Night of Navy and a 1/4" strip of Mint Macaroon for the accents.
  • The flowers were stamped using the Baby Wipe Technique and the inks are Mint Macaroon, Sweet Sugarplum and Pink Pirouette.  The edges are sponged in Mint Macaroon.  The top flower is raised with dimensionals while the others were added with Tom Bow adhesive. 
  • The sentiment stamped in Night of Navy is from the new Banners stamp set ............love it! 
Banners For You is a 32 piece Photopolymer Stamp Set and coordinates with the Bunch of Banners Framelits.  Save 10% when you buy as a bundle

So are you going to join in the fun?  I hope so.  Details are at the Watercooler Wednesday site, and if you haven't already done so, make sure you visit the Design Team's blogs to see for more inspiration.

Happy Stamping!
Penny Tokens Stampin Spot

Sunday, July 17, 2016

Yeah! I Won a Sara D Signature Purse

Oh my goodness, what a great morning this has been.  I woke up to sunshine and soft breezes which instantly put a smile on my face.  The house is clean and business is taken care of so that means the possibility of getting some stamping time in today, which also makes me smile.  

But what really made my day shine was opening my email to discover I'd won a contest for the coveted Sara D Signature Purse, created by the super talented paper crafter, Liz Holloway!  Can you say happy dance?  


Just look at this beauty.  It's constructed from Designer Series paper and card stock.  That giant bold flower is also hand crafted.  This sleek little beauty will hold a lot of cards and up to 4 stamp sets.  Who would know?  It will certainly take a place of honour in my craft room.   


Why is it called a "SARA D" Signature purse you might ask, and why am I so excited to get one? During the April Stampin' Up! On Stage Event in Salt Lake City. Sara Douglas was presented with one of Liz's purses, named especially in honour of Sara, for her demonstrated leadership role as the new CEO of Stampin' Up!  Wow that's pretty special.  How exciting for Liz and Sara!  

You can check out the purse Sara received as well as other designs at the Creative Circle Design Team (CCDT) monthly blog hop by clicking here.

Check out Liz's Holloway Design blog aka Stampersplus, to see some of her awesome designs.  She still has kits available for this purse too, so if you love it and want it get in touch with her.   

Thanks again Liz for making my day!

Happy Stamping!
Penny Token's Stampin' Spot 

Wednesday, July 13, 2016

WWC76 - Penny's CAS Challenge - Butterflies

This is my first time hosting a challenge at the Watercooler and I hope you're going to like it.  I've chosen a Clean and Simple Challenge (CAS) but I've added a theme, one I think everyone will have fun with.  The theme is to include Butterflies. 
Rules for our Clean & Simple Challenges (by group consensus)
So, what is a CAS and what is acceptable for this challenge? Sometimes it's very hard to determine how far you can go with a Clean and Simple design.   So it's clear for everyone,our design team artists recently held a discussion and came up with these guidelines:

  • Either a single layer card base upon which we stamp or a card base with a single layer of card stock upon which we stamp, nothing more. 
  • Since we use embellishments for any other type of card, no embellishments, die-cuts or anything else is allowed except the simplicity of stamping for the "clean & simple" look.
  • Apart from stamping, we will allow heat embossing since, if one decides to use a colour, heat embossing would show better than simple stamping. 
  • No dry (EF) embossing on card base or layer. 
  • Following these rules will keep it clean, simple and challenging.


Here is my CAS Butterfly Card: 


Supplies:
Stamp Sets:  Papillion Potpourri and You've Got This
Ink:              Elegant Eggplant
Card Stock:   Elegant Eggplant for base and Whisper White 
Accessories:  Trimmer, Tom Bow Adhesive

This is a really plain and simple type of card for me, but sometimes that's all you need.  Sometimes, you don't have time to do all the fancy stuff and it's nice to step back from all the layers and embellishments and just let the sentiment say it all.  I think this quote is perfect:


For this card I chose Elegant Eggplant for my ink and card base because I love the rich bold colour paired with Whisper White. I think it sets the tone for this friendship card.  

Although I chose Elegant Eggplant for my card any combination of ink and matching card stock along with Whisper White will work with this design.  To demonstrate this I made five additional cards using the new Incolours and my brand new mini Misti precision stamping tool.  In no time at all I was able to make all of these cards.
I
Everyone I know loves butterflies.  I think this would make a nice gift set for someone.  If I were doing these as a gift set along with making a matching box, I would use a variety of sentiments and make 2 of each card colour.

Peek A Boo Peach

Flirty Flamingo

Emerald Envy
Sweet Sugarplum
Dapper Denim


Stepped Up Version of this Card:

For those of you who aren't fussy about "Clean and Simple" cards I decided to make some additional "stepped up" versions so you can see how little it takes to go from my original "plain jane" card to a new level.

1.  For my first stepped up card I took the basic card and simply drew a free hand border around the outer edge of the Whisper White layer using an Elegant Eggplant fine tip marker to coordinate with the ink and card base.

2. I added some clusters of  Basic Rhinestones to this second card to give it more pizzazz.  

3. For my third card I kept all the original design elements but began by stamping a block image from the Work of Art stamp set in Perfect Plum and Rich Razzleberry inks before I stamped the butterflies and sentiment. On this card I wanted to make the butterflies and sentiment stand out more because of the background stamping and so I stamped the images with Versa Mark and Elegant Eggplant inks, and then heat set them with Clear Embossing Powder. A strip of Rich Razzleberry Taffeta ribbon was the final enhancement.

4.  For my final stepped up card I simply changed the card stock base to Whisper White and then added layers of Elegant Eggplant and Whisper White card stocks.  Although you can't see it I also used Wink of Stella on the butterflies for a little glimmer and pizzazz.
I hope you've liked these samples, and would welcome your comments.  I'd love to know whether you like making CAS cards and which is your favourite sample.  

I also hope you'll join the Watercooler Design team this week with this fun challenge.  We're looking forward to seeing some awesome butterfly CAS cards!  Until then, thanks for stopping by and.....

Happy Stamping!
Penny Token's Stampin Spot

July Hostess Code:  2B9CCGQR
(for on-line orders under $200.00)

Tuesday, July 12, 2016

Sneak Peak - August Thoughtful Branches Promotion

I know August is a few weeks away, but you may be interested in this special promotion that will run from August 2nd to 31st or while supplies last.  I wanted to give you a head's up as this is a one-time only offer

Because I'm a demonstrator I got to order this bundle in a special "demo only pre-order, so mine's on the way, and I can't wait to get my hands on it.  I'm in love with the sentiments as well as all the different tree shapes. I just know this beautiful, all season Photopolymer stamp set and matching framelits dies are going to be a lot of fun to stamp with.  Here's a copy of the flyer: 


The Artisan's team have already been playing with this set and are having a blog hop so if you follow this link you can check out some of the fabulous designs they've come up with.  You're going to love the versatility!  
Happy Stamping!
Penny Tokens Stampin Spot
July Hostess Code: 2B9CCGQR
(for on-line orders under $200.00)

Wednesday, July 6, 2016

3 Things You Need to Know About Stampin' Up Bonus Dollars

1.  For every $60.00 CDN you spend on Stampin' Up! products between July 7th and July 31st, you'll earn a $6 Bonus Day Coupon.

2.  Bonus Day Coupon codes can only be delivered via email, so an email address is required to participate in this promotion.  You'll want to put your Bonus Dollars coupon codes in a safe place or write down the codes, because if they are lost the codes cannot be replaced.

3.  Bonus Day Coupons can be redeemed between August 2nd to August 31st, and can be redeemed against any product of with the exception Stampin' Starter Kits or Paper Pumpkin new subscriptions. 

Contact me today if you want more information.

Happy Stamping!
Penny Tokens Stampin' Spot
July Hosess Code:  2B9CCGQR

2024-2025 Annual Stampin' Up! Catalogue has launched!

 HAPPY MAY 1ST| Today I'm celebrating and  sharing the launch of the much awaited Stampin' Up! Annual Catalogue which will run from ...