Monday, December 16, 2013

Christmas Hostess Gifts - Day One - Tea Light Candle Holder Box

Tea Light Candle Holder Box

Everyone loves tea lights right?  Well all of my friends and family do, so in my world that's "everyone". You can buy a whack of them at the local dollar store or on-line, but what do you put them in when you want to give them as an individual hostess gift. 
Metal Cup Tealights can be bought in bulk.  They're perfect for use in decorative lanterns, hanging lanterns, and more. Bulk wholesale packages generally contain 100 tealights. 
Today I'm going to show you how to assemble a cute little box that's quick and easy to make, versatile and will work for any season or occasion.   This gift box will hold four wax tea light candles, and makes a perfect hostess gift.

I've seen variations of these tea light boxes on various blog sites over the years, but have never made them myself.  After searching the internet for instructions I CASed the tea light box made by Sara Lincoln.  I'm also providing a link to the version that inspired Sara on Sam Donald's blog called Pootles Paper Craft

Here's My Version:  


Assembly:

1.  Cut Pistachio Pudding card stock to 7 3/4" x 5 1/4". Tip: Cut card stock at 5 1/4" on 11" side of paper and you will get two boxes from each sheet. 

2.  Score on 7 3/4" side at 3/4" then turn card stock 90 degrees and score again at 3/4".


.

3.  Score on 5 1/4" side of card stock at 3/4, 2 1/4, 3 and 4 1/2"

4.  Crease all the  score lines with your bone folder.

5.  Using paper snips cut on the score lines on wide side to the 3/4" score line. 

6.  Trim the little tabs on an angle so that when these tabs are folded, they will fold flush against the sides and lid of the box.
7.  Cut a strip of DSP measuring 6 1/2 by 1 3/8" and attach with snail to the box lid.

8.  Using Oval framelits cut an oval using the smallest framelit from the center of the box lid.*
9.  Use your 3/4" oval punch or a 3/4 circle punch to make a slot in the side of the box lid to make it easier to open.  Center this opening below larger oval.

10.  Add sticky strip or Tom Bow glue, whichever you prefer to the small tabs to secure them to the sides and lid of the box.  I do not recommend using snail adhesive as it isn't strong enough to hold if the box is handled very much. 

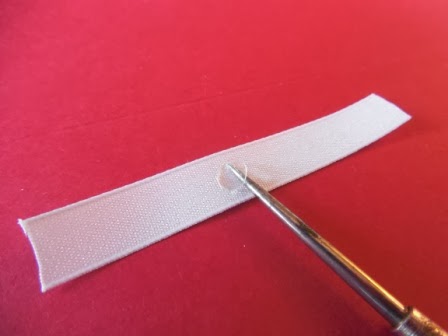
11.  Cut a small piece of clear window sheet and adhere with glue dots to the inside of the lid over the oval opening.  The glue dots won't show when the box lid is open. Note:  If you prefer to keep the contents of the box a mystery omit the above step. 
  

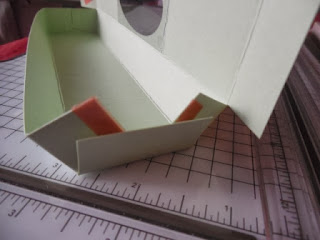
12.  Once the acetate has been added you can remove sticky strip from sides and top and assemble the box.  Tip:  It doesn't show on this picture but I did clip a small triangle from the bottom tab on the lid so it closes smoothly.

13.  Stamp a tag for the top of the box.  For this example I used the Chalk Talk stamp set in Pistachio Pudding ink and stamped on Very Vanilla Card Stock.  I layered up the sentiment and tag with dimensionals.  


Chalk Talk Stamp Set coordinates with Chalk Talk Framelits

14.  To make sure the box stays shut I made a belly band.  Cut a 5 1/2" x 1 piece of pistachio card stock and score at: 7/8, 1 6/8, 3 1/4 and 4 1/8". Secure ends on back with sticky strip.  Put the band around the box and then mount the tag with dimensionals.  


Extra Samples.......


Here are my two Christmas samples.  The Coastal Cabana box sports DSP from the Winter Flurry DSP Stack, a Festive Flurry Snowflake and a sentiment tag stamped with "Merry Christmas" from the Petite Pairs stamp set.  I've also added a Frosted Finishes Embellishment to the center for some added sparkle.  Love those embellishments!  

Petite Pairs Stamp Set - a great set of sentiments to add to your collection. Covers every occasion. 


This picture shows the snowflake on the belly band before it's wrapped around the box.  The snowflake cut out with the Festive Flurry die cuts in Silver Glimmer Paper is mounted to the Island Indigo Snowflake with dimensionals and glue dots.

Note:
 Dimensionals will not stick on their own to glimmer paper, but glue dots will.

The Frosted Finished Embellishments have a very flat back and easily mount with dimensionals to give a little extra height to the layered snowflake.  There's only a few more weeks to get these little sparklers so I think I'll be ordering a couple of extra packages to hoard.  

You may notice that the sentiment flag is not in this picture.  When I looked at this snowflake after it was on the box I decided I needed to add a tag or a sentiment.   It was easy to add the "Merry Christmas" banner tag with a glue dot to the underside of the snowflake.  
 

The second sample box which I'll give with a matching Santa's List Christmas card, does not have an acetate window, just a sentiment tag and ribbon. 

The perfect duo a tea light package and a matching card.  What hostess wouldn't be happy to receive these gifts.
Because this tea box design is pretty plain, I added two medium sized Basic Rhinestones to the check mark boxes on the Naughty or Nice tag to give it some sparkle.  The ribbon tag was made using the wonderful 7/8 White Taffeta ribbon. I love the way it folds and ties so easily.
SUPPLIES: 

STAMPS:
Chalk Talk #130631
Petite Pairs #122497
Very Merry Tags #130402

INKS:

CARD STOCK:
Coastal Cabana - 131297
Very Vanilla #101650
Whisper White #100730
Cherry Cobbler #119685
Winter Flurry DSP Stack #132183
Shimmer White (non Stampin Up)
Season of Style DSP Stack - 132181

Ink:
Pistachio Pudding #131177
Island Indigo#126986
Whisper White Craft or Staz On White

ACCESSORIES:
Simply Scored Score Board #122334
Paper Trimmer #126889
Bone Folder 
Oval Framelit Dies #129381*
Glue Dots #103683
Red Sticky Strip #104294
Snail Adhesive #104332
Dimensionals #104430
Window Sheet #114323
Scissors #103579
Basic Rhinestones #119246
Clear Embossing Powder 
Heat Gun

Note you can substitute any of the paper punches for the Oval Framelit Dies that will fit in the center of the lid such as: 
Large Oval Punch # 119855
Scalloped Oval Punch #119856
Decorative Label Punch #120907
Modern Label Punch #119849
Ticket Duo Builder #126883


Sunday, December 15, 2013

Seven Days of Christmas Hostess Gifts

Christmas is my most favourite time of the year! Why?  Because it's the season for visiting and friendship in our household. Our calendar is already filling up with invitations, and I need to be prepared. 

Good etiquette and form suggests bringing a hostess gift when visiting and dependent on how many places you're going to visit this can get pretty pricey, but don't worry, I have a solution for you!  

Over the next seven days I'm going to provide you with my own gift .... some cute and inexpensive hostess gifts that you can make in a flash and won't cost you a lot of cash!  

And, the great thing about these little tokens of friendship is that they can be made all year through..... just change up your card stock, designer papers and stamp sets and you're set to go.  

I hope you'll enjoy these free tutorials starting on Monday December 16th. They're all made with Stampin' Up! products and accessories.  Please leave me some comments I'd love to hear from you. Let me know which ones you make. Merry Christmas! 

Thursday, December 12, 2013

It's Started - Save up to 80% Off

It's time for the annual Clearance Rack Blitz.  Looking for last minute gifts or items for your own craft room, well now's the time to get them while they last.  Save up to 80% off while supplies last.  Check it out. 

Wednesday, December 11, 2013

Weekly Deals

Somehow it's the middle of the week again and I'm late publishing this weeks great deals from Stampin' Up!

Here they are:


Tuesday, December 3, 2013

Best of 25 Years - December

The last issue of Stampin' Ups! Best of 25 Years Stamp Sets has been posted for December.  

This is a great set paying tribute to so many wonderful stamp sets that were released as Sale-A-Bration free sets.  I loved all these when they were new and still do.   

Best of 25 Years Sale-A-Bration
To see how you can take advantage of the Best of 25 Years stamp sets please check out my page by the same name at the top of my blog and you'll be rewarded with all the details on how to purchase this set and/or any of the other twelve sets that have been offered throughout this anniversary year. Or, find out how you can earn some free stamp sets simply by purchasing.  

Friday, November 29, 2013

Holiday Card Class - Card Number Two


Card number two in my Holiday Card Class series with Cheryl LeFore, once again features the Santa's List Stamp Set.

This card was quick and easy to assemble and the finished card is perfect for mailing because of its light weight and flat surface.  

Supply List: 
Stamps:  Santa's List #131808 wood mount or #131811 clear mount
Card Stock:  Cherry Cobbler, Whisper White and Early Espresso
Inks:  Cherry Cobbler, Early Espresso
Designer Paper:  Season of Style Designer Series Paper Stack #132181
Accessories:  Stylish Stripes Embossing Folder #132174, Dazzling Diamonds glitter, 2-way glue pen, Adhesive Dimensionals, Big Shot machine, Trimmer, Stamp-a-ma-jig. 

Here is the finished card:

Assembly:
1.  Cut an 8 1/2 x 5 1/2" piece of Early Espresso card stock and score at 4 1/4" for side fold card. 

2.  Cut a piece of Cherry Cobbler card stock to  4 x 5 1/4" and emboss with the Stripes Embossing folder in the Big Shot machine. Adhere this piece with adhesive to the card base.
Stripes Embossing Folder measures 6-1/4" x 4-1/2". Use with Standard Cutting Pads.
3.  Cut a piece of the striped designer series paper from the Season of Style paper stack to 4 x 1 1/2" and adhere this strip to the center of the card.
Create multiple cards in a snap with this stack of Designer Series Paper sized specifically for card fronts. You get 48 sheets: 24 ea. of 2 double-sided designs. 4-1/2" x 6-1/2". Acid free, lignin free. Coordinating colours are Cherry Cobbler, Chocolate Chip, Crumb Cake, Old Olive, Whisper White card stocks, inks and ribbons.  Also coordinates with the Season of Style suite.

4.  Cut a piece of Early Espresso to measure 3 1/2" x 3 1/2".

5.  Cut a piece of Whisper White card stock to 3 1/4 by 3 1/4" and stamp the Santa from Santa's list in Cherry Cobbler ink.  Using the Stamp-a-ma-jig position the sentiment "He's making a list...." beneath the Santa and stamp it in Early Espresso Ink.  
This is the perfect tool to keep you from ever ruining a whole project with one crooked image! The stamp positioner gives you the ability to place an image exactly where you want it, every time. Allows for fast and precise stamp placement.

6.  Using a Two-Way Glue pen add adhesive to the fur on Santa's hat, the pom pom, his cuffs and the front of his jacket and then sprinkle with Dazzling Diamonds glitter.  Shake off excess.  When this piece is dry adhere to the Early Espresso square and mount with dimensionals to the card face.  
My card was already finished when I decided it just need some additional "ta da", so I hauled out my glitter and glue pen and went to work. 


Gently pounce the Two-Way Glue pen on it's tip on a scrap piece of paper to start the ink flowing into the applicator.  One the applicator tip is wet with ink spread across areas you want to add the glitter to.  Be careful you don't get too much glue coming out of the applicator you just want a small amount in each area.

Shake the Dazzling Diamonds glitter over the wet surface and then shake off the excess.  Tip:  You might have to use a small paint brush to brush away any excess glitter, especially if you decide to add the glitter like I did to an already finished card.  Instructions in #6 above should be followed, not my example here, lol! 
Hope you can see the light coating of glitter in Santa's suit and hat. Remember, just add a light dusting, you don't want to have globs of glitter, it will only rub off in the envelope.  

2-Way Glue is versatile and provides a permanent or temporary bond. It's perfect for masking or working with stencils! The chisel tip makes it easy to get just the right amount of glue for adding glitter. Let the glue dry after you've applied it (it will become clear), and it will work just like a sticky note.
Dazzling Diamonds is an ultrafine polyester glitter.  It comes in a 1/2 oz. jar.  Use with Heat & Stick powder, Tombow Multi Purpose Adhesive, or Sticky Cuts Letters
7.  Adhere a 3 3/4" x 5" piece of Whisper White card stock to the inside of the card and stamp with a Christmas sentiment.

Voila, that's it!  


Your card is finished and it looks terrific.   Let me know if you like this card. I'd love to hear your comments.  


Wednesday, November 27, 2013

Holiday Card Class Card No 1


Yesterday I shared a sneak peak of three of the cards I made at Cheryl LeFore's stamp a stack Holiday Card Class.  I had such fun making these cards and so thought you might like some of the details on how they were made.

This first card is made with two of my new "fun to have" stamp sets from the Holiday Mini Catalogue,  Santa's List and Very Merry Tags. 

Santa's List available in wood mount (131808) or clear mount (131811).


Very Merry Tags available in wood mount ( 132609) or clear mount (130402).  with the Artisan Label, Decorative Label, Extra Large Oval, Mosaic, Petite Curly Label, 1 3/4" Circle, and 7/8" Scallop Circle punches.  It's available in English as noted above as well as Spanish and French.

Supplies Used:

Stamp Sets:   Santa's List, Very Merry Tags
Card Stock:   Whisper White, Cherry Cobbler, Early Espresso
Designer Paper:  Season of Style DSP
Inks:             Whisper White, Early Espresso, Cherry Cobbler 
Dies/Punches: Decorative Label Punch, Label's Collection Die Cuts, Oval       Framelits
Accessories:  3/8" Whisper White Taffeta Ribbon, White Embossing Powder,
Heat Gun, Dimensionals, Glue Dots, Sticky Strip and Adhesive.

Here's the Full Card 


1.  For this card I cut a piece of 5 1/2 x 8 1/2 Cherry Cobbler card stock and scored it at the center.

2.  I topped this with a piece of Early Espresso Card stock measuring 4 1/8" x 5 3/8".  Adhere this piece to the card base with adhesive.  Before gluing this piece down I used the Labels Collection die and cut out a piece from the center. Tip:  When you're doing this make sure you've left enough space around the die cut image for your adhesive.  


Since this piece of card stock will be covered with DSP why waste it.  By cutting out the center with the Labels die I've conserved card stock and lightened the weight of the card.  
3.  The next layer is a piece of the Season of Style Designer Paper cut at 4 x 5 1/4". Adhere to Early Espresso piece with adhesive. 

4.  At this stage I made a decision to make 5 of my ten cards with a side fold 5 cards with a top fold.  This was purely a personal decision, but one I'm happy with as I like the way both cards came out.  


Side fold

Top Fold 

5.  From the Whisper White Card stock I cut a 3 3/4" x 5" piece of card stock for the inside of the card.  I also cut a 2 7/8 x 3 1/4" piece of Whisper White for the Oval that Santa is stamped on.  Once the Oval was cut I stamped the image of Santa in Early Espresso Ink and then  sponged the edges.  

The Santa image was adhered to the Early Espresso label and then I used sticky strip to make sure that it was firmly stuck to the card base because of the weight. 

I have to tell you that I loved the way this stamp took the ink! It was like silk and for a large stamp the image was clear and perfect.  That's why Santa's List is now one of my favourite new stamps!  

6.  For the Naughty Nice label I stamped the image on Cherry Cobbler card stock with Whisper White ink and then sprinkled it with White Embossing Powder and heat set the image. 

I cut out the image using the Decorative Label punch.  To get the shadow frame around the Cherry Cobbler one I cut out a piece of Early Espresso Card stock with the decorative label punch and then cut that in half across the widest part of the label.  These pieces were adhered to the back of the Cherry Cobbler label to create the shadow on the top and bottom.  A 3" piece of White Taffeta Ribbon was folded in half and added to the back of the completed label before it was mounted to the card with dimensionals.  Here's a look at how I did that.  


For the shadow piece cut a label from a scrap of Early Espresso card stock, and sponge around the edges to give it a darker effect.

Cut the Early Espresso Label in half across the width of the label.  I clip off the pointy ends on each piece so they don't stick out when I attach it to the back of the Cherry Cobbler label.  

Add a glue dot to the center of the ribbon piece.

Fold the ribbon overlapping to the side.  The glue dot will keep it together. Trim the ends of the ribbon on an angle.


Here you can see the Early Espresso pieces layered onto the Cherry Cobber label.  The ribbon was attached with another glue dot and then I added some dimensionals to the back before adhering it to the card.
Here is the finished label.  
Hope you liked this card and will come back to see the other two and how they were assembled.  Let me know which you like better the top fold or the side fold of this card.  

Rock Star Masculine Birthday Card

We finally have some good weather and have spent the week tidying up in the garden and the garage.  Visits to the recycling plant to get rid...