Tuesday, July 23, 2013

Be The Difference Convention Swaps - Tea Party Card

The "Be The Difference" Convention has come and gone, but  sharing my experience with you is just beginning.  Over the next few days I want to share some before, during and after experiences with you.  

To start, I'd like to share some pictures of my card prep for the awesome swap organized by Lori Souter and friends.  This was a 64+1 card swap and the theme was "New Catalogue Stamp Sets".  We were to receive one card for each new stamp set in the 2013-2014 catalogue. That's right 64 new stamp sets including hostess sets and wheels.

Unfortunately it didn't quite go as planned because of a mix-up in swapping times, due to a change in the Convention schedule.  It was unfortunate because I was really looking forward to being able to share all 64 cards with you.   

Regardless I'm blown away by the talent demonstrated in the cards I did receive.  And if over the coming weeks the ones I'm missing are posted, I'll provided some links so you can catch up on those ones too.  

So buckle your seat belts and come along for the ride, because I have some awesome swaps to share with over the coming week.  You're going to love them!

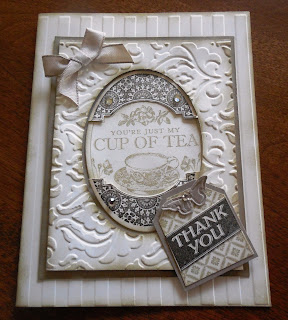
Here's My Tea Party Swap Card:

I made a total of 70 of these cards.  The numbers in the supply list below in brackets show the number of sheets of card stock it took to make these cards.

Supplies List:
  • Card stock:    Very Vanilla (35), Crumb Cake(19)
  • Ink:               Early Espresso and Crumb Cake
  • Stamp Set:     Cup of Tea
  • Accessories:
    • Stripes, Modern Mosaic Embossing Folders and Beautiful Wings Sizzlet, Big Shot Machine
    • Ovals Framelits
    • Large Tag Punch
    • Crumb Cake Taffeta Ribbon
    • Basic Rhinestones 
    • Adhesive, Sponge Dauber 
    • Sharp scissors for fussy cutting (a lot of that!)
 Pulling it together:
  
I tied 70 of these teeny little Crumb Cake Taffeta bows using the "fork method"There is virtually no waste when tying ribbon this way and you ensure all bows are uniform.


The little butterfly only needed a small scrap of card stock so I cut out some 1" x 8 1/2" strips of Crumb Cake and then cut these down into 1" strips.  As you'll see in the photo below, I adhered these butterflies to the tags using glue dots.  A small basic rhinestone was added for a little sparkle. 

I punched out 70 of the Large Tags from Crumb Cake card stock.  I stamped 70 of the Thank you  stamp images on Very Vanilla, then fussy cut them out and mounted them to the Crumb Cake with adhesive.  I re-stamped the Thank You image in Early Espresso Ink on Very Vanilla and then cut out just the "Thank You" banner and adhered these pieces to the tag.  Everything was then sponged with Crumb Cake ink. 

I stamped the Cup of Tea image in Crumb Cake ink onto the center of each of the Very Vanilla Layers using the Stamp-a-ma-jig to ensure the ovals were centered on the card, and then removed the ovals with the Oval Framelits Die.
Once the oval was removed this layer was embossed with the Modern Mosaic Embossing Folder.  I did all the sponge daubing with Crumb Cake ink prior to embossing the layers. 
I loved the shabby chic look of this layer once it was embossed.

I stamped the oval image in Early Espresso on Very Vanilla card stock and then fussy cut all the top and bottom designs away.  I mounted these onto the Crumb Cake oval with adhesive.  Basic Rhinestones were added to three of the circle flourishes on this element.  I was carefully when cutting away these pieces and as a result will be able to use the Cup of Tea images on another project.
I broke all the tasks into 7 groups of 10 pieces, so I could check to make sure I had enough of each element when I began to assemble the cards.  This photo shows a grouping of 10 tags, ovals, butterflies, ribbons and embossed pieces  ready to be put on the cards.

This picture shows my seven piles of card pieces.   Each pile consists of 10 of every layer and element used on the card.
This picture shows the 10 piles of completed cards prior to being placed in their plastic sleeves. 
 
Here you can see a closeup of the detail in the finished card.

The finished card. Ta Da!

Let me know what you think.


Saturday, July 20, 2013

Convention News

Have you missed me?  It's been a while since I posted, but I've been at Stampin' Ups! Be The Difference Conference in Salt Lake City since last Wednesday.  What a week of excitement! Almost 6,000 women representing Stampin' Up! in the United States, Canada, German, England and Australia were gathered.

I've met old and new friends, learned new skills, attended seminars, tried new products, watched amazing demonstrations from some of the international demos, won prizes, and of course had way too much fun.  I've got so much to tell you!

Over the next week I plan to share my pictures and memories of those fabulous Convention moments and also all the exciting news about new products and promotions. Right now I'm packing to go home, so stay tuned as I put together the story.  It's going to be exciting!  

Monday, July 15, 2013

Want to Join My Team ?


Doing  what I love, and sharing what I love with others are just a few of the benefits that made me decide to become a Stampin' Up! demonstrator. 

I love sharing my passion for stamping with family and friends, meeting new people, and being a hobby demo.  I also get my own schedule and that is a definite plus!  

If you have a passion for stamping and want to share your creative talents with others, expand your hobby or just save on your Stampin' Up! supply orders, now may be the time for you to consider being a Stampin' Up! demo too!  For more information and a video on reasons to become a Stampin' Up! Demo click here:

I've reached the Consultant Level in Stampin Up!  I'm ready to move up once my team expands.

Right now the Stampin' Up!s New Demonstrator Kit is completely customizable!  That means you can build your very own Starter Kit you own way.  For $125.00 you get:
  • Your choice of up to $155 worth of any current Stampin' Up! products,
  • and a  business supply pack valued at $70
That's a total of $225.00

But wait there's more free stuff coming!

During July 15th to August 31st, if you sign up and join my team you'll get to pick one of four project kits for free in addition to your great starter kit. How's that for a great incentive? 

Three of the above kits haven't been released yet to the public because they're part of the new Holiday Catalogue product line and they're packed full of great items. You won't want to miss out on this special offer.  


 Click here for the flyer and more details and let me know when you want to sign up. I'll be happy t o answer your questions and help you through the process.


Friday, July 12, 2013

Buy 3 Get One Free


During the month of July Stampin' Up! is offering a great promotion on their fabulous Designer Series Papers and you'll want to take advantage of this money saving offer.  

Between July 1st to 31st, you can purchase any three packages of Designer Series Paper* and choose a fourth package for free.

It's a great deal and a great time to stock up on Designer Series Paper, so you're ready to roll when your creative spark kicks you into high gear.  Click here to see the full promotion and details:

Note:  *This offer does not include Designer Series Stacks and Speciality Designer Series Papers.

Monday, July 1, 2013

New Photopolymer Stamp Set: Settin' Sail


··        
Have you tried Stampin' Ups! Photopolymer Stamps sets yet?  If not here's your chance to get a brand-new photopolymer stamp set called Settin' Sail (item 133453). 
      Lots of versatility in this stamp set which features 21 stamps.  This will be a great set for preserving those vacation memories, creating party decor and other summer fun.

·   To learn more about our photopolymer stamps and see the flyer for the Settin' Sail Stamp Set, click here.
  
          Why Will You Love Photopolymer Stamps?

Photopolymer stamps are unique, fun designs that will inspire you and provide more versatile options you may not see in Stampin' Ups! traditional wood- and clear-mount stamp options. What makes them so great?

  • They're entirely transparent for perfect placement every time! 
  • They are durable. The photopolymer material is designed to last. 
  • Can you say sticky? (Don't worry; in a good way.) These stamps stick amazingly well to our clear blocks (blocks A,C and H recommended).
  • They're age tested. They won't yellow or cloud up over time.  They are clearly a great choice.

If you're still not sure about using these new stamps, why not take the "Seeing the Possibilities" (item 134532) on-line class.  This downloadable class will provide all the basics you need to make the most of the newest photopolymer stamp offerings: Show & Tell 1 and 2 Stamp Sets. 
Take this class to discover how quickly and easily you can line up the stamped images for precision placement, achieve just the right ink coverage, combine images together exactly where you want them, and more. The possibilities are endless! 


This class is divided into six PDF documents, and includes written instructions, step-out photos, instructional videos, and supply lists for 15 projects. The following topics are covered in the class:
  • Backgrounds
  • Building
  • Layering
  • Versatility
  • Gift Giving
  • Memory Keeping

Best of 25 Years Anniversary Stamps - July Edition


Who better to pick a “Best of” stamp set for July other than the person who helped start Stampin’ Up! 25 years ago? You guessed it!  Shelli Gardner, the CEO and Co-founder picked her favorite stamp images from the past 25 years and helped combine them into a single set just for you! You can check out the PDF flyer and all the information about ordering these stamp sets for this month and the past six months on the Best of 25 Years Page at the top of my blog by clicking here: 


So What's So Special About 25 Year Anniversary Stamp Sets?
  • All "Best of" stamp sets include 3-5 images, including a never-before seen image (see yellow highlighted stamp on my post).  These sets are just $17.95, a great bargain!
  • Each month Stampin’ Up! releases a new “Best of" stamp set featuring a new theme.  But don't worry you can still get all the previous months sets, because they'll all be available until March 31, 2014.
  • Check out the new PDF flyer posted every month for each new “Best of” set.
  • All “Best of” stamp sets are only available in Clear-Mount and you will need Clear-Mount Blocks B, C, and G for this set


Fusion Floral Class

FLORAL FUSION CLASS HELD ON JUNE 30, 2013


I love flowers in any shape or form and my recent Floral Fusion Class was all about "shape and form". 

Participants made four fast and fun flower cards.  Each card highlighted a different technique and different materials.  If you weren't able to attend this three hour class and would like too, I'm offering it again on July 9th, so please contact me to register:

Date:            July 9, 2012
Time:           9:30 to 12:30pm
Place:           Abbotsford
Cost:            $20.00* covers materials, supplies and PDFS for all 4 projects
Class Size:    Only 4 spots left.


*Place a minimum $25.00 order at this class and your class fee is waived.  

Atlantic Hearts Sketch Challenge #572:

April has sure been living up to its reputation for rain showers but it's been really on the cold side which isn't normal for this t...