|

**Big Shot Dies are sold separately
|


| Page | Item | Description | Price | ||
192 | 122375 | Simply Sent Great Day Kit
| $15.95 | ||
193 | 122377 | Simply Sent Everyday Elegance
| $14.95 | ||
193 | 122376 | Simply Sent Sweet Moments
| $16.95 |
| Page | Item | Description | Price |
192 | 123682 | It's Your Day | $10.95 |
192 | 124685 | Es tu día (Spanish It's Your day) | $10.95 |
192 | 124800 | C'est ta fête (French It's Your Day) | $10.95 |
193 | 123686 | Everyday Wishes | $11.95 |
193 | 123684 | You're Cherished | $10.95 |
193 | 124865 | Chérissons les anges (French You're Cherished) | $10.95 |


 |
My theme revolves around "Friendship". This beautiful little sentiment is from Pocket Silhouettes and is stamped in Bravo Burgundy ink on Whisper White Cardstock. The sentiment was then punched out using the large oval punch. I cut two pieces of card stock (Bravo Burgundy and Basic Gray) using the decorative layer punch. To get the extended look I cut the Bravo Burgundy layer in half and then glued it to the back of the Basic Gray layer leaving a gap in the center. To finish off the sentiment I've added three small basic pearls for a feminine touch and to tie in with the pearls on the top layer of the card. |
 |
My focal point for the card is from the Friends Never Fade stamp set. I love this one I think it's timeless. I stamped the image in Whisper White classic ink on Bravo Burgundy cardstock, added some White Embossing Powder and used my heat gun to set the ink. The 2" circular stamped layer is mounted on dimensionals to a 2 1/4" circle cut from Basic Gray cardstock. The third circle is 2 1/2" and is in Whisper White cardstock. |
 |
Here's a full view of the card showing the additional layers. The card base is Basic Grey and I've added an additional 5 1/4" x 4"layer of Basic Grey cardstock that was embossed with the Swiss Dot embossing folder. Two 2 x2 squares of Whisper White were embossed using the Flower Garden textured embossing folder. A 2 1/2" x 3" piece of Bravo Burgundy cardstock completes the layers. |
 |
I've added a Whisper White Top Note die cut to the inside of the card that's been embossed using the Flower Garden Texturized Embossing folder die. This ties the images on the front and inside of the card together. |
 |
| One last look at the finished card. I really like the look of this card and will probably add this sketch to my favourites file. |

 While Stampin' Up! has long been recognized in the stamping and crafting industry for producing high-quality rubber stamps and exclusive images in a variety of artistic styles, being recognized by Creating Keepsakes is just another validation that when customers choose Stampin' Up! products, they are choosing the best!

 |
The Best Witches (don't say that fast...lol!) sentiment is from "Halloween Hoot" and I've stamped off some little bats from SU's "Wicked Cool" set. The image is stamped on Pumpkin Pie, and the large oval punch was used to punch out the sentiment. It's mounted on a scalloped oval punched out in basic black. A few purple rhinestone complete the sentiment. This sentiment is popped up on dimensionals so that when the card is opened it has a prop or anchor to hold it open. The inside of the card is made with layered circles in corresponding card stock and lots of room to leave a message. |
 |
View of the card opened up. I've used basic black ink to distress around the entire scalloped edge of the card to give it some extra detail. |
 |
I've used the bat image from "Wicked Cool" to stamp around the scalloped circle. I stamped it in versa mark, basic black ink and then heat embossed it with clear EP. I could have used Black embossing powder too. It gives a kind of shiny look to the background of the card. |
 |
| I added a bit of green glitter glue around the Pear Pizzazz layer to add some additional sparkle. Okay so here's my economizing tip of the week: Did you know you can colour your own basic rhinestones inexpensively with any permanent alcohol based marker (Sharpies work well because they let the colour sparkle through). That's right your can now have red, green, blue rhinestones...........even black to match your favourite coloured cardstocks. So no more searching for matching bling, just colour your Stampin' Up basic rhinestones yourself! All you have to do is j=-0[st colour over the rhinestone with your marker pen and voila! instant colour. Go over it until you get the shade you want. If it's too dark you can take a cute tip swab to lighten the colour by dabbing a bit of rubbing alcolhol (90% or more works well) on a Q-Tip swab and lightly dab it on the basic rhinestone. You can also use an alcohol blending solution but be careful as both solutions will remove the colour. |

 |
 |
 |
| Man the lighting was poor for this inside view of the card........... my apologies. The witch and sentiment are stamped in Black Stazon Ink. |
 Hi everyone. Can you believe that it's Week Five already of Shirley Pumpkin's "Monday Monster Mash Halloween Countdown Week 5"? Only 7 weeks to go to the big day!!! Are you getting excited?
  |
| This was my entry for Week Four. |

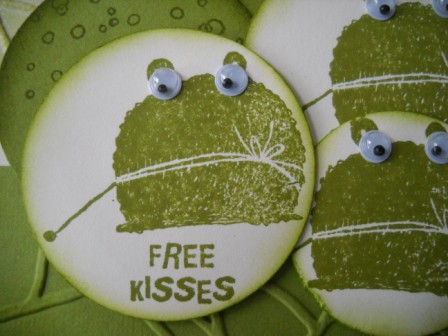 |
| Here's a close up. Aren't they just the cuteest bullfrogs? |

 |
The wheels on the cauldron looked like eyes to me and the rope or whatever it is around the middle of the pot looked like a big wide mouth, and the handled looked like a frog's tongue going for a fly or something! Okay if you can't see it squint or something! LOL |


 |
| Inside view of the card |
 |
The butterfly is double punched from Shimmery White Cardstock and mounted with dimensionals. A small bow in Whisper White Taffeta ribbon was added to the center of the butterfly using Crystal Effects to mount it. |
 |
| This view shows the butterfly layers |
 |
Although it's hard to see from the picture, Shimmery White cardstock was used for these butterflies die cut using the Beautiful Wings Sizzix Embosslits Die. Basic Pearls are the only adornment. |

 |
Inside view of the card. The sentiment "Happy Anniversary" is from the "Something to Celebrate" hostess set previously mentioned. The Butterfly and Flower stamp verse are from the "Of the Earth Set". All are stamped in Crumb Cake ink to match the cardstock base and layer. |
 |
I've only used one Butterfly die cut topped with the Whisper White Taffeta bow on this card. Don't you just love that little bow? They are so fun to make. If you want a lesson on how to make them check out Diana Gibbs lovely tutorial ............that's where I learned to make them. They are fun and easy to do! |

 |
| Basic Pearls are used to add detail to the butterflies. The small butterflies are adhered to the cardstock using Crystal Effects. The larger butterfly is mounted on two dimensionals to give some depth. |
 |
| This is the negative cut from the Top Note mounted to the front of my card. I've applied double sided adhesive strip around the frame to secure the next layer. |
 |
| This is showing the negative strip before I glued it to the card front and applied the Texture Embossed layer. Once all the layers are in place no one will even guess that the Whisper White layer isn't a full layer of cardstock. |

Sometimes you just need some comforting words and to know that someone's thinking of you. I felt that this week's Freshly Made Sket...


