Sunday, September 4, 2011

Monkey 71 - I Missed it!


Okay so last week I had lots going on, but I really wanted to do the Monkey 71- Fall Sketch.  I'd dutifully saved the picture of the sketch to my challenge file, printed out a copy of the sketch so I knew what I was making.  Because I have a very limited number of Fall stamps, seasonal sentiments and designer papers I was really feeling stumped about what to make.  A few days passed and then one afternoon towards the end of the week when I was walking Murphy around the lake, a lightening bolt of inspiration hit me.  Here I was walking through these beautiful woods and all about me golden brown and rust leaves are falling and gathering at my feet.  At that moment I knew what I was going to design and so I ran home, dragging poor Murphy behind me so I could get at this card.  This is what I came up with, but alas it was too late!  The Monkey 71 linky was closed.  Oh well I decided I loved the card and was going to post it anyway.  So here you are: 

I remembered a tutorial on watercolouring with blender pens that Ann Schach made last fall that used the Autumn Spendor set and the simplicity of her techique and her beautiful finished card really impressed me.  So, before starting my project, I  went back and viewed her video and I was really happy I did.  Because I often feel challenged in the watercolouring department and Ann made this technique look so easy, I think viewing the video really helped make me make these leaves look real.  If you want to check out Ann's video and blog post click here


The card base is Always Artichoke, topped with a layer of River Rock that's been texturized with the ever popular Square Lattice Embossing Folder.  The rectangle is made with layers of Always Artichoke, Cajun Craze, and River Rock.  The leaves from the Autum Spendor stamp set were stamped on River Rock and cut out by hand.  I used a blender pen to colour them using Cajun Craze, Old Olive and More Mustard inks.  I've used glitter (non SU) to accent the leaf veins. 

Three artichoke buttons are tied with teeny little stips or Cajun Craze cardstock.  The "Many Thanks" sentiment is from a retired Stampin' UP! set called "Of the Earth" that I simply can't part with, and it was stamped in Cajun Crase on River Rock cardstock and then punched out with the Decorative Label punch. 

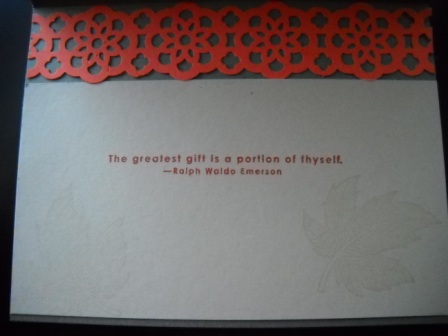
The inside of the card has a Lacey Border punched from Cajun Craze and a layer of River Rock for the base layer.  The sentiment again from the "Of the Earth" set was stamped in Cajun Craze too. Okay that's it. 

Thursday, September 1, 2011

Today is the start, in my opinion, of the best season of the year.  That’s right!  September 1st, marks the official release of the "2011 Holiday Mini Catalogue".  Everyone who's ordered from me this year should have received their mini by now.  If you haven't or if you're a brand new customer who needs one, please contact me so you don't miss out.  This 2011 Holiday Mini Catalogue is available from today until January 3rd.

Check out the fun new stamps, paper, fabric and embellishments for Fall, Halloween, Christmas, and even Valentine's Day.  All these great new products will make your card, scrapbooking, home decor and event creations come together beautifully. 

In addition to all the above new products, I’m happy to tell you about an all new Stampin’ Up! Product that you’re going to love.  This Simply Scored tool that lets you “take the chore out of scoring!


This exclusive scoring tool has been developed specifically for Stampin' Up!.  The Simply Scored ‘s base fits paper or card stock up to 12" x 12" and features score tracks every 1/8".  No more guess work!  It also features two easy-to-read rulers with inch markings down to 1/8" along the top and left side for perfect scoring. There's even a standard left-to-right ruler, a zero center ruler, a set of three markers and a stylus.  And another great feature is that the bottom of the Simply Scored tool is a non-marking base with non-skid feet so it stays securely on your work space.  And, a little bird told me there's more features to be added to this Simply Scored tool in the future.

So what are you waiting for.  If you haven't already flipped to the new PDF version of the catalogue or looked through your printed version, don't miss out.  Start now.  Simply click here.  And, remember my online shop is available 24/7.  Have fun!!!

Wednesday, August 31, 2011

Monday Monster Mash Halloween Count Down Blog Hop - Week Three

Today I'm joining in all the fun over at Shirley Pumpkin's blog "Look At My Cute Stuff" for week three of her twelve week Halloween Blog Hop!  What fun!  Shirley is picking a winner from all the entries submitted each week and then at the end of 12 weeks she'll draw a winner who'll receive $25.00 in prizes from the Holiday Mini.  It's not too late to join in.  All the details on how you play along are on Shirley's blog and it's so easy,  so come along and join in the fun too! 

Week Three
For my entry I decided to combine this Shirley's challenge with this week's Mojo Monday Sketch 206 challenge.  I really liked this sketch and chose to do the square one.  Here's what I came up with

I'd decided to use my "Wicked Cool" stamp set for this week's card but couldn't decide how to do the witch.  I had her hat and her legs but what to do with the body?  I thought about this for quite a while and then the "light came on" while I was doing another project using the "Aviary" set.  You guessed it!  I decided to convert one of those fancy bird cages into my witch.  And here's the result.

  I used Tangerine Tango, Old Olive, Concord Crush, Basic Black and Crumb Cake cardstocks.  Concord Crush ink was used for the bird carge and sentiment. The Tangerine Tango was embossed with the Spider Web Embossing folder. 
The witches shoes were stamped in versamark and basic black ink and then heat embossed with clear embossing powder.  The same technique was used on the hat but in Concord Crush and I repeated the embossing to give a little bit more shine to the hat.  I also embossed the sentiment using versamark and Concord Crush inks.  The "bird cage" dress was stamped on a small piece of "Cottage Wall" a retired DSP and a few green rhinestones were added at the neck and bottom of the dress.  The leggings were stamped on and old olive piece of the same DSP.  Dimensionals were used to give some elevation to the hat and the two squares and sentiment. 
  
Hope you enjoyed my "Wicked Cool Witch".  Have a great day!

Saturday, August 27, 2011

A Beautiful Little Boy

Beautiful little boy in blue.  Love that Elephant!
When I was visiting a friend the other day she showed me her latest "grand baby" pictures, and I was just amazed at how fast this little guy had grown in the four months since he was born.  I offered to do some scrapbook pages for her using My Digital Studio.  The pictures speak for themselves. 
Tristan and his mom sharing a sunny moment

Isn't he just the sweetest little guy!
If you've into digital photography but haven't done any scrapbooking with it and are wondering how to start, you've got to check out My Digital Studio.

My Digital Studio is an easy-to-use digital design software package featuring Stampin’ Up!’s exclusive artwork, designs, and colors. The software comes with an extensive array of multimedia options for the creation of interactive digital scrapbooks and cards—which can then be saved to DVDs, emailed, or uploaded to the Internet. Designed to accommodate users with all levels of ability and experience, My Digital Studio gives you the option to use premade designer templates—or to create your own using a wide array of designer papers, punches, stamps, and embellishments. The software also includes an integrated, high quality, and competitively priced professional print service, allowing you to print photobooks, calendars, greeting cards, and more.

Stampin' Up has even created a web site for My Digital Studio.  Just go to  http://mydigitalstudio.net to see this great site. Stampin' Up! has provided discussion forums for customers and demonstrators as a source of support, motivation, and inspiration when using My Digital Studio.  You can share your success stories, find useful solutions to problems, get creative ideas, and offer suggestions. They have an awesome gallery full of samples  that demos and customers have made and so many helpful videos showing how to use this product.  Stampin' Up! welcomes comments and participation by My Digital Studio users and digital design enthusiasts at all levels of ability and experience! 

If you have any questions please call me or drop me an email I'd be happy to help you out. 

Stampin' Queen's Sketch Challenge 1 - My Version

Today I'm excited to share with you my take on the Stampin' Queen's first ever Sketch Challenge.

I decided to use my The Open Sea stamp set and I will be sending this card along to Stampin' Up Headquarters in Salt Lake City in the hopes of encouraging them to keep this fabulous set and the Nautical Expedition papers on the "still available list".  See my SOS button on the side-bar for more details. 
My card base is Cherry Cobbler and I've used 3 strips of Nautical Expedition paper mounted on Night of Navy cardstock for the background.  Each of the strips of DSP were sponged with Night of Navy.  A strip of Cherry Cobbler Ribbon was rauched for the ribbon detail and I omitted doing a bow from this sketch.  I also love the Word Play Stamp Set and I chose the sentiment "You Mean The World 2 Me" feeling this was significant in my quest to save the On the Open Sea Set.  Hope that makes sense.  The globe on the sentiment is stamped in Night of Navy and adhered with dimensionals. 
I kept the inside simple by just adding a piece of matching Nautical Expedition DSP.  In hind sight I might stamp and emboss  the Sail Away stamp in the bottom right hand side in Cherry Cobbler..............yeah I think that might do it!  Enjoy.

Hope you like this simple card and will check out all the rest of the beautiful design team and participants cards on the Stampin' Queen's site.  They are simply awesome! 

Friday, August 26, 2011

More Snowflakes: Northern Flurry Stacked Snowman

Did you know that you can also add snowflakes to your cards and scrapbook pages by using one of Stampin' Up!s fabulous embossing folders?  If not check out the background of this card where you will see the sharp details of the snowflake behind the chubby little stacked snowman. 

If you've never used an embossing folder in the Big Shot machine and would like to try before you buy give me a call I'd be happy to show you how easy it is to create wonderful background images. 

In this card two embossing folders were used to create the background for the snowman.  For the beautiful snowflake background the first image was embossed on Pool Party cardstock using the Northern Flurry Textured Embossing Folder.  The second image is the snow bank, which was done on Whisper White with the Finial Press Textured Embossing Folder.  The little Shimmery White Snowflake is from the Sizzlet Snowflakes #2 die cuts.    

Northern Flurry Textured Impressions Embossing Folder Die
120902
Price: $9.95
Create the wonderful tumult of snow storms on your winter projects with our Northern Flurry Textured Impressions Embossing Folder. These impressions coordinate perfectly with the images in our Northern Hearts stamp set for an abundance of sensational snowflakes to blanket a card or scrapbook page.

Textured Impressions Embossing Folder
Folder measures 4-1/2" x 5-3/4"
Coordinates with Northern Hearts set
Use with standard cutting pads and multipurpose platform

Finial Press Textured Impressions Embossing Folder Die
115963
Price: $9.95
Stampin’ Up!’s exclusive Finial Press Textured Impressions Embossing Folder creates a deeply embossed image on card stock and paper. The die embosses one side of the paper and debosses the other side, so you can use either side, depending on the look you want to achieve. You can emboss an entire card front edge-to-edge or create a large embossed image.
Designed to cut through one sheet of paper or card stock at a time
Use with Sizzix Big Shot machine, standard cutting pads, and multipurpose platform
Die size: 4-1/2" x 5-3/4"

Thursday, August 25, 2011

Halloween Hoot ........... Monkey 70: Halloween + Sketch


Have you checked out the Halloween Challenge at A La Card Monkey this week?  What a great sketch. I don't have a lot of Halloween stamps but I liked this sketch so much I thought I'd join in the fun.  I resurrected a retired Stampin' Up! set called "Halloween Hoot".

Frogs are stamped in Basic Black on Old Olive cardstock.  I restamped the frog's head  3 more times in Pumpkin Pie, Concord Crush and Old Olive so each frog would have a different colour hat.  The hats were glued on and the frogs were mounted with dimensionals to the Old Olive "lily pads".  The larger circle images and the bands across the card are in the same colours.  The black band was embossed with the Web Embossing folder.  A bit of green glitter was added for some bling. 

Inside layer of the card. 


If you're looking for some more Halloween ideas, challenges and fun  check out Shirley's blog where she's counting down the 12 weeks to Halloween.  Here's her blog address: Monday Monster Mash Halloween Blog Hop


2024-2025 Annual Stampin' Up! Catalogue has launched!

 HAPPY MAY 1ST| Today I'm celebrating and  sharing the launch of the much awaited Stampin' Up! Annual Catalogue which will run from ...