Tuesday, December 17, 2013

Christmas Hostess Gifts - Day Two - Christmas Crackers

Christmas Crackers:

Here's another quick and easy hostess gift but with a twist.  If you're hosting your own Open House or Girly get-together how about giving "Gift Crackers" to your guests.  Just make one for each guest and a couple of spares and load them into a pretty bowl or basket and have guests choose one before they leave your event. 

Crackers are traditionally part of the Christmas table decor, but I've made these super cute little crackers into gift packages for guests. They can be used for any occasion not just Christmas.  

After watching the video by Joanne James of The Crafty Owl's blog in UK I was hooked and knew I wanted to share them with you.  Joanne is a fabulous crafter so make sure when you visit her blog that you leave her a comment and check out all her other great projects.

Simply change up the Designer Series Paper or card stock and these crackers can be used at Birthday Parties or other seasonal events........think Halloween Party!  Fill them with candy or little trinkets. Your guests will love them no matter what time of year or occasion.....trust me! 

My Version:

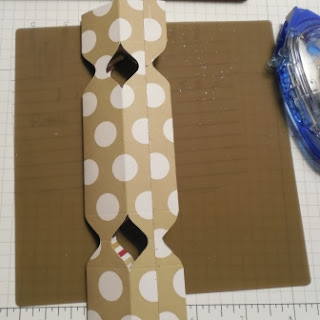
I am totally head over heels in love with my Stampin' Up Envelope Punch Board.  It's not just for envelopes!  The cute gift crackers in the picture above were all made with the envelope punch board.  They are so quick to make you can assemble a dozen or more in an evening without even breaking a sweat.  


How to Make Your Crackers: 
1. These crackers were each made with a 6 1/2 x 4 1/2" sheet of designer series paper. I chose to use the Winter Frost Designer Series Paper Stack and Season of Style Designer Series Paper stacks because they were just the right size.  You could also make them with card stock and decorate the edges.  
Winter Frost DSP Paper Stack #132183.  Create multiple cards in a snap with this stack of Designer Series Paper sized specifically for card fronts. 48 sheets: 24 ea. of 2 double-sided designs. 4-1/2" x 6-1/2". Acid free, lignin free. Bermuda Bay, Coastal Cabana, Island Indigo, Pool Party, Smoky Slate, Whisper White. Coordinates with the Winter Frost suite.

Season of Style DSP Paper Pack # 132181.  Create multiple cards in a snap with this stack of Designer Series Paper sized specifically for card fronts. 48 sheets: 24 ea. of 2 double-sided designs. 4-1/2" x 6-1/2". Acid free, lignin free. Cherry Cobbler, Chocolate Chip, Crumb Cake, Old Olive, Whisper White. Coordinates with the Season of Style suite.


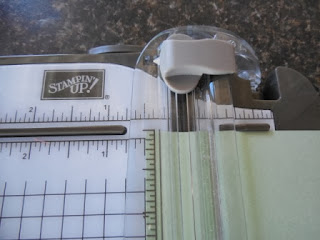
2. Once you've chosen your paper you'll need to score it.  Starting with the 6 1/2" side of the paper score it at:  1, 1 1/2, 2, 4 1/2, 5 and 5 1/2 inches. 


3.  Rotate the paper and score at 1, 2,3,and 4 inches.


4.  Use your bone folder to gently crease the score lines on all sides.  


5.  On 6 1/2" side fold score lines (again very gently - you don't want to rip the paper or stress it), into a mountain/valley/mountain fold on each side. These creases will create the cracker part of the box.

6.  With one inch fold at the bottom of the 6 1/2" paper, fold over paper and insert into the envelope punch.  Line up the end of the paper at the 1 1/2" mark on the measuring line.  The punch should be lined up with the valley fold.  See picture below.  


7.  Punch and then move paper along to the 5 inch mark on the measuring scale and then punch again.  Repeat until the end of the paper.  Rotate paper 90 degrees and then punch again to the outside edge of the paper. 
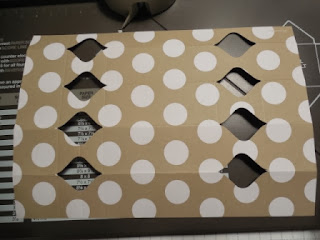

Rotate and punch this sheet again so that the punch holes go through the end of the paper. 

8.  When you've finished punching it's time to join the ends to form the cracker box.  The easiest way to do this is to flatten out the cracker and apply adhesive to the outside edge and then fold over.  


9.  Your cracker is now ready to stuff and to decorate.  Place your gift item inside the cracker and using 11" lengths of ribbons tie bows to hold the cracker ends together.  


10. Stamp tags or sentiments and adhere to the center of the cracker, and you're all done.  Here are some closeups of the ones I made.


Supplies:

Stamp Sets:
Very Merry Tags #130402

Card Stock:
Season of Style Designer Series Paper Stack #132181
Winter Frost Designer Series paper Stack #132183
Red #121790 and Silver #124005 Glimmer Paper 
Scraps of Whisper White Card stock for sentiments and tags.

Ink:
Cherry Cobbler
Island Indigo

Accessories:
Seam Binding Ribbon or Other Ribbon of your choice 
Basic Rhinestones
Scoring Board or Paper Trimmer with Scoring Tool
Envelope Punch Board
Label Bracket Punch #132153
7/8" Scallop Circle Punch
1 1/4" Scallop Circle Punch
Dimensionals, Sticky Strips, Adhesive and Glue Dots

Suggested Fillers:
Hershey's Kisses or other individually wrapped candies
Lip Balm or Lip Stick 
Wine Charms (put in a small cello bag) 
Scratch and Win Tickets (rolled) 
Stampin Up Re-inkers 


What would you fill these crackers with.  Give me your ideas, I'd love to hear them.  Leave me your comments on this tutorial and I'll have a draw for a kit of six crackers.  Draw will be on December 28th, 2013.

Weekly Deals - December 17 to 23

This week's "Weekly Deals" have been posted and will be available while supplies last from December 17th through 23rd.  Check them out at my on-line store:


And, don't forget to check out the Clearance Rack for some last minute specials.  You could save up to 80%.  

Monday, December 16, 2013

Christmas Hostess Gifts - Day One - Tea Light Candle Holder Box

Tea Light Candle Holder Box

Everyone loves tea lights right?  Well all of my friends and family do, so in my world that's "everyone". You can buy a whack of them at the local dollar store or on-line, but what do you put them in when you want to give them as an individual hostess gift. 
Metal Cup Tealights can be bought in bulk.  They're perfect for use in decorative lanterns, hanging lanterns, and more. Bulk wholesale packages generally contain 100 tealights. 
Today I'm going to show you how to assemble a cute little box that's quick and easy to make, versatile and will work for any season or occasion.   This gift box will hold four wax tea light candles, and makes a perfect hostess gift.

I've seen variations of these tea light boxes on various blog sites over the years, but have never made them myself.  After searching the internet for instructions I CASed the tea light box made by Sara Lincoln.  I'm also providing a link to the version that inspired Sara on Sam Donald's blog called Pootles Paper Craft

Here's My Version:  


Assembly:

1.  Cut Pistachio Pudding card stock to 7 3/4" x 5 1/4". Tip: Cut card stock at 5 1/4" on 11" side of paper and you will get two boxes from each sheet. 

2.  Score on 7 3/4" side at 3/4" then turn card stock 90 degrees and score again at 3/4".


.

3.  Score on 5 1/4" side of card stock at 3/4, 2 1/4, 3 and 4 1/2"

4.  Crease all the  score lines with your bone folder.

5.  Using paper snips cut on the score lines on wide side to the 3/4" score line. 

6.  Trim the little tabs on an angle so that when these tabs are folded, they will fold flush against the sides and lid of the box.
7.  Cut a strip of DSP measuring 6 1/2 by 1 3/8" and attach with snail to the box lid.

8.  Using Oval framelits cut an oval using the smallest framelit from the center of the box lid.*
9.  Use your 3/4" oval punch or a 3/4 circle punch to make a slot in the side of the box lid to make it easier to open.  Center this opening below larger oval.

10.  Add sticky strip or Tom Bow glue, whichever you prefer to the small tabs to secure them to the sides and lid of the box.  I do not recommend using snail adhesive as it isn't strong enough to hold if the box is handled very much. 

11.  Cut a small piece of clear window sheet and adhere with glue dots to the inside of the lid over the oval opening.  The glue dots won't show when the box lid is open. Note:  If you prefer to keep the contents of the box a mystery omit the above step. 
  

12.  Once the acetate has been added you can remove sticky strip from sides and top and assemble the box.  Tip:  It doesn't show on this picture but I did clip a small triangle from the bottom tab on the lid so it closes smoothly.

13.  Stamp a tag for the top of the box.  For this example I used the Chalk Talk stamp set in Pistachio Pudding ink and stamped on Very Vanilla Card Stock.  I layered up the sentiment and tag with dimensionals.  


Chalk Talk Stamp Set coordinates with Chalk Talk Framelits

14.  To make sure the box stays shut I made a belly band.  Cut a 5 1/2" x 1 piece of pistachio card stock and score at: 7/8, 1 6/8, 3 1/4 and 4 1/8". Secure ends on back with sticky strip.  Put the band around the box and then mount the tag with dimensionals.  


Extra Samples.......


Here are my two Christmas samples.  The Coastal Cabana box sports DSP from the Winter Flurry DSP Stack, a Festive Flurry Snowflake and a sentiment tag stamped with "Merry Christmas" from the Petite Pairs stamp set.  I've also added a Frosted Finishes Embellishment to the center for some added sparkle.  Love those embellishments!  

Petite Pairs Stamp Set - a great set of sentiments to add to your collection. Covers every occasion. 


This picture shows the snowflake on the belly band before it's wrapped around the box.  The snowflake cut out with the Festive Flurry die cuts in Silver Glimmer Paper is mounted to the Island Indigo Snowflake with dimensionals and glue dots.

Note:
 Dimensionals will not stick on their own to glimmer paper, but glue dots will.

The Frosted Finished Embellishments have a very flat back and easily mount with dimensionals to give a little extra height to the layered snowflake.  There's only a few more weeks to get these little sparklers so I think I'll be ordering a couple of extra packages to hoard.  

You may notice that the sentiment flag is not in this picture.  When I looked at this snowflake after it was on the box I decided I needed to add a tag or a sentiment.   It was easy to add the "Merry Christmas" banner tag with a glue dot to the underside of the snowflake.  
 

The second sample box which I'll give with a matching Santa's List Christmas card, does not have an acetate window, just a sentiment tag and ribbon. 

The perfect duo a tea light package and a matching card.  What hostess wouldn't be happy to receive these gifts.
Because this tea box design is pretty plain, I added two medium sized Basic Rhinestones to the check mark boxes on the Naughty or Nice tag to give it some sparkle.  The ribbon tag was made using the wonderful 7/8 White Taffeta ribbon. I love the way it folds and ties so easily.
SUPPLIES: 

STAMPS:
Chalk Talk #130631
Petite Pairs #122497
Very Merry Tags #130402

INKS:

CARD STOCK:
Coastal Cabana - 131297
Very Vanilla #101650
Whisper White #100730
Cherry Cobbler #119685
Winter Flurry DSP Stack #132183
Shimmer White (non Stampin Up)
Season of Style DSP Stack - 132181

Ink:
Pistachio Pudding #131177
Island Indigo#126986
Whisper White Craft or Staz On White

ACCESSORIES:
Simply Scored Score Board #122334
Paper Trimmer #126889
Bone Folder 
Oval Framelit Dies #129381*
Glue Dots #103683
Red Sticky Strip #104294
Snail Adhesive #104332
Dimensionals #104430
Window Sheet #114323
Scissors #103579
Basic Rhinestones #119246
Clear Embossing Powder 
Heat Gun

Note you can substitute any of the paper punches for the Oval Framelit Dies that will fit in the center of the lid such as: 
Large Oval Punch # 119855
Scalloped Oval Punch #119856
Decorative Label Punch #120907
Modern Label Punch #119849
Ticket Duo Builder #126883


Sunday, December 15, 2013

Seven Days of Christmas Hostess Gifts

Christmas is my most favourite time of the year! Why?  Because it's the season for visiting and friendship in our household. Our calendar is already filling up with invitations, and I need to be prepared. 

Good etiquette and form suggests bringing a hostess gift when visiting and dependent on how many places you're going to visit this can get pretty pricey, but don't worry, I have a solution for you!  

Over the next seven days I'm going to provide you with my own gift .... some cute and inexpensive hostess gifts that you can make in a flash and won't cost you a lot of cash!  

And, the great thing about these little tokens of friendship is that they can be made all year through..... just change up your card stock, designer papers and stamp sets and you're set to go.  

I hope you'll enjoy these free tutorials starting on Monday December 16th. They're all made with Stampin' Up! products and accessories.  Please leave me some comments I'd love to hear from you. Let me know which ones you make. Merry Christmas! 

Last Free Shipping of the Year - December 9, 10 11, 2024

Heads up, it's time for the last FREE SHIPPING promo of the year! From December 9–11, you can shop and save on all qualifying orders of...