Wednesday, January 30, 2013

Sale-A-Bration Product Highlights: Day Three

January 22nd to March 22nd,, 2013
J
FEELING SENTIMENTAL STAMP SET


Are you looking for a stamp set that's going to wow both your male and female friends and family?  Do you like vintage?  If you said yes to one or both of these questions then the Feeling Sentimental Stamp Set is for you.  This simply awesome 4 piece stamp set comes in English, French and Spanish and either in wood block or clear mount style.  

Two cards from the Stampin' Up Pinterest site featuring stamped images from the Feeling Sentimental Stamp Set.
Order Item #129627(w) or 129630(cm)

HAPPY HELLO SIMPLY SENT CARD KIT:


i can't say enough about this Happy Hello Simply Sent card kit.  It is truly beautiful.  If you've never had a simply sent kit this will be the one for you.  Simply Sent Kits are the quickest way to make a coordinated beautiful card without having to cut and stamp.  Here's what you get when you order this kit:
  • 8 printed, die-cut cards.  4 of these cards have the "hello" greeting pre-printed on them and 4 are blank,
  • 8 printed custom die-cut envelopes (daffodil delight pattern is printed on the beautifully cut flaps),
  • 24 Daffodil delight card stock sticker flowers you can layer up,
  • 8 Basic Gray card sticker strips 
  • 8 pieces of Basic Gray 18" pre-cut strips of Baker's Twine, exclusive to this kit, and
  • 8 adhesive backed rhinestones.
TIP: To make these cards extra special cut a 5 1/4" x 4"  piece of coordinating card stock (choose from Whisper White, Basic Gray, Daffodil Yellow, Baja Breeze) and mount this to the back of the card shell.  This will give a totally different look to your card.  

Click Here for Online shopping
LINKS TO OTHER CURRENT PROMOTIONS
YOU MAY WANT TO CHECK OUT:
  1. Fancy Friends Kit 
  2. Valentines Day Promotions
  3. Talking Tags
  4. Stampin Trimmer
  5. Clearance Rack 
Happy Stamping.  Please leave a comment if you liked this post and found it helpful!

Penny Tokens


Tuesday, January 29, 2013

Sale-a-bration Product Highlights: Day Two

January 22nd to March 22nd 2013

Welcome back to "Day Two" of my tour through the Sale-a-Bration Flyer.  I hope you found yesterday's post helpful and are returning for more information on the featured products. 

Vine Street Embossing Folder


I absolutely love to use texture on my cards and scrapbook pages and one of the quickest and most fun ways to make an impression is by embossing with one of Stampin' Ups! fabulous Textured Impressions Embossing Folders.  This Vine Street Embossing Folder and a single sheet of card stock run through a  Big Shot Machine will make a beautiful background design.  This 4 1/2 x 6 3/8 folder has a wonderful leaf pattern on it that coordinates well with the Madison Avenue Stamp set and the Sycamore Street DSP. 

Order # 130492.  This product is FREE with a $60 purchase, not including shipping and handling.

Bloomin Marvellous Stamp Set


Butterflies, Flowers and Hummingbirds,the Bloomin' Marvelous stamp set is simply a great all occasion set.  Don't let the picture fool you, all images are shown either as a real stamp or as a stamped image. 

This set comes with eight wood or clear mount stamps in your choice of English, French or Spanish.  This would make a great gift for a beginner stamper.  

Order Item #:  129651(w) or 129654 for clear mount.  This item can be yours for FREE with a $60 order (before shipping and tax).


LINKS TO OTHER CURRENT PROMOTIONS
YOU MAY WANT, TO CHECK OUT:
  1. Fancy Friends Kit 
  2. Valentines Day Promotions
  3. Talking Tags
  4. Stampin Trimmer
  5. Clearance Rack

Happy Stamping.  Please leave a comment if you liked this post and found it helpful!

Penny Tokens

Monday, January 28, 2013

Sale-A-Bration Product Highlights Day One


January 22nd to March 22nd 2013 -
Stampin' Ups! Biggest Sale Event of the Year
If you're like me, sometimes it's hard to look at a bunch of images on a flyer page or in a store and actually see something you want.  I'm easily overwhelmed by too much stuff, and I'm not very good at reading diagrams or flow charts.  When I study them they become a blur of colour and images, and I can't focus on individual items.

Okay, so maybe that's being dyslexic or maybe it's just mass confusion on my part, but I know I need to see things as individual pieces before I can make up my mind to buy or use something. 

When I received my Stampin' Up! Sale-A-Bration Flyer this month I was immediately confused and a bit panicky.  There was just too much going on for me.  I became overwhelmed, and put it away to look at it later.  When I took it out again I felt the same way, but because I didn't want to miss anything, I spent some more time with it.  For Pete's sake I'm a demo and should have "got it", right?  

In defense of Stampin' Up they're bringing out a fresh new approach with this sale flyer. Everything they are offering in this SAB flyer is off the wall gorgeous but the flyer layout just doesn't work for me. I know a number of you have expressed the same feeling, so it wasn't just me and I don't want you to miss out on opportunities to get amazing FREE stuff. 

So this week I'm attempting to simplify things for you and me.  Notice I said attempting!  How am I going to do that?  Well, quite simply I am going to walk you through the product portion of the flyer showing you all the individual products and bundles in their own individual little glory. 

I've already outlined the three ways you can earn these free products in this post, so if you don't remember go back and check it out.  I'll do a different post each day this week, covering the 19 FREE products you can choose from when you spend $60 or more. Hope you'll come back every day.  Okay are you ready?

Sycamore Street Designer Series Paper:


Did you notice that this beautiful banner at the top of the page is actually the Sycamore Street Designer Series Paper (DSP)?  I didn't at first, I just thought it was a design element.  On closer examination this DSP is gorgeous. Remember it will only be offered in this SAB promotion, so don't miss your opportunity to get some.  
  • Each package comes with 12 sheets of  12 x 12 double-sided designer paper -- that's two each of 6 double-sided designs.  
  • This DSP is Acid and Lignin free so it's good for card making and scrap booking.
  • The Sycamore Street DSP is easy to coordinate.  Just look at how many of Stampin' Ups! beautiful card stocks, buttons, inks and ribbons will go with it:
    • Island Indigo
    • Pool Party
    • Rich Razzleberry,
    • Sahara Sand
    • Summer Starfruit
    • Tangerine Tango
    • Whisper White
  • Order Item #127540 it's FREE when you place a $60.00 order (before S&H and tax).
Madison Avenue Stamp Set: 
This versatile Two-step stamp set has 5 beautiful images and comes in either wood mount or clear mount style.  The images coordinate with the Sycamore Street Designer Series Paper.  

Order Item # 129657(w) or 129660(cm) it's FREE when you place a $60.00 order (before S&H and tax).

Sycamore Street Ribbon and Button Pack:
Who doesn't love buttons and matching ribbon? When you choose this item as your free product you'll get:
  • 3 spools of ribbon (1) Island Indigo, (1) Pool Party and (1) Tangerine Tango.  All hot colours!
  • Each 1/4" satiny feeling spool of ribbon is approx. 5 yards in length
  • You also get 36 buttons:  12 each in the 3 above colours.  The buttons are approximately 5/8" wide and have a cute pattern around their rim.
Order Item # 130812 it's FREE when you place a $60.00 order (before S&H and tax).

Sycamore Street All Bundled Up:

If you want all 3 of these products for FREE, you can earn them as a bundle when you host a party with a minimum of $525 in sales before tax and shipping.  That seems like a lot but it's not hard to do! Ask me how.  


Well I hope this series of posts will help you to make your selections a little easier.  Until tomorrow happy stamping! 

LINKS TO OTHER CURRENT PROMOTIONS
YOU MAY WANT TO CHECK OUT:
  1. Fancy Friends Kit 
  2. Valentines Day Promotions
  3. Talking Tags
  4. Stampin Trimmer
  5. Clearance Rack
Click Here to Go to the On-Line Store

Happy Stamping.  Please leave a comment if you liked this post and found it helpful!

Penny Tokens

Monday, January 21, 2013

Count Down to Sale-A-Bration 2013

Click Here for Link to SAB Catalogue

In less than 12 hours Stampin' Ups! biggest sale event of the year begins.  Are you ready to earn free products and have fun? 

Sale-a-bration runs from January 22nd until March 22nd, 2013.  Have fun, host a party and get free stuff, place your own order or join up as a demo during this time period.  

Thank You Cards for Friends

As I've mentioned before I have limited Stampin' Up! supplies in my little home away from home. So when I got around to making a batch of "Thank You" cards post-Christmas, I had to make do with what was on hand.  What a challenge!

I miss all my Stampin' Up! supplies and tools so much, but it also gives me a bit of a reality check.  I have to remember that you do not need it all and your creativity is only as limited as you choose it to be.  There are always choices. 

So with that in mind, I decided to make small gift cards with matching envelopes and liners for my friends and family who were so kind through the Christmas season.  

Getting Started:
I checked out my stash and began by choosing designer paper and then trying to match it to card stock, ink and ribbon I had.  This approach worked well.  I had a non-SU patterned paper that blended well with some Close to Cocoa (retired),  Always Artichoke and Very Vanilla card stocks. And, as luck would have it, some matching inks and a few yards of Always Artichoke seam binding.  Okay that was all I needed to get started.  Yeah!!!

Here are the six cards and matching envelopes I made.  I was also able to squeeze in a small box for a birthday present.  More on that later and a different post.  


I didn't have a sketch to work with.   I just wanted something simple that would be quick to make and easily mailed.  I decided to make the cards in the following measurements:

  • Card base in Close to Cocoa measures 4 1/2 x 4" with a side fold.
  • Always Artichoke layer was 4 1/4 by 3 3/4"
  • DSP layer was 4 by 3 1/2"
This layout worked well with the leaf patterns on the designer paper and allowed lots of room for the ribbon and sentiment.  Each card has a slightly different look, but if they were given as a set would look really nice. 


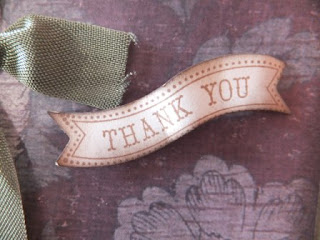
Don't you just love this sentiment?  This tiny set called Itty Bitty Banners (126257 cm/126255 w) is on page 134 of the Idea Book and Catalogue (IB&C).   I took advantage of Stampin' Ups! one day 15% off sale back in October and  bought it and it's served me well ever since.  There are 6 perfect sentiments in this set and it has the advantage of having a matching framelit die set called "BittyBanners" on pg. 191 of the IB&C.  The "Thank You" sentiment worked perfectly on my card.  It was stamped in Close to Cocoa on Very Vanilla card stock and then mounted with dimensionals.
Itty Bitty Banners Item # 126257 (cm) $14.95 or wm 126255 $19.95 

page 134 IB&C. 


Bitty Banners Framelits - 3 dies, largest  2 1/4" x 1/2".  Coordinates with Itty Bitty Stamp Set, and Blue Ribbon Stamp set on page 33 IB&C.
Item # 129267 $18.95.


I made the matching envelopes with my old Score Pal. Let me tell you I really needed my Simply Scored tool with all the accurate measurements, and the Simply Scored plate that makes envelope making so easy.  


I always stamp the back of my cards with a Stampin' Up! Trademark stamp and usually  my personalized name stamp.  Since I didn't have the latter, I added my  signature Palm Tree stamp.  


LINKS TO OTHER CURRENT PROMOTIONS
YOU MAY WANT TO CHECK OUT:
  1. Fancy Friends Kit 
  2. Valentines Day Promotions
  3. Talking Tags
  4. Stampin Trimmer
  5. Clearance Rack

 Happy Stamping.  Please leave a comment if you liked this post and found it helpful!

Penny Tokens

Saturday, January 19, 2013

Oh Whale...... Baby Shower Card

In this post I'd like to share the second card we made on Tuesday night at Cera's workshop.  

Now, while I absolutely loved the Hearts a Flutter Valentine's Day card that I posted yesterday, I fell head over heels in love with this baby shower card. 

Cheryl LeFore's card design was awesome as always, and her directions were so easy to follow.  

So cute!   I had a smile on my face the whole time I was making this card.  

Ingredients:
Stamp Sets:  Oh Whale (129132) and Rain or Shine (126777)
Card Stock:   Baha Breeze, Old Olive, Early Espresso and Whisper White
Ink:              Basic Gray, Daffodil Delight, Baha Breeze, Old Olive
Big Shot:       Cloudy Days Embossing Folder (127022)
Accessories:  Dimensionals, Lucky Limeade Butcher's Cord, Paper Piercing tool

Oh Whale Item #12932 Clear Mount  $20.95 or Wood Mount #12929 $27.95, page 29 of the Spring Catalogue.
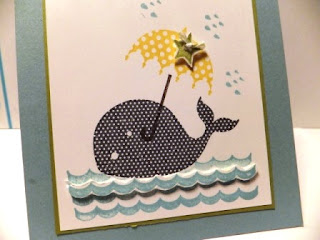
Begin this card by stamping the "whale image" in Basic Gray on a 3 1/4" x 3 1/2" piece of Whisper White card stock. Make a mask by stamping the whale image on a Post-it-note and then cut out this image and adhere it over the original stamped whale. 

Tip:  Make sure when you stamp the image that some of the removable adhesive from the Post-it-note is on the mask so it will stay in place.

Next, ink up the "wave stamp image" with Baja Breeze and stamp right over top of the mask creating waves all around the whale.  Make an additional wave on a scrap of Whisper White and then cut out the image. Cut thin strips of dimensionals 
and place along the back of the wave before adhering  just beneath the whale to provide some dimension. 

Tip:  Don't throw away that mask.  When you're finished just keep it in your plastic container with your stamp set and it will be there when you need it the next time. 

To complete the scene, an umbrella from the Rain or Shine stamp set was stamped in Daffodil Delight and the handle was stamped in Early Espresso beneath it.  Next time I'll use my Stamp-a-ma-jig so I get the alignment a little better. 

The little star was stamped in Old Olive and fussy cut with my paper snips. Two holes were punched into it with a paper piercing tool and the the tiniest bow you've ever seen was tied with Lucky Limeade Butcher cord.  OMG was that hard to do!

The star was adhered to the umbrella with a dimensional. The final touch was to add 3 little spots of rain with the "rain drop" stamp from the Oh Whale set.  The finished Whisper White piece was adhered to a piece of Old Olive card stock that measured 3 3/8" x 3 5/8", and then this piece was glued to the card base.  
The three little clouds in the top section of the card base were cut from a piece of Whisper White card stock that was embossed with the Cloudy Days Embossing Folder.  

Prior to embossing the card stock, a brayer was used to add Baja Breeze ink to the embossing folder.  Once the card stock and embossing folder were run through the Big Shot the ink transferred and outlined the clouds. I chose the grouping of clouds I wanted and fussy cut three of them out.  Two of the images were glued right to the card base and the third was added on top of one of the others with dimensionals.  Baby Shower was then stamped in Basic Gray ink beneath the clouds to finish off the card front.  
       
Rain or Shine 10 piece stamp set Item # 126777 page 30


There are a number of ways to finish the inside of the card, but I chose to stamp the umbrella and rain images in the top right corner of the 3 3/4" x 5" piece of Whisper White card stock.  I couldn't resist adding the sentiment "Whalecome" in Basic Gray ink.  
This was a fun and easy card design to make, and I know it will be received with oohs and ahs at a Baby Shower.  This same card could be used to create invitations simply by adding invitation information to the inside instead of the "Whalecome" greeting.  


LINKS TO OTHER CURRENT PROMOTIONS
YOU MAY WANT TO CHECK OUT:
  1. Fancy Friends Kit 
  2. Valentines Day Promotions
  3. Talking Tags
  4. Stampin Trimmer
  5. Clearance Rack
Click  here to visit my on-line store:


Happy Stamping.  Please leave a comment if you liked this post and found it helpful!

Penny Tokens

Friday, January 18, 2013

Hearts a Flutter Vintage Card


On Tuesday night I had the pleasure of attending a workshop hosted by Cera and demoed by Cheryl LeFore.  What a great time I had!  

The hostess and her mom were so accommodating and friendly, welcoming me into their home and introducing me to the other guests.

Cera's mom prepared and served a  delicious meal of homemade soup, salad and cornbread, which we ate before starting our evening's projects.  Talk about a wonderful way to begin a stamping evening with all the comforts; especially on a really cold evening!

Cheryl, having just returned from Leadership in Orlando Florida, had lots to share with us.  She began by showing us the flyers for the new Single Stamp sets and the 25th Anniversary Stamp Set Releases that are starting this month. We also got to ooh and aah over the Paper Pumpkin monthly kit that is being released this year.  Awesome kits!  I'll be signing up for these too!  I'll be touching on all the other promotions in a later post because for now I want to share the the first of two beautiful cards we made.

Hearts a Flutter Vintage Card:
This beautiful vintage look is achieved by combining several new products that are available in the Spring Mini catalogue.  Here are the ingredients for making this card:

Hearts a Flutter Clear Mount Stamp set 129252 ($22.95) or Wood Mount 129249 ($31.95) on page 11 Spring Mini Catalogue.
Hearts a Flutter Framelit Dies item #130159 ($30.95) make it easy to cut out the images from the Hearts a Flutter Stamp set. Cuts a single sheet of paper using the Big Shot.


Card Stock:  An 8.5 x 5.5 piece of Pool Party card stock was folded at center for the card base.   The dry embossed area was achieved with the Adorning Accents Heart Folder (125601).  Very Vanilla card stock was used for the inside liner of the card and for the two tickets that were stamped using the That's the Ticket stamp set. 


Stamps:  The largest heart image from the Hearts a Flutter stamp set and Framelit Bundle (131097) was used for the second heart which is nestled under the bow. You can barely tell in this picture, but in the closeup further down, you may be able to see some of the detail achieved by stamping the Raspberry Ripple card stock with Versa Mark Ink and then embossing it with the Pool Party Embossing Powder.  A really hot look!  

You can purchase this stamp set and framelits individually, but if you buy them in a bundle you'll save 15%.  That's what I did as I anticipate using this set a lot.

The tickets from the That's the Ticket stamp set (128075) on page 27 of the Spring mini, were stamped in Raspberry Ripple and Pool Party on Very Vanilla card stock.  They were punched out with the Ticket Builder Punch from the Idea Book and Catalogue.  They are really cute and sure added a lot of nostalgia to this card front.  


DSP:  A small strip of More Amore DSP (129309) was used for the heart banner and the large decorative Raspberry Ripple Heart was cut from the beautiful Laser cut sheet that is included in this package.  You can cut 16 hearts from this DSP.  That's a lot of cards!
More Amore DSP Spring Mini Catalogue Item # 129309 $15.95
Accessories:  One Vanilla Flower Trim (126869) piece was adhered with glue dots.  I fell in love with these little beauties.  These floral rosettes can be dyed or partially coloured to co-ordinate with your projects.   A true value at just $9.50 for 2 yards of these enchanting flowers.  
s
Some Pool Party 3/8" Ruffled Ribbon (122975) was tied in a bow and adhered with glue dots on top of the large heart from Hearts a Flutter.  It really complimented the other elements on this card front.

The inside of the card  has a single heart from the Hearts A Flutter  stamp set stamped in Raspberry Ripple on this 4 x 5 1/4 piece of Very Vanilla Card stock

Well what do you think?  Leave me a comment if you  like this card.  Tomorrow I'll share the second card which was made with the Oh Whale and Rain or Shine stamp sets.  

LINKS TO OTHER CURRENT PROMOTIONS
YOU MAY WANT TO CHECK OUT:
  1. Fancy Friends Kit 
  2. Valentines Day Promotions
  3. Talking Tags
  4. Stampin Trimmer
  5. Clearance Rack
Click Here to Look at On-Line Store Items


Happy Stamping.  Please leave a comment if you liked this post and found it helpful!

Penny Tokens

Last Free Shipping of the Year - December 9, 10 11, 2024

Heads up, it's time for the last FREE SHIPPING promo of the year! From December 9–11, you can shop and save on all qualifying orders of...