Showing posts with label Freshly Made Sketches. Show all posts

Monday, September 7, 2020

Confessions of a House Bound Paper Crafter

Between the loss of my mom in June and the COVID-19 thing, I've been having a very difficult time paper crafting and doing the things that truly make me happy.  

I have to be honest here and let you know I really, really  miss my mom and I miss my friends and hanging out with them.  I miss our get-togethers and fun card making times.  And although I read all kinds of motivating stories about demos that are doing this and that to carry on their Stampin' UP! relationships, quite frankly it makes my head buzz and I get tired.  

I don't know whether it's the times we live in or I'm just getting older, but I haven't figured out how to engage my friends and customers by holding Zoom and Facebook meetups and the whole virtual media thing tires me out.  I guess that's why I haven't had much MOJO going on and seem to be spending my time binge watching Netflix and trying to think my way out of this funk instead of yakking with you all and posting cards and projects.  

To my credit, I have to say my leisure time hasn't been all about watching the latest episodes of Frankie and Grace I actually have spent some time in my card studio reorganizing and doing lots of serious cleaning and purging.  One day I'll do a tour of my room, but for now this is what it's looking like:


When I've had the energy and mind, I've also been finishing up old projects, using up scraps of designer papers and retired card stock I've accumulated and trying a few new things.  I haven't felt very challenged though, until I saw this clean and simple sketch challenge from Freshly Made Sketches and it called my name.

So here's to the first challenge of the month (year actually) and what I came up with.  Hopefully I can continue to find inspiration and challenges that re-motivate me to stamp and I can continue to share with you in some form or other.    


For this card I used the Trimming the Town Designer Series Paper for my background and one of the layers.  I like all of the papers in this suite.  They're colourful and appealing in every way.  

My card base is Poppy Parade with a layer of Pool Party.  The cute little gnome is from the Gnome for the Holidays cling stamp set.  

The sentiment "There's no place like GNOME for the Christmas Season", was perfect for this card.  This card may not meet the visual "clean and simple" criteria of Freshly Made Sketches challenge #451, but it sure was simple to make. From start to finish this card took about a half an hour to make.  Having a sketch you can work with, is a great way to nudge your creativity.   You have to like that.  


I coloured the gnome with Stampin' Up! Blends, matching up the colours in the Trimming the Tree DSP ... Poppy Parade, Garden Green, Pool Party, Old Olive, Smokey Slate, Daffodil Delight and Crumb Cake.  I also added a little shine to the gnome's nose and the Christmas lights with Nuvo Drops.

Thanks for bearing with me through this rant and glimpse into my personal difficulties with procrastination and lack of motivation.  And, hopefully my card for the sketch challenge has inspired you to pick up your card supplies again and get crafting. 

I'd love to hear how you've been coping and creating.  If you're not motivated like me, I'd love to hear your story too, maybe we can work this out together.  In the meantime......

Happy Stamping!
Penny Tokens Stampin' Spot
Penny Hanuszak, Independent Stampin' Up! Demonstrator 

SEPTEMBER HOSTESS CODE:  NA46AR73


Sunday, November 2, 2014

Christmas Star Card -FMS#160

Happy November everyone!  Halloween is over and the clocks are turned back once again as we head into late fall.  Although it's been a while since I've been able to post, I'm back in circulation again, and starting the count down to Christmas with some great cards and techniques. 

I'm starting off my month with a wonderful easy sketch I found on Freshly Made Sketches that was designed by Rita Wright, of Rita's Creations blog.   I liked the simplicity of this sketch, which helped my card come together fairly quickly.  Make sure you visit the site and check out all the great entries by the design team and other participants.

Here's the Sketch:
Here's my card:
I wanted to create a vintage style Christmas card using some of the awesome designer papers from the Trim the Tree Designer Series Paper Pack.  I chose two complimentary papers with Garden Green and Crumb Cake designs and then paired these up with Crumb Cake, Cherry Cobbler and Garden Green card stocks.  

Supplies:
Ink:  Crumb Cake and Memento Tuxedo Black
Card Stock:  Crumb Cake, Cherry Cobbler, Garden Green
Papers:  Trim The Tree Designer Series paper Stack, Gold Glimmer Paper
Accessories:  Stars Collection Framelits, Banner Framelits, Itty Bitty Accents Punch (star), Stripes Embossing Folder,  Paper Trimmer, Adhesive, Dimensionals, Glue Dots.

How It's Made:
1.  The card base measuring 4 1/4" x 11" and scored at 5 1/2 is cut from Crumb Cake card stock.  I sponged the front edges of the card with Crumb Cake Ink.

2.  My next layer was made with Champagne Glimmer Paper.  Now I love this stuff but I don't like wasting it.  As you'll see from the next two pictures, I make the most of it before using it as a layer on a card.

I used a variety of punches and framelits to punch out images from the center of the 5 1/4" x 4" piece of Champagne Glimmer Paper.

Here's the finished layer before I adhered it to the card front.   Looks pretty awful, but remember it'll be covered with the next layer of card stock and no one will ever know but you.   

After punching away the center of the piece (see above) I've cut away whatever scraps remained and left only a small border around the inside of the square.  This step saves on mailing costs by taking away the weight and bulk from the card
 3.  The next layer is a 3 3/4" x 5" piece of Cherry Cobbler card stock that's been texturized with the Stripes Embossing Folder before being adhered over the glimmer paper layer.   Note it's hard to stick card stock to glimmer paper so I used Tom Bow adhesive to attach.

4.  I cut a banner from the Trim a Tree Designer Series Paper Pack and a coordinating square which were both mounted on card stock to give them a little more stability on the card front.  The edges were sponged with Crumb Cake Ink to give them a vintage look.  
 
There are 48 sheets of 4 1/2" x 61/2" pieces of Christmas themed designer series paper in this stack.  Pages coordinate with  Cherry Cobbler, Garden Green, Crisp Cantaloupe, Pistachio Pudding, Sahara Sand, Early Espresso and Whisper White inks and card stocks.

5.  I stamped a medium sized star from the Bright & Beautiful stamp set in Cherry Cobbler ink on a piece of Crumb Cake Cardstock.  This star and a smaller one were cut out using the Star Collection Framelit dies.   I mounted the medium star on Cherry Cobbler card stock and fussy cut around it leaving a 1/8" border.  This was mounted over top of the banner with dimensionals.


6.  The smaller star was cut from the Garden Green piece of DSP and was stamped with the word "JOY", one of the five word stamps featured in the Bright and Beautiful stamp set. I cut out an additional small star from the Champagne Glimmer paper and mounted the DSP star to it with glue dots.  I also punched out five small stars with the Itty Bitty star punch and mounted them to the card front with glue dots.  
 

I hope you enjoyed today's card and brief tutorial.  Please leave me a comment if you have a moment, I really value your feedback.   Let me know how you do your Christmas cards........ all at once, or do you make a few at a time throughout the year and set them aside?  I'd be interested in any great methods you might have for making cards in bulk.  

Happy Stampin'!
Penny Tokens 

Sunday, August 31, 2014

Freshly Made Sketches Challenge #151

It's Labour Day weekend and, as usually happens on a long weekend, we've had a mixed bag of weather, with cooling temperatures and some rain.  I feel sad that the beautiful warm weather we'd been having didn't hold for all those families trying to get in one last camping trip or day at the beach before the bustle of September and back to school starts. Oh well, it's the prelude to fall. 

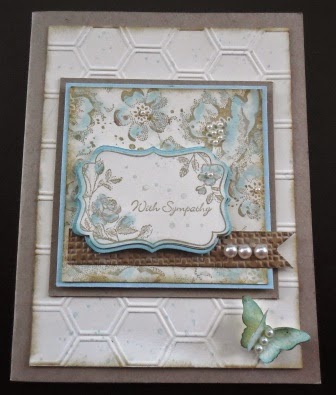
Today I've made a Sympathy card based on a sketch from Freshly Made Sketches Challenge #151.  I liked the simplicity of this sketch designed by Kim Singdalsen the Freshly Made Sketches August Guest Designer.  It was her first ever sketch, and she's done an awesome job!  Check out all Kim's other great cards on her blog Joyful Creations With Kim.  
Here's Kim's Sketch:


Here's My Card:

Supplies:
Stamp Sets: 
  • Four Frames
  • Teeny Tiny Wishes 
  • Friend to Friend (R)
  • Gorgeous Grunge
  • Papillion Potpourri
  • Stippled Blossoms
Card stock:  
  • Crumb cake for the 8 1/2 x 5 1/2" base, the 3 1/4" x 3 1/4" layer and the 1/2" x 3 1/8" banner.
  • Soft Sky for 3 x 3" layer and scrap for the Decorative Label layers
  • Very Vanilla 5 x 3 3/4" for first layer, 2 7/8" x 2 7/8" for stamped layer and a scrap for the Decorative layer and butterfly.
Ink:  Crumb Cake, Early Espresso and Soft Sky

Accessories:   
  • Decorative Label Punch
  • Bitty Butterfly Punch
  • Square Lattice Embossing Folder (R)
  • Honeycomb Embossing Folder 
  • Aqua Painter
  • Basic Pearls
  • Dimensionals, Glue Dots, Adhesive Strips
 
The Very Vanilla layer measuring 5" x 3 3/4" was embossed with the Honeycomb Embossing Folder and then randomly and lightly stamped with the speckled stamp from the Gorgeous Grunge set and Soft Sky Ink.

The banner strip was cut from Crumb Cake card stock and embossed with the now retired Square Lattice Embossing Folder.  Three medium sized basic pearls were added for some interest.

For the 3rd layer on the card I stamped the floral image from the Four Frames stamp set in Crumb Cake on a piece of Very Vanilla card stock.  Details on the flowers were touched up with Soft Sky ink and an Aqua Painter.  One small basic pearl was added to the top flower to tie it in with the flowers on the 2nd layer.  This piece was punched out with the Decorative Label punch and a border was added in Soft Sky card stock.  Some small sprinkles were added in Soft Sky with the Gorgeous Grunge stamp.
 
Decorative Label Punch coordinates with the Four Frames Stamp Set.


Four Frames Stamp set - a very stylish stamp set.

I started the design on the 2nd layer of Very Vanilla card stock by randomly stamping the sprinkle image from Gorgeous Grunge in Crumb Cake ink.  The large rose and smaller detailed petal roses from the Stippled Blossoms stamp set, were then stamped randomly in Crumb Cake  ink. I used an Aqua painter and Soft Sky ink to add shadows and hints of colour to the roses and then finished off this layer with a smattering of tiny basic pearls in the flower centers. 

I
 I wanted to keep the inside of the card simple with lots of "white space".  A 5 x 3 3/4" piece of Soft Sky was added to the inside of the card and topped with a piece of Very Vanilla cardstock measuring 3 1/2" x 4 3/4".  The sentiment "Thinking of You" from the retired Friend to Friend set was stamped in Early Espresso and the large flower image from Stippled Blossoms was stamped in the bottom corner in Soft Sky.

The beautiful little butterfly was stamped twice in Soft Sky ink on Very Vanilla cardstock and then punched out with the Bitty Butterfly punch.  The edges of the butterfly were sponged with Soft Sky and Crumb Cake inks.  The butterflies were nested with a Glue Dot and then added to the card with a dimensional.  The wings were fluffed up with the bone folder to give an appearance of flight and finally a small band of pearls was added for the body. 

Here's the finished card.  I'm pleased with how it turned out. 


Well that's it for today folks.  I hope you'll take the time to go and check out all the other entries and guest designer cards for this sketch on the Freshly Made Sketches blog site.  There is so much creativeness and awesome ideas there. 

Happy Stamping!
Penny Tokens

FREE SHIPPING - ONE DAY ONLY

  MAY DAY!  MAY DAY!  MAY DAY! If you have something on your wish list, or are thinking about stocking up on some essentials, now is your ti...