Showing posts with label Christmas Stamp a Stack. Show all posts

Thursday, July 21, 2011

Christmas In July Workshops

Everyone loves to get a jump on making their Christmas Cards and because of this I decided to hold a "Christmas in July" stamp-a-stack workshop to help get things rolling. I actually offered this class on July 10th at my home and again on July 13th in Vernon, BC. What fun we had. Each participant made 4 of 4 different card designs in a 31/2 hour class. Whew!!! That was a lot to accomplish. Want to see what we made: 

Here are the 4 Christmas Card Designs.
Each of the cards has it's own unique feel and utilizes a number of punches and stamp sets from the new 2011-2012 Idea Book and Catalogue.  Here are the individual cards and a brief description.
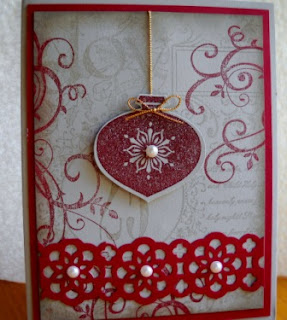
Christmas Ornament Card:  Sahara Sand cardstock stamped with Christmas Collage, Baroque Motifs and mounted on Cherry Cobbler.  The new Lace Ribbon Border Punch adds a decorative design.  The ornament is from the Delightful Decorations Stamp set and punched out with the Ornament Punch. 

The Vernon class used River Rock cardstock in place of the Sahara Sand and the edges were sponged in Cherry Cobbler.  The combo really worked.

The second card design was inspired by a design on page 21 of the IB&C which features the Snow Much Fun Stamp Set from page 35 of the catalogue.  I love this new set and so did everyone in the class.   I've also provided the details for this card in my earlier post entitled Inspiration in Action Case Contest.

Here's a closeup view of the Snowmall layering and the inside of the card.  The layering makes the snowman look so fat and jolly and brings some life to the card too!


The third card featuring two adorable penquins in the snow is based on punch art using the Owl Builder Punch (118074) page 213 IB&C.   What fun this was.   To position all the little parts of this punch art like the eye balls and nose, we used a tip I found on one of the blogs (sorry if it's your blog please let me know so I can give you credit here) whereby you use a toothpick dipped in melted bees wax to pick up all the little pieces.  This worked like a charm and made it both easy to glue and position these small little pieces.   The card is layered on Whisper White cardstock.  A piece of Baja Breeze is embossed with the Northern Flurries Embossing Folder and the sentiment is from the "Sincere Salutations" stamp set. 

And finally, the fourth card which also uses one of my all time favourite seasonal stamps "Holiday Lineup" is designed to look like these happy little snowmen are all huddled outside a window on a cold frosty day.  Lots of colouring with markers here but the design is super simple to recreate and is all about stamp placement.


I still have some class sets left so if you are interested in making the stamp a stack or a class just featuring one of each of the 4 designs then give me a call, I'd be happy to arrange a date and time.

Thursday, December 2, 2010

Delightful Decorations Movers and Shapers Card - Christmas Stamp-A-Stack

This summer I've really used my Big Shot a lot and one of my favourite Big Shot die cuts has been the  Magnetic Movers and Shapers Curly Label  (114506 pg. 208 IB&C).  It's very easy to use and adds a beautiful window design to a card front.   There are also two accompanying sets that can be used with this set.  The one I ordered is called Holiday Windows (116821 pg. 208) and it has an ornament, a dove, a circle and a curly label die shape.  This set is absolutely perfect for the holiday season and I think will add some real versatility to my cards.

Initially I was planning on using it to make a card with a window in the front corner, but let me tell you all that changed in a flash when I happened across a video tutorial on  Glenda Caulkins blog site .  She demonstrates some unique and interesting ways to use the Movers and Shapers magnetic die cuts not only for this card project, but for others.  She's awesome! 

I was intrigued by her floating ornament card and as soon as I saw it I shamelessly wanted to CASE it.  My intention was to use the Candy Cane Christmas Specialty DSP from the Holiday Mini catalogue (SOLD OUT) along with the Merry Crittermas Stamp set I had on order.  Imagine my disappointment when the stamp set arrived but not the DSP. I was fortunate to get my order in just before it sold out but  the last I checked, it's still in transit. Oh well, my fingers are crossed it'll arrive this week and then I'll make this card again and post it for you.

Okay, so not to be defeated and because I was dying to make this card, I rummaged through my scrap DSP and found some retired SU paper that looked like it would work, and I teamed it up with Creamy Caramel and Real Red Cardstock.  I loved the simplicity of this card, the few supplies required and how quick it was to make.  It kind of reminds me of Hansel and Gretel and/or gingerbread houses....what do you think?  Here's a view of the full card from a couple of different angles. 

The trick to making this card is to ensure that the fold is centered on the die cut and the Big Shot plate only covers to the fold line when you run it through the machine.  If you watch the video tutorial it is self explanatory. 
.

The sentiment which is from the retired Christmas Punch stamp set is stamped in Early Espresso on the inside of the card.  I initially stamped the sentiment on a post it note and used that to make sure of the placement before stamping to ensure the sentiment didn't show when the card front was closed.  That worked perfectly.

NESTS OF CHRISTMAS PAPER PUMPKIN ALTERNATIVES USING #fms#662

 Here's the latest sketch challenge from Freshly Made Sketches #662 and designed by Jen T.  Make sure you check out the Design Team car...