What signals one of my most favourite times of the year? Well, for me the first signs are the leaves starting to turn, the weather's getting a bit chillier at night, and the kids are back in school. Yep, FALL is officially here and it's time to start thinking about all the seasonal celebrations ahead.
This weekend I've joined the Wacky Watercooler Blog Hop design team to celebrate a "September Mixup". Our hop is running from tonight through the 19th of September and is offering some really creative ways of using products from both the new and annual catalogues.
We have 15 terrific gals participating and showing off their talents so be sure to follow the hop and leave some love along the way! The Wacky Watercooler Blog Hop runs in a circular fashion, so no matter where in the list of participants you begin, inevitably you'll wind up in the exact same place again if you keep going to the "next".
If you started at the beginning of the hop you've just arrived from Marsha Reed's fabulous blog. Wasn't her project awesome? Okay now it's time to see what I came up with...........
Halloween Gift Bags - Howl-o-ween Good Times!
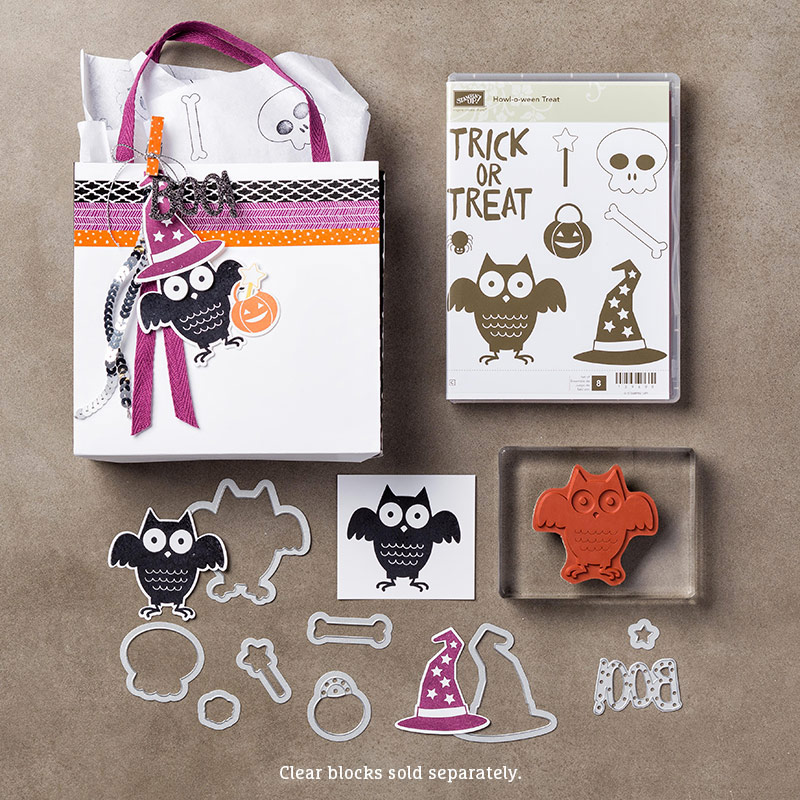
We don't get many kids on Halloween night anymore, so for those 5 or 6 that brave the elements to haunt my front door, I love to have some special treat bags on hand.
Supplies:
Stamp Sets: Howl-o-ween Treat* Six Sayings Hostess Set Holiday Catalogue
Ink: Blackberry Bliss, Hello Honey Marker. Momento Tuxedo Black Ink, Tangello Twist Re-Inker
Card stock: Tangello Twist, Gold and Black Glimmer Paper, Happy Haunting Designer Series Paper
Accessories: Lots of Labels Framelit Dies, Boo To You Framelit Dies, Spider Web (R) and BoHo Chic Embossing Folders, Bat punch(R), Google Eyes (non-SU), Dazzling Details, Pumpkin Pie and Blackberry Bliss ribbons, Word Window and Large Oval punches, Basic Rhinestones, Dimensionals, Tom Bow Glue, Big Shot and Trimmer.
 |
| The Howl-o-ween Treat Stamp Set which comes in wood or clear mount and the Boo to You Framelit Dies are featured on page 49 of the catalogue. They can be bought individually or you can save 15% by purchasing them as a bundle. |
 |
| I love this cute little 4" x 1 1/2" gift bag. It's simple, very quick to make and decorates easily. For this bag I started with a 12 x 6" piece of the Happy Haunting Designer Series Paper. If you love Halloween Paper, this set of design papers is a real winner. Each design and the colour mix are very special. |
 |
| I used a Hello Honey marker for the owl's nose and a Blackberry Bliss Marker to enhance some of the feather details on the owl's body. I punched out two small circles with the Itty Bitty Punch set from Black Glimmer paper to mount the google eyes on. Although they don't show up very well in this photo, the wavy feathers on the owl's chest were coloured with dazzling details that I added a bit of Tangello Twist re-inker to. I used two of the Label Framelits from lots of Labels to die cut the two label tags that the owl is mounted on. I embossed the smaller label with the Bo Ho Chic embossing folder and the larger one is cut from Gold Glimmer paper. They are mounted to the bag with dimensionals. |
My Second Bag:
 |
| Here is the second bag which showcases the Skull and Crossbones from the Howl-oween Treat stamp set. I layered the stamped images on two labels cut out with the Lots of Labels Framelit Dies. The Blackberry Bliss label was embossed with the now retired "Spider Web" TIEF. The other label was cut from Gold Glimmer Paper. I stamped the super cute little spider from this stamp set in Tuxedo Black ink and then punched out a piece of Black Glimmer paper with the circle punch from the Itty Bitty Accents punch set and glued it onto its back with a dimensional. Two rhinestones coloured with a black sharpie were added to the skull's eye sockets. The "FaBOOlous" sentiment is from the Six Sayings Hostess stamp set. I fussy cut out the wording and added dazzling details to make it glimmer. |
Directions for the Bag:
1. Cut 12 x 6" piece of Designer Series Paper or Card Stock of choice.
2. Score on long side at 4", 5 1/2", 9 1/2", and 11"
3. Turn DSP to short side and score at 4 1/2".
4. Cut from the bottom along score lines to the 4 1/2" score line. Fold on score lines and trim off small rectangle in bottom right hand corner of bag.
5. Assemble bag with Sticky Strip. Fold so small tabs are on the inside of the bag bottom and there is a large tab on the bottom. You only need to apply sticky strip or glue to the side seam and the bottom of the bag.
6. Pinch the sides of the bag together towards the top, like a lunch sack.
7. Make a handle area by punch through both thicknesses with either a Word Window or a large oval punch.
Embellished Ornament:
Do you ever look at a stamp set or dies in a magazine or catalogue and it sucks the breath right out of you? Well that's what happened to me when I turned to page 15 in the Holiday Catalogue and saw the Embellished Ornament stamp set and coordinating Delicate Ornament Thinlet Dies. I fell in love with them, and they quickly went to the top of my wish list. Here's what I've made with them so far:
 |
| I pride myself on finishing the insides of my cards to mirror the exterior. When I finished this card, I laughed because the inside could actually be the outside it turned out so pretty. I owe that to the Delicate Ornament Thinlet die that I used to cut out this precious bauble. These are pretty intricate dies but I use a cardboard and wax paper shim when I run these dies through my big shot and I find they cut like butter on card stock, glimmer and foil papers. |

|
 I stamped two additional ornament images and fussy cut the flower from the center of both. These were mounted with dimensionals on the original ornament and a basic rhinestone was added to the center. You might think that the shiny circles on the ornament were achieved with rhinestones, but think again. I actually cut the 1/8" circles from Dazzling Diamonds glimmer paper using a punch and then glued them on to each of the spots on the ornament. I cut the point off a toothpick and used that to apply the glue to the back of the dots and then add them to the ornament. I stamped two additional ornament images and fussy cut the flower from the center of both. These were mounted with dimensionals on the original ornament and a basic rhinestone was added to the center. You might think that the shiny circles on the ornament were achieved with rhinestones, but think again. I actually cut the 1/8" circles from Dazzling Diamonds glimmer paper using a punch and then glued them on to each of the spots on the ornament. I cut the point off a toothpick and used that to apply the glue to the back of the dots and then add them to the ornament. |
Supplies:
Stamp Set: Embellished Ornaments
Card Stock: Smokey Slate, Whisper White and Blackberry Bliss, Silver Foil and Dazzling Diamonds Glimmer paper
Ink: Blackberry Bliss
Accessories: Softly Falling TIEF, Big Shot, Delicate Ornament Thinlet Dies, Basic Rhinestones, detail scissors, dimensionals, Tom Bow adhesive. 1/8" circle punch
You can bundle and save 15% on the Embellished Ornament and Delicate Ornament Thinlet Dies through January 4, 2016.
Usually I do three projects for these hops, and although I have one in the works I unfortunately didn't get the time I'd anticipated to finish it. But don't worry, rather than rush and botch the project I'm going to finish it later this week and then I'll share it with you under a separate post. So please make sure you come back and check it out.
Now that I'm done I'm passing you along to our next talented designer, Bev, who is sure to delight you with her projects. Make sure you click on her name here or on the "Next" watercooler icon below.
Happy Stamping Everyone!
Penny Tokens Stampin Spot


 Happy Stamping!