Sunday, January 22, 2023

Book Binding Card Featuring Adorable Owls

I just couldn't resist sharing one more Adorable Owls card with you.  The format or style of the card is called a Book Binding card.  For information on how to make this wonderful card click here to see one of my previous posts and instructions. 

How cute is this little one.  For this owl I chose Gray Granite Stampin' Blends for the feathers.  I put a dark gray outline around the face and then used a White Blender pen to softly draw in the colour.  I liked this effect and so I did the same for the owl's tummy. The eyes were coloured with Balmy Blue and Nuvo drops were added for a little shine and I lengthened the eyelashes with a black marker.  So sweet.  
The book binding card format is one of the quickest cards you'll ever make and it  has an instant WOW factor.  Another great feature of this card is that it doesn't use a ton of paper or card stock to make it.  In fact you can get two book binding cards from one sheet of 8 1/2 x 11" card stock.  


I took advantage of the beautiful papers in the Dandy Designs designer series pack to help choose my ink colours.  If I make this card again, I'll use my Fresh Freesia blends to add some tone around the edges of the DSP.  Fresh Freesia and Pale Papaya are a natural colour pairing and work well together in this card, to lend a very feminine look.    


This card combines sentiments from the Framed Florets stamp set and images from  the Adorable Owls.  I also stamped the large flower from Framed Florets and coloured it with Pale Papaya and Dark Flirty Flamingo Blends. I absolutely love the font mix in the Framed Florets set, especially the "Wishes for a Beautiful Birthday" sentiment.  


So I've shown you a few different cards to make during this series of Adorable Owls and I hope you've enjoyed looking at them as much as I did making them.  This grouping of cards would make a fun class.  Let me know if you live in the Abbotsford area and you'd like to participate in an Adorable Owls class.  I'd love to hear from you.  


HAPPY STAMPING!
PENNY TOKENS STAMPIN' SPOT!
Penny Hanuszak, CDN Independent Stampin' Up! Demo


Monday, January 16, 2023

Pop Up Birthday Cards with Adorable Owls

 Today's post includes a couple of cards made with Pop Up techniques and feature the following products:

  • Dandy Designs DSP - Sale-A-Bration Level 2 FREE with $120 purchase* #160836 
Here is Card Number One:

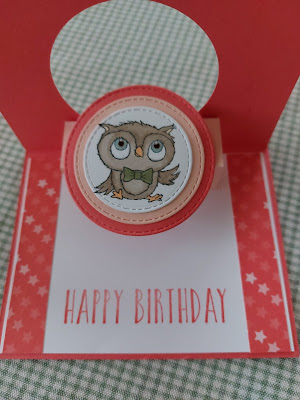
This is called a Pop and Flip fancy fold card and is an ideal card style for birthdays of any age.  It never fails to bring a smile when the card is opened.  This one features one of the beautiful plaid paper designs in Calypso Coral, Pale Papaya and Fresh Freesia colours, from the Dainty Designs 12 x 12 Designer Series Paper.

I really like this Pop and Flip design because it's quick and easy to assemble and has a real WOW factor for anyone receiving the card.  You can check this post for a masculine version of the card I made in December.  My inspiration for this card Pop and Flip card came from Dawn Griffiths.  Here is the link to her video.   

Here is Card Number Two:  Pop Out Swing Fold Card

This second card is also a fancy fold action card.  It's called a Pop Out Swing Fold. and there are many versions and tutorials on Youtube.  The one that inspired me was again created by Dawn Griffith.  Click here to view how to make this card.


This sweet little owl is coloured with Stampin' Blends. I used Crumb Cake Light and Dark for the Owl, light and dark Pale Papaya  for the beak, inside the ears, a little colour for the cheeks and the owl's feet.  The sweet little bow tie was coloured with light and dark Calypso Coral blends. 

Dawn Griffiths and the link to her Youtube instructions is here.  

I really like this last card style.  Although I didn't take a picture of it, I have added two Whisper White panels on the reverse side of the folded section for writing a message.  This works better and for me than adding a writing panel over top of the DSP.  

This is an example of one I made for an anniversary this month.  I've used papers and stamps from Stampin' Up's Everything's Rosy retired suite.  On this card I added a Whisper White panel that measures 3" x 3 1/2" and scored at the center for the message.  


I hope you enjoyed today's cards and will try out "pop up" cards in future.  They're fun and add a bit of zest to  birthday and other occasion cards.  I'd love to hear about your favourite fancy fold style so drop me a comment and I'll get back to you.  

HAPPY STAMPING!
PENNYTOKENS STAMPIN' SPOT
Penny Hanuszak, CDN Independent Stampin' Up! Demo 

Shop My 24/7 Online Store 
Click here to go to my online shop 


Friday, January 13, 2023

THREE GREAT REASONS TO SUBSCRIBE TO PAPER PUMPKIN IN FEBRUARY

FEBRUARY 2023  PAPER PUMPKIN KIT

The Sunshine & Smiles Paper Pumpkin Kit is going to be awesome, and yes, it's definitely gonna make you smile! 

This kit includes:

  • Everything you need to create 9 radiant cards—3 each of 3 designs—and 9 coordinating envelopes.
  • A sweet springtime photopolymer stamp set.
  • A Mango Melody Stampin’ Spot
  • A fun peek-through window scene on each card!
  • Cute precut critters and labels, fun raindrop embellishments, and more! 
  • Finished card size: 5-1/2" x 4-1/4" (14 x 10.8 cm)
This kit will provide the perfect solution when you have a friend or family member weathering a storm, and in need of a smile.  It'll definitely brighten their day!

There are three super great things about subscribing to the February Sunshine and Smiles Paper Pumpkin kit that I know you're going to LOVE!!!  

1.  SUITE COORDINATION: 

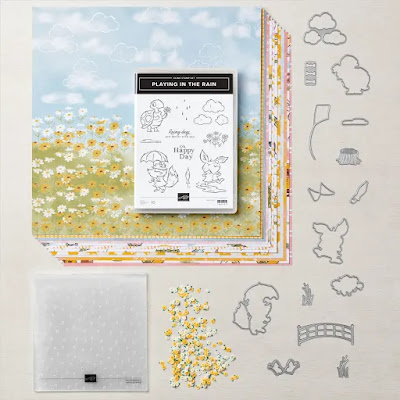
If you've checked out Stampin' Ups! new Mini Catalogue released on January 5th, you've probably already fallen in love with the Rain or Shine Suite Collection shown on pages 50 and 51.  If not check it out because it's going to capture your heart.  This suite has it all - a cute stamp set called Playing in The Rain with coordinating dies , a coordinating embossing folder called Raindrops, and the most awesome designer series paper called Rain or Shine.  There's even some sweet little flower embellishments called Loose Daisy.  


So here's the exciting news the February Paper Pumpkin kit will have stamps and precut paper critters that coordinate beautifully with Rain or Shine Collection as well as another surprise.

2.  ADD ON:

For the first time EVER, Stampin' Up! will be featuring an Add On of two coordinating dies.  I can tell you they're a cute frog and a flower and they'll go perfectly with the Rain or Shine Suite Collection to add even more enjoyment to your crafting experience.  So whether you're a beginner stamper or experienced this Add on which is sold separately, will be something you won't want to miss out on Sunshine & Smiles Dies (Available for purchase starting 11 January, while supplies last).

Item number: 162486    Cost $8.25 CAD

This Add On includes:

  • One coordinating frog-shaped die: 1-1/8" x 7/8" (2.9 x 2.2 cm)
  • One coordinating flower bouquet die: 1-1/8" x 7/8" (2.9 x 2.2 cm)

Note: Stampin’ Cut & Emboss Machine sold separately..    

3.  PAPER PUMPKIN SUBSCRIPTIONS AND SALE-A-BRATION: 

  • Subscription Period for the Sunshine and Smiles February  Paper Pumpkin kit is January 11 –  February 10 |
  • Many Paper Pumpkin subscribers purchase their 12 month pre-paid subscription during Sale-A-Bration each year so they get the best deal on 12 months of Paper Pumpkin including their choice of 4 FREE Sale-A-Bration products and Stampin’ Rewards. 
  • Click here to subscribe with me me .  Starting with the February kit I will be offering a monthly Paper Pumpkin Club.  Stay tuned for sign up information. 
HAPPY  STAMPING!
PENNY TOKENS STAMPIN' SPOT 

Penny Hanuszak, CDN Independent Stampin' Up Demo 

Sale-A-Bration Flyer: 
Click here to see PDF version 


Thursday, January 12, 2023

On the Farm - FMS Challenge #568

When you're paper crafting and you draw a blank what motivates you to create?  Over the years, I've found the best way for me to get my mojo going is to start with some kind of challenge.  It doesn't matter which paper crafting group, and there are many, or whether its a sketch, a color, or a theme challenge.  What matters is I've looked at something that has motivated me to move to my craft desk and begin creating. 

So today, in line with my 2023 New Year's Resolution to complete at least one sketch challenge a week,  I've taking my inspiration from the Freshly Made Sketches #568  challenge hosted by Judy.

Here's the Challenge Sketch:

And Here's My Card: 

On the Farm Bundle 


SUPPLIES AND MEASUREMENTS: 

Stamp Set :  

  • On the Farm 160652 - 17 cling red rubber stamps.  
  • Coordinates with the On the Farm Dies and can be purchased as a bundle #160661 with a 10% discount of total price. 

Card Stock and Paper: 

  • Whisper White for card base 8 1/2" x 5 1/2" scored at 4 1/4" and 3 3/4" x 5" piece for inside panel. Scraps for stamping the images, cut out with 1" square punch. 
  • Basic Black one piece 5 3/8" x 4 1/8" for front layer (1) and 3 1/8" x 5 1/8" for center panel.  Cut 3 stitched square dies from the inner parts of these two panels for the 3 black mounting squares. 
  • So Saffron layer (2) for front of card 5 1/4" x 4".  Embossed with  Evergreen Forest 3-D Embossing Folder (retired). Insider layer 5 1/4" x 4". 
  • Day at the Farm Designer Series Paper #160835 from the 2023 Sale-A-Bration flyer.  Cut a panel 3" x 5".  

This set is a Level 1 ($60.00) Freebie during Sale-A-Bration and will go quickly.  So, if you're like me and love country images then Day at the Farm 12" x 12" (30.5 x 30.5 cm) Designer Series Paper will be a must have!

One side of the sheet has country-inspired images: cows, sheep, and pigs; ducks and chickens; vegetables; barns and silos; trees and plants. One sheet even has a full-page scene that you can cut into six separate 4" x 6" (10.2 x 15.2 cm) scenes to use on card fronts! The other side of each sheet has basic patterns that have a subtle pastoral feel: wire, burlap, rolling hills, plaids.  

Here is a view of the whole sheet of dsp I  used for this card.  I made 8 cards by cutting and chopping this paper into workable panels.


INK:
Momento Tuxedo Black Ink for the images and inside sentiment
Cajun Craze, Mango Melody, Pear Pizzazz and Pool Party Stampin' Blends for colouring the three 1" panels.
 
ACCESSORIES:
Paper Trimmer #152392
Stampin' Cut and Emboss Machine #149653 for die cutting squares and embossing the front panel
Evergreen Forrest 3D Embossing Folder (retired)
Black Dimensionals # 150893 for mounting the three 1 1/4" square stitched panels.
Sponge Dauber #133773 for colouring background on white 1" panels

This card came together in under 15 minutes once I had decided on the papers and card stock colours I wanted to use, and that's the beauty of using a sketch.  Freshly Made Sketches is a great source for simple clean card or scrapbook layouts.  In fact they have a whole library of sketches to choose from.  Make sure you check them out.  

Happy Stamping!
Penny Tokens Stampin' Spot

Penny Hanuszak, CDN Independent Stampin' Up! Demo

SALE-A-BRATION

Click here to see the Sale-A-Bration Flyer PDF.  If you're Canadian and you'd like a copy of the flyer and the Holiday Mini Contact me. 

JOIN NOW 
Click here to JOIN My Team.


SHOP NOW 

Click here to shop in my  24/7 Online Store 


JANUARY HOSTESS CODE

Click here to see how you can earn an additional FREE gift from me by adding my January Hostess Code


Flying Through the Aspens


I'm excited to show you another card featuring the Adorable Owl stamp set from the Sale-A-Bration flyer.  This is card three of a series of cards I'm sharing with you using this stamp set, and there are more to come.


For today's card I wanted to feature the owl in flight, and I thought what better way to display it than if it was flying through the trees.  


How cool is that?  I combined the owl image with the Aspen Die and Fancy Flora Designer Paper from the new Mini Catalogue.  The Aspen Tree Dies which were  originally bundled with the Perched on a Tree stamp set in the holiday mini, were carried over has been carried over into the new catalogue.
Aspen Die Set coordinates with Perched in a Tree Stamp Set

Fancy Flora 6 x 6 DSP pack 

The card base is an 8 1/2" x 5 1/2" piece of Evening Evergreen cardstock and is scored at 4 1/4".  I adhered a 4 x 5 1/4" piece of the Fancy Flora papers that had a mixture of Soft Succulent and Highland Heather design for the next layer.  

For the final layer on the card front I die cut the Aspen Die from the center of a 4" x 5 1/4" layer of Whisper White and then embossed this piece with the Timber Embossing Folder. Before adhering it to the card base I used a sponge dauber and some Crumb Cake ink and added some colour to the tree trunks to bring out the texture.  The Owl was mounted with dimensionals.  

I finished off the card front with a small sentiment "Hoot! Hoot!" stamped in Evening Evergreen and mounted on a small piece of Evening Evergreen card stock.  I cut the sentiment "Hoot! Hoot! You're So Cute" into three pieces to give me more flexibility when using it.  

For the inside of the card I began with a 4" x 5 1/4" layer of Soft Succulent card stock.  I cut a 3/3/4" x 5" piece of Whisper White for the next layer and then added a 1" x 3 3/4" strip of the DSP along the bottom. 

The Happy Birthday sentiment is from a retired stamp set called Perennial Birthdays and the "It's your Day" is from the Adorable Owls stamp set.  Both were stamped in Soft Succulent ink. I couldn't resist adding the little owl with the bow tie to the bottom right corner.    

I hope you've enjoyed today's birthday card and how I've combined it with designer paper and a die to give it a whole new look.  

Happy Stamping!
Penny Tokens Stampin' Spot! 
Penny Hanuszak, CDN Independent Stampin' Up Demo 


JANUARY HOSTESS CODE: 
Click here to see how to apply the January Hostess Code to Your Online
Order and get an additional FREE Gift from me.


SHOP IN MY ONLINE STORE: 

Tuesday, January 10, 2023

ADORABLE OWL BIRTHDAY PROJECTS

My card today combines the three owl images from Adorable Owls and a fun die called Picture This to create a sweet birthday card. This card would be great for either a child's or an adult's birthday, or other occasion.


I love the colour combination of Bermuda Bay, Fresh Freesia and Granny Apple Green for the dotted paper background.  The Dandy Designs DSP #160836 is available for FREE with a $120 purchase during SALE-A-BRATION.  This 48 pack of 12 x 12 papers, that includes plaids, polka dot and stripe designs is ideal for making cards or scrapbook projects.

Dandy Design #160836
Supplies:  

Stamp Sets:   
  • Adorable Owls #160269 FREE LEVEL 1 with  $60 purchase during Sale-A-Bration.  Stamped all three of the owl images for this card.  Stamped the word "Hoot!" on card front.  
  • Family and Friends (just retired from July to Dec Mini) for the string of lights on inside panel. 
  • Perennial Birthday (retired) for the Happy Birthday sentiment on the inside panel. 
Card Stock and Paper:
  • Whisper White Cardstock - 2 pieces.  One 8 1/2 x 5 1/2" scored at 4 1/4" for the base and a second piece 3 3/4" x 5" for the inside.   Scraps of Whisper White to stamp three owls in Black Momento Ink.  
  • Granny Apple Green - 2 pieces. For front layer cut a piece 5 3/8" x 4 1/8" adhere to front of card base.  For inside cut a piece 4" x 5 1/4" and adhere to card base. 
  • Bermuda Bay - 2 pieces.  Cut a piece  4" x 5 1/4 for front layer and a scrap for stamping three "hoots!" sentiment times 3.  Cut out stamped images with a 1" circle punch. 
  • Dandy Design DSP - 1 piece measuring 3 3/4" x 5" Line up the Picture This die cut to center on the dsp and run through Big Shot.  
Ink:
  • Momento Black ink for stamping owl images on Whisper White 
  • Versa Mark Ink on scrap of Bermuda Bay.  Sprinkle with White Embossing Powder and heat set.  Cut out with 1" circle punch and adhere to Bermuda Bay cardstock layer.  
  • Stampin' Blends:  Light and Dark Gray Granite, Light and Dark Bermuda Bay, Light and Dark Pale Papaya
  • Markers:  Basic Black Marker for touching up eyes 
  
 
These owls really are adorable and make me smile every time I colour or add one to a project.  To highlight those beautiful big eyes I coloured the black portion with a Stampin Up Basic Black Marker and used the dark and light Bermuda By Stampin' Blends to colour the eye portion.  

I left a little white space below the coloured portion and it seemed to give a bit more life and then topped it off with a small application of NUVO Clear drops for shine.  You can achieve the same result with clear liquid glue but remember to let it dry thoroughly before touching or moving your project. 


Here is another Adorable Owl birthday card using the same Dandy Designs dsp for my card background.  I changed up the colours for this card and brought in a panel of Fresh Freesia as the accent  colour. 


For this card, I stamped several owls in Momento Black ink on a piece of 5 1/4" x 4" Whisper White card stock.  I coloured them with Stampin Blends in light and dark Crumb Cake, Granny Apple Green, Bermuda Bay, Pale Papaya and Fresh Freesia.   I didn't colour the middle owl, instead I used one of the pre-coloured images I had fussy cut and attached it with Dimensionals.  This little guy had blue eyes and a blue party hat to set him apart from the rest of the owls and show he was special.  I stamped the sentiment "It's your day!" in Fresh Freesia ink and mounted it on matching card stock.  A sprinkle of pearlized sequins added some shine. 

When I was finished colouring the owls I was going to adhere the full panel overtop of the polka dot dsp, but I decided to change that up and give the card more dimension.  I cut a 3 1/4" x 4 1/2" layer from Fresh Freesia cardstock and a 3" x 4 1/4" rectangle using the Scalloped Contours Dies #155560, from the owl panel and adhered these two panels with Dimensionals, before attaching to the dsp layer. 

I hope you liked these cards and would love to hear your thoughts on this stamp set.  I'll be posting more in this series later this week, so come back again.  Cheers.

Happy Stamping!
Penny Tokens Stampin' Spot

Penny Hanuszak, CDN Independent Stampin' Up! Demonstrator


Monday, January 9, 2023

Time for a Sketch Challenge - FMS #567

Amy is the sketch hostess for the Freshly Made Sketch challenge #567 this week.


Here's My Card:


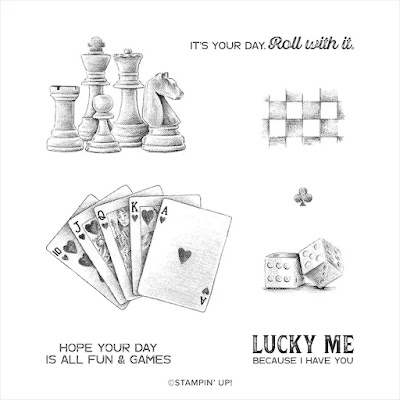
For today's card I decided to make a monochromatic masculine birthday card featuring images from the retired Game On stamp set from Stampin' Up!  I liked the sketch as presented, however decided to flip it to a landscape card because the circle images just worked better for my layout that way. 

The card base is an 8 1/2 x 5 1/2" piece of Cinnamon Cider cardstock that is scored at 4 1/4".  I created a stamped layer on a piece of Very Vanilla cardstock that measures 5 1/4" x 4".  


To create the background I stamped the deck of cards with Cinnamon Cider ink, moving in a clockwise pattern and then filling in the blank spots with the edges of the stamp. 


I stamped the dice twice on Very Vanilla cardstock and cut them out with a 1 1/4" circle punch.  I did the same for the deck of cards and cut it out with a 1 3/4" circle punch.  The Cinnamon Cider punches were cut out with the Picture This circle die.  

This was a quick way to die cut three perfect circles.

This card was quick and easy to make and didn't require a lot of work.  Hope you enjoyed this post and will come back again.  

Happy Stamping!
Penny Tokens Stampin' Spot
Penny Hanuszak, CDN Independent Stampin Up Demo 


2024-2025 Annual Stampin' Up! Catalogue has launched!

 HAPPY MAY 1ST| Today I'm celebrating and  sharing the launch of the much awaited Stampin' Up! Annual Catalogue which will run from ...