Tuesday, December 1, 2020

Toasty & Warm Wishes - Using Up Scraps


Happy December!  It's hard to believe December 1st has arrived and we're still under COVID restrictions.  For us that means no mixing and mingling, but I'm not letting that get my spirits down.  My house is now decorated from top to bottom, I'm playing Christmas tunes while I stamp and admiring my treasured Christmas ornaments and lights.  All my neighbors have hung their lights too so I'm definitely getting in the Christmas mood. 


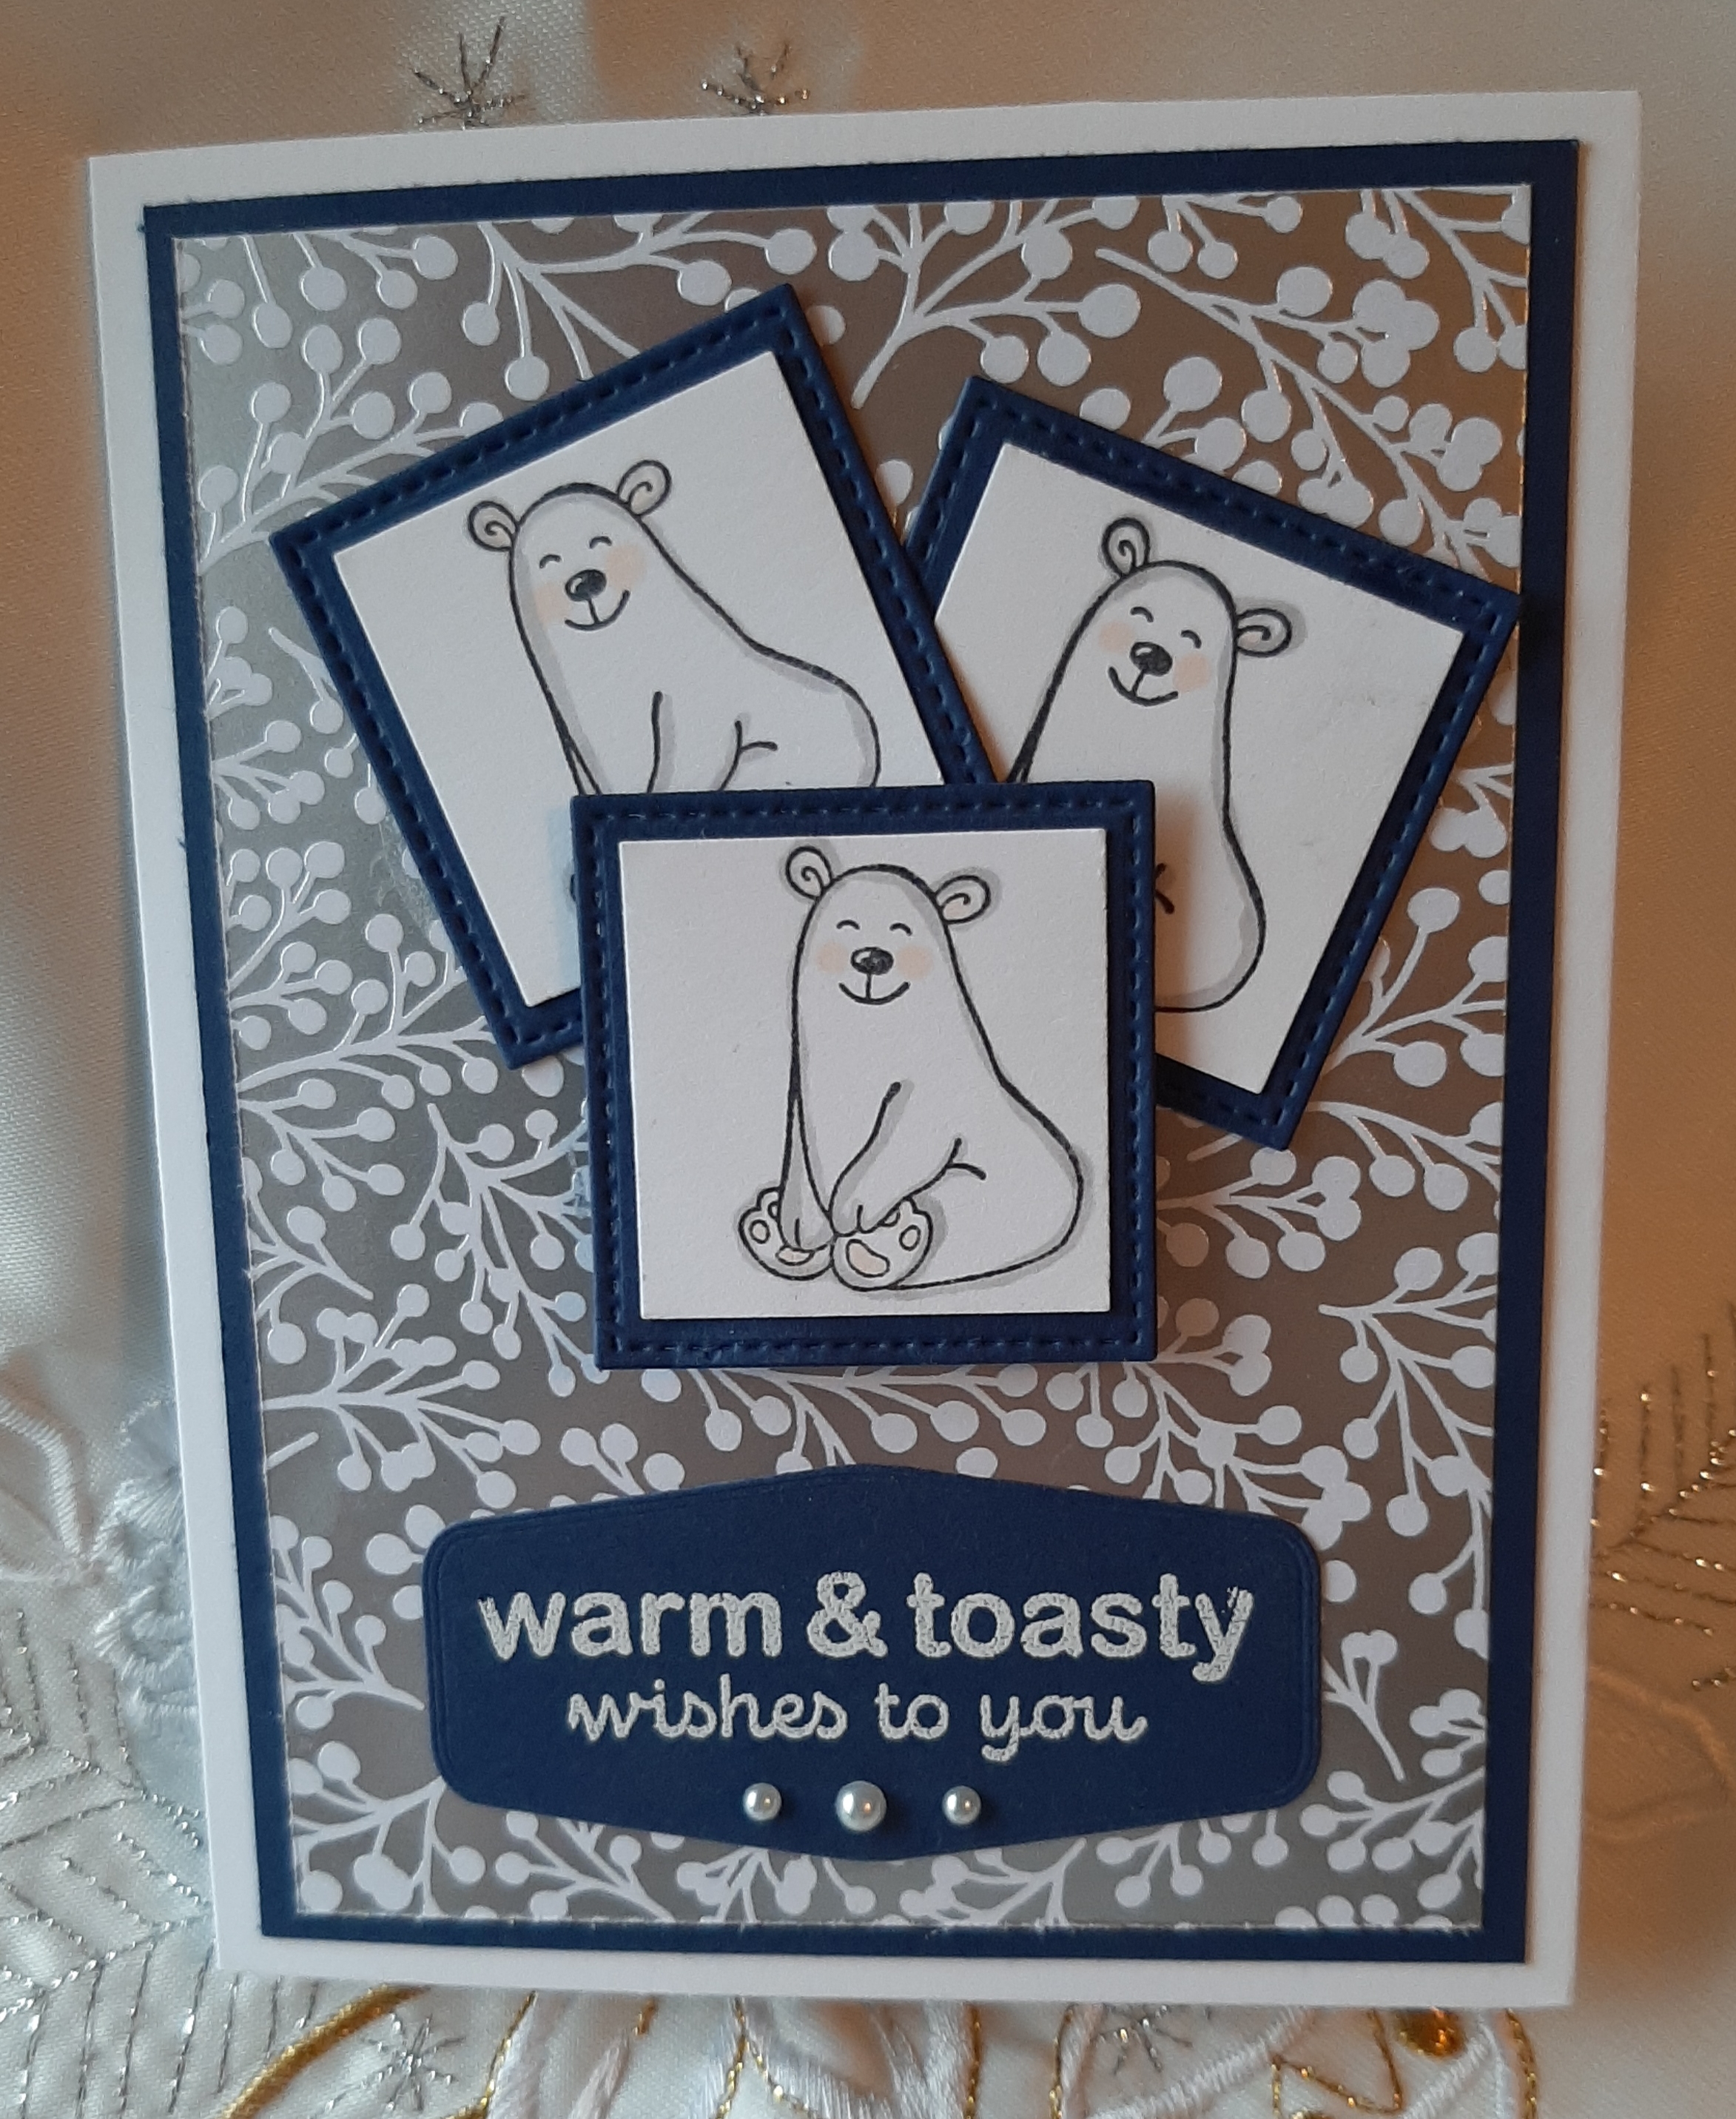
Yesterday I posted a card for the Freshly Made Sketches challenge #463 featuring the Polar Bear from Toasty & Warm, and I promised to show you a second card I made using the same sketch.
Freshly Made Sketches - by Amy #463

Here is my card:

For this version I used the Snowflake Splendor Designer paper but I flipped it over and used Pool Party and Shaded Spruce as my main colours for card stock, inks and blends.   The snowflake design and softly muted colours of this paper are beautiful.  
Snowflake Splendor Designer Series Paper.

I dry embossed the Designer Series paper with the snowflakes from the Winter Snow Embossing Folder.  The strips were cut from scraps of Pool Party and Shaded Spruce card stock I had on hand.  All the measurements and details are in yesterday's post which you can see here

I changed up the platform that the bear is on from an oval to one of the medium sizes Stitched Nested Labels dies and cut it from a piece of Gold Glimmer paper I had in my stash.  

The Stitched Nested Shapes Dies are great for layering sentiments and images.   

I also changed up the inside of the card a bit by simply changing the side the paper strip was attached to.  I used the same sentiment "warm and toasty wishes to you" and stamped it in Shaded Spruce ink.  


I'm happy with both of the cards I made using the FMS design. But this card isn't only for Christmas, it could easily be rejigged by changing the sentiments for winter birthday or friendship cards. Either way, it's sure to put a smile on the receiver's face when they see their card. Love it!


Thanks for dropping by and viewing my projects.  I'd love to hear what you think of these cards.  Which is your favourite colour combination?  Would you use this layout?  

Happy Stamping!

Penny Tokens Stampin' Spot

Penny Hanuszak, Independent Stampin' Up! Demonstrator 


DECEMBER HOSTESS CODE:  SRMEMX7U

If you're planning on placing an order in December please apply my Hostess Code at the end of your order "SRMEMX7U" if your order is less than $200 before s/h& tax, and you will receive a special gift from me.  If your order is over $200 don't apply the code, because you'll receive Stampin' Rewards based on your order total.  Thank you.

December Contest - Win a Stamperatus Platform

I'm having a draw for a brand new Stamperatus Platform during the month of December.  To be eligible to win just place a minimum $50.00(before s&h and tax) order and your name will be entered in my Christmas Day draw. 

Winner will be notified on Christmas Day!  What a great present!  Value $67.00.  Note:  Canadian orders only.  

Monday, November 30, 2020

Using Up Paper Scraps - What About Those Strips?

For this week's sketch challenge at Freshly Made Sketches I'm going to be looking at using up some of the scrap strips I have been hanging on to.  You know the ones you didn't get around to using on the inside of a card, or for other projects.  

Here's the sketch:

What do you do with all your left over strips of card stock when you finish making cards for the day?  I don't throw mine out, I simple store them in a tall glass by my trimmer.  My scrap strips vary in length and width, and usually range anywhere from a 1/4" to 1" wide.  Most of these strips are a minimum of 6" long sometimes a bit shorter.  I use these strips for decorating the inside of my cards and or stamping sentiments on. Having them out on my table where I can see them means they get used up and I'm not always cutting strips from my larger papers.  

For today's card I needed three short narrow strips of card stock in Highland Heather, Gorgeous Grape and Pool Party. It turns out I had all three colours in 1/2" x 5 1/2" strips and I only had to trim them down on the ends.  Made my day!  

Here's My Card Using The Strips & the Warm & Toasty Stamp Set:

I'm so happy with the way this design turned out.  It's a great sketch and came together very quickly.  

I started with an 8 12" x 5 1/2" piece of Highland Heather card stock and scored it at 4 1/4" for the card base. Next I added a 4" x 5 1/4" piece of Gorgeous Grape card stock, followed by a 5" x 3 3/4" piece of the beautiful Snowflake Splendor Designer Series Paper(dsp).  

I embossed the dsp with the Winter Snow Embossing Folder and sponged the edges with Highland Heather ink and a sponge dauber, before adhering it to the first layer.  Love it!  

The snowflakes in the Winter Snow EF are beautifully designed to give a soft background yet dense enough that you can see each beautiful design.   This embossing folder is featured in the Holiday Catalogue until January 4th, 2021. 

I can't say enough about the Snowflake Splendor dsp, it pairs beautifully with Balmy Blue, Coastal Cabana, Highland Heather, Misty Moonlight, Night of Navy, Pacific Point, Pool Party and Whisper White.   The piece I chose for my background coordinated really well with the Highland Heather, Gorgeous Grape and Pool Party card stocks I chose.  

I was able to shape the tops of these strips with my Lovely Labels Pick a Punch #152883. I used a sponge dauber and the corresponding inks to give each strip some definition and for fun I stamped the "just for you" sentiment from Warmy & Toasty on the ends of the strips. 

Create six unique labels using the Lovely Labels Pick a Punch. You get two designs in three widths--1" (2.5 cm), 3/4" (1.9 cm), and 1/2" (1.2 cm). Just cut a strip of paper to the desired width (any length), then slide it in, punch, and get a perfect label.  Item # 152883 in the Annual Catalogue.


I stamped the Polar Bear on a scrap of Whisper White and fussy cut out his image. Isn't he cute?  I really love his sweet little face and his cute little tush.

I coloured his scarf and toque with Highland Heather Light and Dark Stampin' Blends.  I drew a very thin line around the inside of the bear's image with a Light Smokey Slate Stampin' Blend.  His skates and nose were first coloured with a Dark Black Stampin' Blend and then I added some shine with Crystal Clear Nuvo Drops.

To provide a base for the polar bear, I cut out an oval using the Stitched Shapes dies from some old silver glimmer paper.   "Here's to a Cool Yule" was stamped in Gorgeous Grape ink on a scrap of Whisper White and then cut out using the tab die from the Tasteful Labels Die cuts. Some Basic Rhinestones were added to the tab and the three strips to give a little interest.  

For the inside of the card I cut a 4" x 5 14" layer of Gorgeous Grape followed by a 5" x 3 3/4" piece of Whisper White.  I added a small 1/4" strip of the DSP to the right of the Whisper White layer and stamped the sentiment "warm & toasty wishes to you" and a small snowflake in Gorgeous Grape.  

And that is my card for today.  I hope you liked it.  I'm working on a second one that will be in Coastal Cabana, Pool Party and Shaded Spruce, so come back tomorrow to see that version.  

HAPPY STAMPING!

PENNY TOKENS STAMPIN' SPOT 

Penny Hanuszak, Independent Stampin' Up! Demonstrator 


LAST DAY FOR NOVEMBER 

HOSTESS CODE: ZZ49FQKS

If you are placing an order today and it is under $200 CDN before S&H, apply my November Hostess Code and you'll be eligible to receive a gift from me.  If you're placing an order valued at over $200 CDN you will automatically receive Stampin' Rewards based on the total value of your order before S&H.  


Click here to shop in my 24/7 Online Shop


Monday, November 23, 2020

WARM & TOASTY WISHES FOR YOU

Freshly Made Sketch challenge this week is by Narelle, who did a pretty good job of "throwing" this sketch together based on her computer icon.  Love the inspiration!  

Here's My Card:


My card features the tiny polar bear from the Warm & Toasty Stamp Set.  He is such an adorable little character I just couldn't resist.  But don't just think of this image as being a Christmas/winter image it can be usable all year round.  At the end of the post I'll show you a cute card I made to welcome baby using this sweet and versatile image.  

My card started with an 8 1/2" x 5 1/2" piece of Whisper White card stock that was scored at 4 1/4".  The first layer is a 5 1/4" x 4" piece of Night of Navy followed by a 5" x 3 3/4" piece of designer paper from the Feels Like Frost designer series pack. Stampin' Up! thankfully brought this beautiful winter themed 6 x 6 paper pack forward from last year's Holiday Catalogue.  The designs are so much fun to work with and I absolutely love the metallic designs on the reverse side.    


This is the exact paper I chose for my card background today.  I started off matching my Night of Navy card stock to the beautiful image but when I turned it over to add my glue, I stopped, stared and in that aha moment chose to showcase the metallic side of the paper.  So beautiful!

The bears were stamped in Momento Black ink on Whisper White card stock and then punched out with my 1 1/4" square punch. I coloured the bears with Stampin' Blends. Don't you think the little blush cheeks and toe pads are cute? I used the light powdered pink blend for those. The bear is outlined with the light smokey slate blend and it adds just enough of a shadowy light colour to bring him to life.

The Night of Navy squares that the bears are mounted on were cut with the 2nd smallest die cut in the Stitched Shapes squares.   The two background squares were just adhered with Tom Bow adhesive, but I added a double layer of Dimensionals to the lower part of the front square so it would pop it up enough to provide some dimension.  That seemed to work.  

And that's it for this fun FMS today.  Once I decided on my theme this card literally came together in minutes, which is what I want.  Another pro is that the card is flat and mail able, which is great at this time of year if mailing a lot of cards.  I also think this sketch would be usable for any theme and or season.  I like that so I'll be keeping this sketch in my "Using Up Scraps" idea bin.    

Before I go here is my Welcome Baby card using the Warm & Toasty stamp set.  What do you think?  Isn't she adorable?   I added a little bow at her neck with a baby pearl... so feminine.


For this baby card I began with an 8 1/2 x 5 1/2" base of Sahara Sand, scored at 4 1/4".  The first layer is a piece of designer paper from the Peony  Garden Designer Paper Series.  It features a nubby Petal Pink texture.  The second piece of designer series paper is from the In Good Taste packet and has a soft wool like appearance, so made me think of a super soft baby blanket. 


The sweet little sentiment "Hello Baby" is from the So Sentimental Stamp set.  I used the Tasteful Labels Dies to cut out the labels that I mounted the bears and sentiment on.  These small labels are perfect for grounding small images so they don't get lost in the background of a card.  

Thanks for dropping by today.  Hope you liked my cards.  Leave a comment and tell me which one is your favourite.  Appreciated.  

Happy Stamping!
Penny Tokens Stampin' Spot 
Penny Hanuszak, Independent Stampin' Up! Demonstrator 

NOVEMBER HOSTESS CODE:  ZZ49FQKS
If you're thinking of putting in an order this month, and it is under $200.00 before shipping and handling, add my November Hostess code at the end of your order, and you'll receive a free gift from me.  If you're planning in putting in a larger order, no worries if you spend over $200.00 you'll be earning your very own Stampin' Rewards to choose products you want.  

  
Click here to shop in my 24/7 Online Store


Sunday, November 22, 2020

Merry And Bright On-Line Extravaganza


Tuesday November 24th is almost here, and I can't wait!  What's so special about November 24th?  Well it just so happens it's one of Stampin' Up!s most well loved and busiest sales days of the year.  It's time for the Merry and Bright On-Line Extravaganza sale!  

If you're planning on placing one last Stampin' Up! order before Christmas honestly this is the day to do it!  Save 10% on most Stampin' Up! items during this one day Christmas Bonanza sale.  Nearly all 2020–2021 Annual Catalog items are eligible for the 10% discount.  Click here for the Exclusions list for details so you're not disappointed.  

You'll want to place your order as soon as possible on the 24th to ensure you receive your products and they're not sold out. Remember to use my November Hostess Code ZZ49FQS if your order is under $200.00 and you'll receive an exclusive Christmas thank you card and small gift from me.

Note: You may experience shipping delays due to increased shipping demands during the holiday shopping season.  Having said that Canadian orders have been getting priority.  

Happy Stamping!

Penny Tokens Stampin' Spot
Penny Hanuszak, Independent Stampin' Up! Demonstrator

NOVEMBER HOSTESS CODE:  ZZ49FQKS

If you place an order in November that's under $200 before shipping and handling, please remember to add my special Hostess code to the end of your order, and you'll receive a special Christmas thank you card and a small gift from me.  If you're placing an order over $200 don't add the hostess code because you will be able to choose your own Stampin' Up! Rewards based on the total of your order.  Thank you.

Click here to shop in my 24/7 On-line Store 


Wednesday, November 18, 2020

Remembrance Day Traditions

Add caption
Last Wednesday was November 11, 2020 a day never to be forgotten.  It is the day each year that we Canadians join others throughout the world to honour and celebrate the lives of those brave men and women who have fought to preserve our freedoms and ways of life.  

This Remembrance Day was significant for our family as it marked the 5th month since our mother's passing.  My sister and I've been visiting our parent's grave site each month since she passed on the eleventh of June. We generally bring flowers but because it was Remembrance Day we brought poppies to put in the urn.


When we arrived at the Langley City cemetary a Remembrance Day service was just finishing up.  We had to park up top and walk the road down to our parents grave.  Although it was a rainy day there were lots of folks still milling about and visiting family graves.  We were thrilled to see all the wreaths and Canadian flags that had been placed on the graves of those who had served our Country. 

Both of our parents lost brothers in the war and they always attended the local Remembrance Day celebrations, so it felt extra special and significant that the service happened just feet from their graves.  

After the visit and watching the television coverage that evening, I decided to make a Remembrance Day card in honour of my relatives and others who served in both World Wars. I took my inspiration from the beautiful poster at the beginning of this narrative and a this memory of my Uncle Charlie who died near Normandy France in World War II.


Here is my card:

When I looked at the poster with its rolling hills representing the trenches I knew I could recreate them using my Curvy Celebrations dies. I combined two of the die cuts and used 2 x 6" pieces of Basic Black, Basic Grey, Grey Granite and Smokey Slate card stocks to form the hills. 

Originally I was going to stamp a series of poppy images using the Painted Poppies stamp set but I thought the poppy images were too big for the design I had in mind. So, I checked my paper stash and found a sheet of the Painted Poppy designer paper from last year, that worked well.  

I fussy cut several of the flower images that were in varying shapes and sizes.  I used my Poppy Parade light and dark blends to colour in any white outlines or pool party patches from the background of the paper before adhering the flowers to the card. I added the poppies with liquid adhesive and dimensionals and layered them down the left side of the card. Once the poppies were in place I die cut a piece of Whisper White with the Stitched Rectangle Shapes Die and stamped the sentiment.  I added red rhinestones on the sentiment label and at the top of the card to symbolize more poppies.


The "Remember" sentiment is from a retired set called Well Said.  The sentiment actually says "Remember When" but I was able to ink up the image with Momento Black ink and then carefully remove the ink from the word "when" with a wet shamy.   I totally love that rolling font for the "R".  

This year in Canada we were able to purchase Poppy Pins for $5.00.  This new pin replaces the black felt center piece with the wire pin. I'm not sure but I think every year for as long as I remember, I lost my poppy just minutes after buying it, so I was happy to see a more wearable attachment added.  I'll still buy poppies every year to support the Legion and Veterans as they do so much good work, but I liked this idea.  After looking at how shiny the lapel pins were in the picture, I decided to add some clear Nuvo drops to mine.  

Well that's it for today.  Although late in posting, I hope you enjoyed this card and it's composition.  


HAPPY STAMPING!
PENNY TOKENS STAMPIN' SPOT 
Penny Hanuszak Independent Stampin' Up! Demonstrator 

NOVEMBER HOSTESS CODE:  ZZ49FQKS

If you're planning on placing an order under $200 before S&H apply the hostess code for this month, and I'll send you a free gift.  If you place an order that's over $200 you'll automatically receive Stampin' Up! Hostess Rewards for free products.  Thank you for shopping at my store.


Click here to visit my 24/7 Online Shop


Rock Star Masculine Birthday Card

We finally have some good weather and have spent the week tidying up in the garden and the garage.  Visits to the recycling plant to get rid...