Wednesday, April 15, 2015

Sneak Peek Wacky Watercooler April (Fool) Blog Hop - It's Coming.....

It's almost time for the Wacky Watercooler's April (Fool) Blog Hop, which runs from April 16-18th. This is a huge Hop, with 14 participants all sharing their great projects.  Wow that's a lot of talent in one place and I just know you're going to get a lot out of this.   

All the blog projects will feature products from the Occasions and Annual Catalogues, and Clearance Rack, so this is a great time to get a last look at some of your favourites before the end of the catalogue year.  

Oh by the way, the "fool" part of the blog title isn't referring to tricks or April Fool's Day, it's actually referring to the hopper's first projects, which must be something "different from what they seem".  So if you like surprises gear up for some great ones!  

Here's a sneak peek at what I'm going to be sharing with you: 


Come back for a visit on Thursday night (April 16th) and I promise you won't be disappointed.  All the links to the Wacky Watercooler April (Fool) Blog Hop will be posted by 6pm Pacific time 7pm Mountain. 


Because it's a circle blog hop, you can start anywhere (but I'm hoping you'll start with me).  And, if you leave me a comment I'll enter your name in a draw for one of my finished projects. 

See you Friday!

Happy Stamping!
Penny Tokens 

Saturday, April 11, 2015

The Butterflies Are Coming......

Update on Butterflies Thinlits and a Special Offer!

Have you been wanting to order the Butterfly Thinlet Dies and wondering what on earth happened to them? Well here's an update you probably will be interested in.   Like you, I sincerely hoped the Butterfly Thinlit dies would  be available for the Sale-A-Bration sales period and when they weren't, I thought okay maybe there's a chance they'll be available for the Free Shipping promotion. Unfortunately, neither of those scenarios happened. By way of explanation, here's what really happened:


Originally the Butterfly Thinlit Dies were scheduled to arrive by April 8th, but then Stampin' Up! received notification from their supplier that although the ship had reached the west coast port, the container containing the Thinlits was still on the ship. Yikes!  

Then, they received verification from a third party that the vessel was still in port but although it docked on Friday, April 3, the container with the Thinlits had yet to be pulled.  Because this container has yet to be discharged from the vessel, the soonest the Butterfly Thinlits will arrive in Stampin' Up!s warehouse is the beginning of the week of April 13, with the best estimate for orderability, being April 15 Finger's crossed!

Stampin' Up! realizes how disappointed its demos and customers were in not being able to purchase the Butterfly Thinlits in time to receive Sale-A-Bration rewards--especially in the discounted bundles, so they are making two special offers that will be available from the day the Butterflies Thinlits are again available through April 30th:

Offer One:  Get the Butterfly Thinlits at a 15 percent discount--just $26.30! or,


Offer Two:    Buy any of the Butterflies Thinlits Bundles at the already-discounted price and choose one of three FREE Sale-A-Bration items (only available while supplies last)!

  • Best Year Ever Designer Series Paper (item 138633)
  • Best Year Ever Accessory Pack (item 138634)
  • Irresistibly Yours Specialty Designer Series Paper (item 138635)


Check out Page 26 in the Occasions Catalogue.  You can place your order on-line as soon as they are available.

Happy Stamping!
Penny Tokens 

Friday, April 3, 2015

LIMITED TIME FREE SHIPPING

Get FREE shipping on any orders placed between April 6-April 10th!   There is no minimum purchase required (excluding expedited orders), and all types of orders qualify (customer, demonstrator, workshop, online).   

Paper Pumpkin past kits and kit refills are eligible for free shipping if purchased online, however Paper Pumpkin subscriptions are not eligible for free shipping on this promo.

Now's the time to stock up on your basics and get those items on your Wish List, while you're not paying shipping and handling ............... what a bonus! 


Don't forget, if you loved the Stampin' Up! 2013 - 2015 In Colors they are retiring with the annual catalog (last day is June 2, 2015), so you'll want to stock up. Don't be disappointed, order your favorite 2013 - 2015 In Color inks, card stock, ribbon, markers and more while they're still  in stock AND take advantage of free shipping!   

Submit orders by
Phone:  Friday, April 10, 2015; 6:50 pm (MT)
Online:  Friday, April 10, 2015; 11:50 pm (MT)


Happy Stamping!
Penny Tokens

Thursday, March 12, 2015

BLENDABILITY ALCOHOL MARKERS - DISCONTINUED

Today I want to share some very important and sad news about the discontinuation of the Blendabilities Alcohol Based Markers from Stampin’ Up!  

After a few turbulent weeks of product returns and customer complaints at Stampin’ Up!, they have decided to discontinue the entire Blendabilities alcohol program from their product line, effective immediately.

Stampin’ Up! had been doing an extensive product investigation after receiving continuous complaints about markers leaking out or drying up.  While they were investigating these complaints with the manufacture it was identified that a consistent manufacturing defect which results in alcohol evaporation from the Blendability mold can’t be resolved at this time.  

As the manufacturer is unable to rectify this problem in a manner that would meet Stampin' Up!'s high quality standards and provide a stable, long term solution, it was decided by Stampin’ Up! to completely discontinue the Blendabilities product line from their offerings.  

If you are one of my customers who have recently placed an order and are awaiting the delivery of any Blendabilities products, then you need to contact me to discuss the alternatives.   For example, if you’ve chosen Blendabilities as your Sale-A-Bration Freebie, then you will be able to choose an alternative Sale-a-Bration item. But I'll need to know as soon as possible as Sale-A-Bration items are only available as long as supplies last and until the end of March 2015.  

I understand the disappointment and frustration this news may bring, after all, I’m feeling it too, but I also understand that Stampin’ Up! has made the move with your best interests in mind, and will come up with alternatives some time down the road.  

Happy Stamping!
Penny Tokens

Thursday, February 26, 2015

Wacky Watercooler Spring Fever 2015 Blog Hop


I was absolutely thrilled when Heidi Weaver asked me to participate in the Spring Fever Wacky Watercooler Blog Hop this month.  This is one of those really fun blog hops where the design participants always come up with awesome projects relating to a stamping theme.    This hop celebrates Sale-a-bration and the Spring Occasions catalogues.

Whether you linked to me from Christine Giuda's Dancin Stamps blogspot or this is your first stop on the Spring Fever Wacky Watercooler Blog Hop, I hope you'll enjoy what I have in store for you. This is a triple project post, so make sure you keep scrolling down!  

Oh and just remember our blog hop is hopping in a circle so grab some refreshments and continue hopping until you return to your starting point. It's quite a  journey and I'm sure you're going to find plenty of inspiration along the way. I'd love it if you left a comment to let me know that you've stopped by, and how you liked my projects, and I hope you'll come back to visit me again. 

In case you have to leave or get lost, here's a list of the blogs participating in this hop:
My Favorite Past Project:
I was thrilled to learn that Kath Rick's blog "All That Scrap" was assigned to me for the favorite past project part of the blog hop.   

Let me tell you, choosing a card to CASE (Copy And Share Everything) from Kath's blog was definitely a hard choice for me as there are just so many exciting posts. Kath's card making creativity has long been an inspiration for me, and I sincerely enjoy visiting her blog and checking out her many challenge and technique posts.   I hope you'll drop by and check it out too.  You won't regret it.  

Here's the card I chose for my "past favourite".  
Card created by Kath Ricks of All That Scraps Blog Spot - February 13, 2014
Here's my version of Kath's Birthday Card:
I liked the Watercolour DSP Kath used for her background and the blend of white, yellow and black layers. I also liked how the floral image was showcased on the black background left by the die cut.  I decided to copy the colour scheme but changed up my layers, dies and stamp sets for my rendition. I hope you like my version and will leave me a comment on it.
I'm a big fan of the Butterfly Basics stamp set in the Occasions Spring Catalogue, so when it came to designing this card I didn't have to think very hard about which stamp set I'd use.  The floral image is fabulous whether it's stamped in it's entirety or shown as only a partial image and I think it's one of those stamps that looks good coloured or just stamped in black ink.  I would have liked to have used Blendabilities on this image however I think it looks okay coloured with Stampin' Up! markers.  Let me know what you think.   

I chose to play up the black and white frame on Kath's card by adding an additional two layers below the designer paper layer.  Note:  Before adhering the first black and white card stock layers, I cut a die image from the centers to reduce their overall weight on the card.  Because my image was larger than the one Kath used I opted to use the Window Frames Collection Framelits to cut the opening in my dsp layer before embossing it with the Honeycomb Textured Impressions Embossing Folder.  Note:  DSP becomes really fragile to handle once it's embossed, so I didn't want to risk tearing it.  

This is the inside of the card and the Whisper White panel measures 5 1/4" x 4".  I stamped the Honeycomb from the Basic Butterfly stamp set across the center of the page and then layered the sentiment from the same set on top of it.  Two  1/4" strips of Basic Black and DSP were layered across the bottom. 


Here you can see some of the detail and colouring of the stamped image.  


Supplies Used:
Stamps:  Butterfly Basics and Petite Pairs 
Inks: Black Memento Ink, Hello Honey
Markers:  So Saffron, Starfruit, Crushed Currie, Old Olive, Wild Wasabi and Pear Pizzazz
Card stock:  Whisper White, Basic Black 
DSP: 
Accessories: Window Framelits, Paper Trimmer, Big Shot, Honeycomb Embossing Folder, Adhesive
Butterfly Basics Stamp Set page 26 of the Occasions Catalogue

MY SECOND PROJECT:
I'm totally in love with the stamps and products in this year's Sale-A-Bration and Occasions Spring catalogues.  My favorite stamps are the Lotus Blossom and Basic Butterfly because of their soft feminine images and the ease with which you can combine them.

For my second project, I decided to make a Center Stair Step Card featuring both these stamp sets.  If you've never tried a stair step card before, now's your chance.  I hope my instructions and photos will help you along.  In my opinion, stair step cards have such a wow factor when they come out of the envelope, that makes them fun to give!   
Here's my Card:
Supplies:
Stamp Sets:  Lotus Blossom, Basic Butterfly, Petite Pairs and Gorgeous Grunge
Card Stock:  Basic Black, Whisper White and Calypso Coral
DSP:  Stacked With Love 
Ink:  Tuxedo Memento Black Ink, Cantaloupe Crisp, Old Olive 
Accessories:  Trimmer, Score Pal, Bone Folder, Basic Butterfly Framelits,
Basic Pearls, Old Olive 1/8" Taffeta Ribbon, dimensionals, glue dots, and adhesive strips.

How Did I Do It:
Although you may think this is a difficult card to make, fear not, because it's super easy.  This card requires only a few cuts and scores and then you're off to decorating it, so just follow my steps:
1.  Cut your Basic Black card base to measure 5 1/2" x 11".  
2.  Using your trimmer place your card stock facing the right side and at the 1" mark, move the cutting blade down to the 6 1/2" mark on the ruler.  

3.  Flip the card stock over and repeat this cut on the other side.  These are the only two cuts you need to make on this card stock. 
4.  Starting with the card stock facing the top of your trimmer, score from the outside edge of the card stock to the beginning of the cut at the 1" mark then move over to the other side of the card and repeat.
5.  Move the scoring blade down to 2" and score to the cut line and again on the other side of the card.
6.  Move the scoring blade down to 5 1/2" mark and score but this time move to the inside of the cut lines and score just the center part of the card.  This will be the fold line for the front of the card.  
7. Move the scoring blade down to the 6 1/2 " mark and score from the outside edge of the card stock to the score line and repeat on the other side.
The score lines are the dashes at 1", 2", 5 1/2" and 6 1/2". 
 Note if you're using a Scoring Tool to do the scoring, complete all the scores at 1", 2", 6 1/2" and then remove card stock, flip it and repeat for the other side of the card stock and then score only the center at the 5 1/2" mark.  To fold score lines, start at the 1" score and do a mountain fold.  At the 2" score line do a valley fold and at the 5 1/2 and 6 1/2" score lines do a mountain fold. Reinforce folds with bone folder. 
The 1", 5 1/2" and 6 1/2" score lines are folded as mountain folds and the 2" is a valley fold.
8. Decorate the side, front and bottom panels with Stacked with Love Designer Series Paper and Cranberry Crisp card stock. Here are the measurements for the panels:
Black card base before the panels are adhered. 
Side Panels:
Cut two pieces of Cranberry Crisp measuring 4 1/4" x 3/4".  Cut two pieces of DSP measuring 4" x 5/8", adhere to side panels. 

Bottom Panel:
Cut one piece of Cranberry Crisp card stock to measure 5 1/4" x 3/4" and a piece of Stacked with Love DSP to measure 5" x 5/8".

Center Panel:
Cut a piece of Cranberry Crisp cardstock to measure 3 1/4" x 4 1/4".  Cut a piece of Stacked with Love DSP to measure 3 x 4".  *Cut a piece of Basic Black cardstock to measure 3 3/4" x 2 3/4" and a piece of Cantaloupe Crisp to measure 3 5/8" x 2 5/8".  The Whisper White panel is 2 1/2' x 3 1/2".  

Adhere all the card stock and DSP pieces to the panels, except for  the ones marked with an asterisk (*) above.  They will be added with dimensionals, once the stamping is done. 
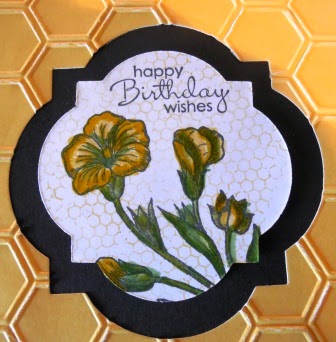
9.  Stamp the Lotus Blossom stamp image in Cantaloupe Crisp on the Whisper White panel. the stems are stamped in Old Olive and I added some splatter with the Gorgeous Grunge splatter stamp in Old Olive and Cantaloupe Crisp.  Stamp the "Happy Birthday Wishes" in Olive Green.  Stamp the small butterfly from the Butterfly Basics stamp set in the upper corner. 


10.  Tie a piece of Old Olive 1/8" Taffeta Ribbon around the card panel and add a bow.  Adhere to Cantaloupe Crisp and Basic Black panels noted above and then mount on center card panel with dimensionals. 

11.  Die cut two of the medium sized butterflies with the Butterfly Framelit Dies and adhere with glue dots to the bottom right hand side of the card.  I used Basic Pearls on the center of the butterfly.  

Can be bought as an individual die set or as part of a bundle.  See page 26 of the Occasions Catalogue.

12.  For the card inside I cut a piece of Whisper White card stock to measure 5 14" x 4" and adhered it to the inside.  I stamped Happy Birthday from a no name set and some more of the Lotus Blossoms to finish the card.  


Additional Project:
I am also going to show you some of the other card sets that I've made with these stamp sets and hope you will enjoy them too.  

This card set was made with Tangelo Twist and Hello Honey inks. 


Matching envelopes which I made with my Envelope Maker.  

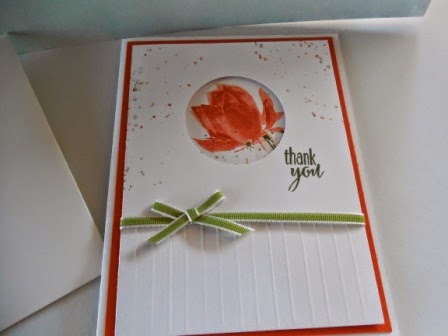
I made four of this card style and they featured mixed sayings - "Happy Birthday", "Thank You", "Get Better Soon" and "With Sympathy".  I used Tangello Twist and Mossey Meadow Inks. 

The inside view and matching envelope.


Loved the addition of the Gorgeous Grunge Splatter!  It really adds a watercolour effect to these card fronts. 

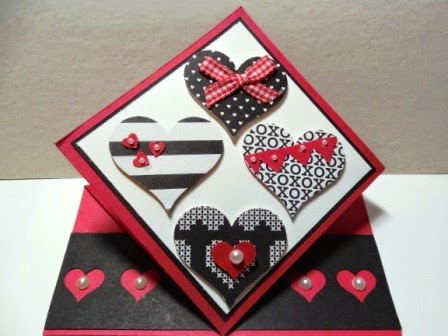
This one is quite unique in that I had been stamping over top of a piece of Whisper white card stock on my piercing mat, and at the end of all the stamping I was left with a collage of images.  I couldn't let it go to waste so cut the card stock down to card front size and used it.  I quite liked this "art work". 

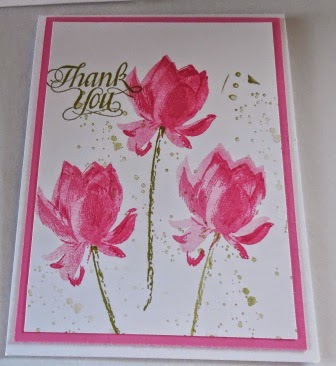
The following sets of cards were down in Old Olive and Strawberry Slush inks and cardstocks.  


All of the thank you cards had a similar inside. 


Well that's it for me for today.  But I'll be back again with some more projects later this week, so I hope you'll come back. Thanks again for visiting and for your feedback.  Much appreciated. 

The next person on our Wacky Watercooler blog hop is Heidi Weaver and I know she'll have something awesome to share with you.  

Click here to go to Heidi Weaver's blog: 

Click here to go to Christine Giuda's blog: to go to 

Click here to go the Wacky Watercooler Blog 

Happy Stamping!
Penny Tokens

Saturday, February 21, 2015

WWC17 Valentine Challenge Winner!

I've just received two very exciting pieces of news from Heidi Weaver of the Wacky Watercooler Blog Hoppers  and I couldn't wait to share them with you. 

The first piece of news is this:
That's right, they chose my card as the winner of the WWC17 Valentine Challenge last week.  Here's the card:

I'm so excited and unbelievably thrilled, especially because it's the first time this group have held a challenge, so that makes my card the first time ever winner. Whoo Hoo!!!  So here's a big shout out and thanks to the Wacky Watercooler Blog Hop participants.

Now the second big piece of news I want to share with you is that I'm actually going to be participating in The Wacky Watercooler Spring Fever Blog Hop coming up February 26th through 28th.  I've been invited by Heidi to join the participating blog hoppers, and I'm totally over the moon about this, and looking forward to participating in future blog hops.  

I hope you'll visit my blog during that time and check out the Spring Fever Blog Hop because it's sure to be exciting and filled with all kinds of great Spring and Easter projects from this talented stamping and paper crafting group.  I know you're going to love it, so come on back!  

Happy Stamping!
Penny Tokens

Words of Comfort FMS Challenge 634

Sometimes you just need some comforting words and to know that someone's thinking of you.  I felt that this week's Freshly Made Sket...