Tuesday, August 1, 2023

Welcome August

Wow!  Summer is Whizzing by and it's already August 1st!  Here is my new Hostess Code for this month.  I hope you'll take advantage of it to earn some extra free gift from me.  


Apply my monthly Hostess Code to any order valued between $60 to $199.00 (not including shipping, tax and handling), and you'll receive a share of that month's workshop order in the form of a FREE stamping gift. (see details below).

Your new products are shipped directly to your front door and generally arrive within 5-7 days of placing your online order. There's no middle man.

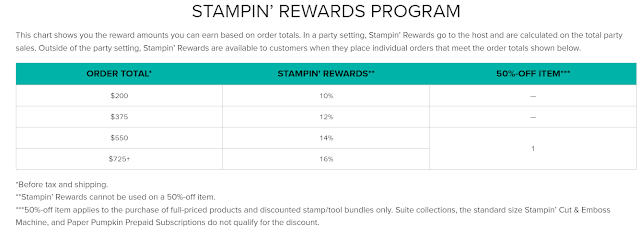
Note:  If your order is over $200 before shipping, handling and sales tax, you will automatically be rewarded by Stampin' Up and get to choose free products with the Stampin' Reward dollars you've earned.  

Adding the Hostess Code To Your Order:

The monthly Hostess Code is my way of rewarding my customers who place an order valued between $60 to $199.00 before shipping and handling, and don't qualify for Stampin' Rewards.  If your order is in this range, simply add my Hostess Code for the month when you reach the Shopping Cart checkout on your order. 

It's easy, just follow these steps: 

  • If you haven't already got an on-line account then go ahead and set one up first and choose me as your Stampin' Up! Demonstrator.
  • Complete your order and proceed to the Shopping Cart checkout page.
  • Add this month's Hostess Code in the box provided for same.
  • Don't forget to add it because once your order has been closed I can't add it for you, and you'll miss out on your free gift.
DURING AUGUST REDEEM YOUR BONUS DAYS COUPONS FOR $6.00 CREDITS:
If you placed any order valued at $60.00 before shipping, handling and tax during the month of July, then you will have earned Bonus Dollars, and now is the time to redeem them.  

Simply enter the Bonus Day Coupon Code (you'll have received an email from Stampin' Up! with the code(s)) in the Coupon Code area.  If you are applying multiple codes make sure to add a comma in between each code number. 


HAPPY STAMPING!
PENNY TOKENS STAMPIN' SPOT

Penny Hanuszak, CDN Independent Stampin' Up Demonstrator 

Shop On-Line for:


CLICK HERE FOR MY 24/7 ONLINE STORE 


Wednesday, July 26, 2023

Peace On Earth Christmas Challenge #44

 It's Christmas in July.................

I actually stumbled upon this Christmas challenge site in early July, just before the release of the Online Exclusive "One Horse Open Sleigh".  I was very excited to find a new to me Christmas Challenge site, as I've been looking for a nudge in that direction.  

Originally my plan for 2023, was to start making at a minimum 10 cards per month so I could have most of my Christmas cards ready to send out in November, but those plans fell to the wayside some time ago.  But it's never too late so be prepared to see a lot more Christmas cards from now on!  

This new to me Christmas themed challenge site is called Peace On Earth Christmas Challenge.  Here's their badge:

Peace on Earth Christmas Challenge #44

Their rules are pretty simple and clear - use the image that's posted bi-weekly as your theme and enter.  This site is all about Christmas ....yippee!!!  

Here's the Peace On Earth Challenge #44 inspiration:

Peace on Earth Challenge #44 

HERE ARE MY CARDS:


I took my inspiration from the two pictures of the cabins in the challenge picture.  I can imagine this couple gliding through the snow on their way home, anticipating a warm fire and a cup of hot chocolate.  

My card is fairly simple to make.  It's called a "W fold".  I've used a piece of the designer paper from Stampin' Up!s Open Sleigh  paper pack to create the beautiful snowy scene behind the sleigh.  

The sleigh and horse were coloured with Stampin' Blend markers.  The sentiment Wishing you a Season of Cheer is stamped in Black Momento Ink.  

Supplies:

Card Base:    
  • Early Espresso card stock 8 1/2" x 5 1/2" scored at 4 1/4" E
  • Early Espresso W fold piece measures 3" by 5 1/4 and is scored at 1" & 1"  
  • Use a bone folder to burnish the folds (mountain and a valley. The mountain fold faces the front and the valley is attached to the card base with adhesive.
Mats: 
  • Cut x 6 x dsp piece for background to measure 4" by 5 1/4" adhere to card base front. 
  • Cut two 3/4" x 5 1/4" strips for the front of the mountain and the valley folds.
  • Cut a 4" x 5 1/4 inch piece of whisper white card stock for inside mat.  Stamp the barn image from the retired Christmas Barn Stampin' Up! stamp set in Gray Granite ink (stamp off to get a lighter image) and then stamp the sentiment across the center in Real Red ink.    


Embellishments and Colouring:

Blends:    Boho Blue, Real Red, Cinnamon Cider, Crumb Cake, Just Jade
Add ons:  Self-adhesive snowflake sequins (3) white, scrap of silver cardstock for carriage detail and runner.  Wink of Stella on snow portion of trees in background picture. 

While I was making the first card I was inspired to make a second one featuring  a silhouette of the couple gliding through the early morning light.  The inspiration for this card came from Tami White who created some awesome cards and a video on her blog featuring the One Horse Open Sleigh set.  I don't often CASE cards but I was excited to try the silhouette technique with this stamp set, and I wasn't disappointed.  

To make this card my own I've change up a few things including the mats, sentiment and interior of the card.  In the picture the horse and carriage look pitch black, but in real time, when you look at it the details show through the ink and it really does look like the carriage and horse are in the shadows as the sunsets.  Kudos to Tami for sharing this technique. 

For my card I started with Basic Black cardstock for the card base which measures 8 1/2 x 5 1/2 and is scored at 4 1/4".  I've added a 5"1/4 x 4" mat in Boho Blue cardstock and a 5 1/8" x 4 1/8" Real Red Glimmer Paper as a second mat.  The final mat is a 5" x 3 7.8" mat from the One Horse Open Sleigh Designer Paper pack.  

I've stamped the Wishing You a Season of Cheer in Real Red Ink.  The horse and carriage were stamped in Momento Black Ink directly onto the designer paper.  To create the silhouette feature, I used a basic black marker with a brush tip, to colour over the entire image.  Voila!  That was quick and easy.   


For the inside mat I cut a 5 1/4 x 4" piece of Boho Blue cardstock and a 5 1/8 x 4 1/8" piece of Whisper White.  The Christmas Barn image is stamped in Gray Granite and once again I stamped the sentiment in Real Red ink. 

Well it was fun making some Christmas Cards today and I hope I can continue to participate in this challenge on a bi-weekly basis to add to my Christmas stash of cards.  What fun!  


HAPPY STAMPING!
PENNY TOKENS STAMPIN' SPOT

Penny Hanuszak, Independent Stampin' Up Demo 


Tuesday, July 25, 2023

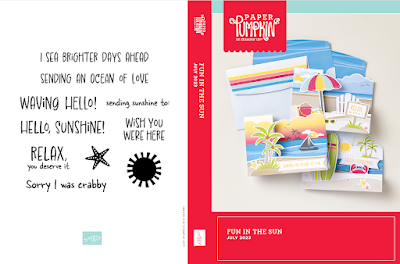
Fun In The Sun Paper Pumpkin Kit - July 2023..........Loved It!


When I received my July Paper Pumpkin Subscription I couldn't wait to open the box and explore the contents.   It's amazing!  There are enough supplies to make 9 beautiful summer, beachy type cards with matching envelopes that are so bright and cheerful they'll put a smile on your face right away!  

These fun fold cards are just perfect the way they are in the kit, so  I'm just making them exactly the way they're supposed to be.  Check out this video so you can watch how they are assembled.  


The July Paper Pumpkin kit includes:

  • All the supplies you need to create nine cards with fun accordion folds 
  • 3 each of 3 designs, with coordinating envelopes.
  • An all-occasion stamp set to send friends and family words of encouragement, support, and kindness.
  • Iridescent Sequin Embellishments.
  • 1 Classic Stampin’ Spot: Daffodil Delight.
  • Summertime Ephemera pieces, labels, and paper pieces.
  • Adhesive Dots and Tear & Tape Adhesive.
  • Completed card size: 5-1/2″ x 4-1/4″ 
  • Coordinating Stampin’ Up! colors: Azure Afternoon, Basic Gray, Crumb Cake, Daffodil Delight, Flirty Flamingo, Granny Apple Green, Melon Mambo, Pool Party

Here are my cards: 
In my opinion this is one of the best kits this summer, and the cards which are awesome looking were so extremely easy to assemble. The most time consuming piece was popping out all the add ons from the sheets and sorting all the bits and bobs that made up each card.  It also helps if you stamp the sentiments for the cards and set those aside until you're ready to use them.  
 
The instructions for each card are very visual.  There are a series of pictures for each card that show exactly where the glue dots and tear n' tape go on the back of the ephemera pieces or layers, and where to adhere those pieces to the card base.  It's unusual to get a PP kit with 3-D or Fun Fold cards, so for beginners folding the card bases might be a little tricky, however if you follow the written instructions and or watch the assembly video it will be a piece of cake.  
 
Believe me if you're a beginner and you don't want to try anything on your own,  follow the instructions and you'll have a set of nine beautiful cards with matching envelopes in no time at all.   If you're more advanced or an avid stamper you can still have a lot of fun and create even more projects by taking the kit apart and doing your own thing. I read one demo has made 19 cards from this kit by cutting apart the various layers and the envelopes and using coordinating cardstocks for the bases.  


Paper Pumpkin subscribers can kits are only available to order up until the 10th of each month to subscribers.  For example this July 2023 kit was only available for ordering from June 11th to July 10th, 2023.

Information about the current month's Paper Pumpkin kit can always be found on my events calendar. The Green Dots on the Calendar and the Events schedule are specifically for Paper Pumpkin information.    
Just click on this link to go to my web page and check out the notes on specials and important dates beside my calendar.  If you click on the date on the event page the link will take you to a screen that provides some additional details and links.  And you can always check out what the next month's kit is all about.  


Paper Pumpkin is so much more than just a kit.  Click on "Blog" in the header of the subscription page and a wealth of information opens up for you.  There are links for on-line support and encouragement from the Paper Pumpkin team.  There is a Facebook Page, monthly videos of released kits, links to Paper Pumpkin on Pinterest, and YouTube about making "Alternatives" with the current month's kit.  

A subscriber's first Paper Pumpkin kit comes with an acrylic block so even if you don't have stamping supplies, you're ready to stamp.  Each kit includes everything you need to make a project including a stampin' spot ink pad and each month's stamp set is unique to Paper Pumpkin and can't be purchased anywhere else. You also have access to coordinating kits and sales products that aren't available to non-subscribers. 

I forgot to mention there's also a link so you can print a case insert for the current kit so you can keep your stamp set and ephemera all together in in a storage box. 

Insert for Plastic Stamp Storage Case


So essentially each month's kit which costs $34.00 (including GST & Shipping) is all inclusive and contains all you need to craft without having to have all the other stamping products out there. Economical and easy.  

If you don't like a kit that's being offered you have the ability to go online and cancel that month's kit as long as you do it before the 10th of the month.  If you do nothing, the monthly kit will be billed on your subscription plan (unless its a prepaid subscription) and sent to you within a week of the closing on the 10th of the month. If you want to cancel your subscription it's easy, no hassle at all and you can quit anytime you want to.  So easy! 

Coming Next Month
Create beautiful cards with next month’s Meaningful Flowers Paper Pumpkin Kit. Send messages of friendship, loyalty, and encouragement and create beautiful and unique paper crafts featuring delicate flower designs and significance.

The subscription period for August's kit is between 11 July and 10 August. Click here to subscribe!

HAPPY STAMPING!
PENNY TOKENS STAMPIN' SPOT 
Penny Hanuszak, CDN Independent Stampin' Up! Demo 

Shop My 24/7 On-Line Store for:
HOSTESS CODE FOR JULY 2023: 


Friday, July 21, 2023

Garage Sale Sunday - Hope to Sell Some Stamps!

  RRR Parking Lot Sale 

Happiness is having a vendor table at the summer Country Lane Garage Sale this coming weekend!!  Woo Hoo! I can't wait!  

I've got lots of gently used Stampin' Up! Products and other craft items for sale including stamps, dies, embossing folders, paper, cardstock, ink and embellishments.  

Hope to see you there!  

Here's the details:  

    Date:        Sunday July 23rd, 2023

    Place:       RRR Parking Lot Sale 

                    Country Lane Crafts

                    17720 65A Avenue

                    Surrey, BC  

    Time:      10:00 to 1:00pm


Happy Stamping!

Penny Tokens Stampin' Spot 

Penny Hanuszak, CDN Independent Stampin' Up! Demo 


Wednesday, July 19, 2023

Using Up Scraps - 6 x 6 Designer Paper OSW


I don't know about you but I have way too much designer paper in may stash of card making supplies, so I'm always looking for new and creative ways to feature and use it up in my card making.  

Recently I watched a video by Frances Martin (Frenchie) that showed how to make four cards simply by cutting a 6 x 6 piece of dsp on angles.  I instantly wanted to try out this One Sheet Wonder (OSW) cutting design.  

Essentially the OSW is created by taking a 6 x 6 sheet of DSP and marking all four sides of the paper at either 1 1/2" or 1 3/4".  Once your marks are in place line up the top and bottom marks in the cutting groove on your paper trimmer and make a cut.  The next step is a little tricky, but hold the two cut halves of paper together (still 6 x 6 with the cut line down the center) and turn the paper so the next set of marks are at the top and bottom in the trimmer and cut again.  This will give you four pieces of paper that are cut on an angle. 

Here are the Four Cards I Made: 

I had the Artistically Inked stamp set that was used in Frenchie's Youtube Video, however didn't have the cardstock and designer series paper on hand, so decided to go with a cosmopolitan vibe in black, white and tan.  


Design and Products Used:  

One of my favourite stamp sets.  The sentiments in this set and the unique watercolour images are perfect for so many projects.  
The Cane Weave Embossing folder provides the perfect backdrop element on your projects.  This wonderful embossing folder was carried over into the Annual Catalogue from the 2023 Spring Mini and I'm so happy Stampin' Up! did this.  

Assembly: 
  • Follow instructions above for cutting the OSW 6 x 6 piece of designer series paper.  
  • Cut four card bases at 5 1/2" x 8 1/2" and score at 4 1/4".  
  • Cut mats to 5 1/4" x 4" in Wild Wheat (new Incolour) or Basic Black cardstock.  Note the second card doesn't have a mat. 
  • Cut four smaller mats to 3 3/4" x 5" and with the Cane Weave Embossing Folder.

I'd love to hear your thoughts on these four cards, and the 6 x 6 OSW design, so leave me a comment below.  


Happy Stamping!

Penny Tokens Stampin' Spot 

Penny Hanuszak, CDN Independent Stampin' Up Demo

Visit My Online Store for 24/7 shopping.


JULY HOSTESS CODE: 

Don't forget to apply my July Hostess Code when placing an order under $200.00 CDN before shipping and handling, so you can receive a free stampin' rewards gift from me.  Click here to see how to use my code: 


ONE DAY ONLY ....DON'T MISS OUT!!! 
JULY 19, 2023  THE CLOCK IS TICKING


Tuesday, July 18, 2023

Gone Fishing Accordion Style


Let's Go Fishing Suite 

I was so excited to get my hands on Stampin' Up!s 2023/34 Annual Catalogue this past May.  And, I wasn't disappointed as there were so many wonderful stamp sets and products to choose from.  

Since I really enjoy creating masculine stamp sets and scenes, one of the first sections of the catalogue I search is the Hobbies and Recreation section on pages 78 through 93. 

Wow I had some hard decisions to make, but bar none, my favourite new product was the Let's Go Fishing Suite, which includes stamps, dsp, dies, and an awesome 3-D embossing folder called Twisted Rope EF.  No hesitation here, it was the first item I loaded into my shopping cart.  

The Let's Go Fishing Suite Collection #161546 is reasonably priced at $99 CDN and includes: Gone Fishing Bundle (10% discount) Stamp set and coordinating dies, Let's Go Fishing 12 x 12 paper and the Twisted Rope 3D Embossing Folder.  

If you're not interested in the embossing folder or beautiful designer paper in the suite, you can order the bundle which includes the 16 piece photopolymer stamp set and 17 coordinating dies.  It's called Gone Fishing Bundle.   

One of the first things I did with this set was experiment with the stamps and dies and just played with applying different colours and textures to the stamped images and cutting them out.  What fun!  

It's very easy to get the colours perfectly applied as most of the stamps are a 2-step process.  First you  stamp the base image usually in Momento Black Ink and then you stamp the colour with the coordinating fill image.  Easy peasy! 

HERE ARE MY CARDS: 

Gone Fishing Accordion Fold Birthday Cards 


The card fronts were basically a mix and match of the fabulous dsp designs mounted on an 8 1/2 x 5 1/2" card stock base.  Bases were in BoHo Blue, and Very Vanilla.  Mats measure 5 1/4" x 4" and were in Calypso Coral and in Pebble Path.  For the labels I used the Deckled Rectangle Dies.  

The Deckled Rectangle Dies are nested dies that have a torn cardstock look.  I totally love these dies and they look beautiful in all my projects.   

Accordion Fold Interior Surprise:  

What I love about these cards is the surprise you get when you open the card.  It's definitely got a WOW factor.  Here's what it looks like when you open the card:


Here's what you need:
  • 10" x 5 1/4" piece of Designer Series Paper
  • A neutral cardstock piece for the sentiment that is 5" x 1 3/4".  On one of my samples above I cut two of these panels in Very Vanilla cardstock and I glued them to each side of the accordion fold. 
  • I used scraps of coordinating cardstock for the sentiment squares and circles and Very Vanilla cardstock for the sentiments 
  • I followed a Youtube video on how to create this card and you can find it on Cheryl Hamilton's blog by clicking here. 
I hope you enjoyed this quick and easy fun fold card and will try to make one yourself.  You'll be delighted with the results. I love the fact that  I can use up my DSP stash and get two cards from one 12/ x 12" sheet of designer paper.  

I'd love to hear what you think of this card.  Please leave your comments below. 


Happy Stamping!

Penny Tokens Stampin' Spot 

Penny Hanuszak, CDN Independent Stampin' Up! Demo 

Click here to visit my Online Shopping Site: 


24 HOUR STAMP SALE JULY 19, 2023

Find yourself staring at multiple stamp sets from the 2023–2024 Annual Catalog and can’t decide which ones to get? You won’t have to stare for much longer because on 19 July 2023, you can get those stamp sets you’ve been wanting at a 15% discount! 

This is a lightening sale and lasts only one day so make sure you are ready to shop ‘til you drop! This is definitely a deal you don’t want to miss out on.

HERE'S WHAT YOU NEED TO KNOW: 

  • Host Stamp sets are excluded. 
  • SALES PERIOD: 19 July 2023 from 12:00 a.m. (MT) to 11:59 p.m. (MT)
  • ORDERING DEADLINES
  • Phone: 19 July 2023 at 6:59 p.m. (MT) Online: 19 July 2023 at 11:59 p.m. (MT)
  • The sale will run for 24 hours.
  • All order types qualify for this promotion.
  • There is no limit to how many stamp sets may be purchased.
  • The 15% discount will apply to all stamp sets from the 2023–2024 Annual Catalog (excluding host stamp sets).
  • No discount code necessary—the 15% off discount will be applied automatically.


Don't forget to add my July Hostess Code to your order at checkout if your order is under $200.00 CDN before shipping and handling.  If you apply this hostess code in the box provided you'll receive a gift from me and a thank you card.  

HAPPY STAMPING!  

PENNY TOKENS STAMPIN' SPOT 

Penny Hanuszak, CDN Stampin' Up! Demo

Online Shopping Link: 

Last Free Shipping of the Year - December 9, 10 11, 2024

Heads up, it's time for the last FREE SHIPPING promo of the year! From December 9–11, you can shop and save on all qualifying orders of...