Monday, February 20, 2023

Gaggles of Geese Birthday Greeting - FMS#573

Time for another sketch challenge over at Freshly Made Sketches.  

Here is Kim's sketch design: FMS#573

Here's My Card: 

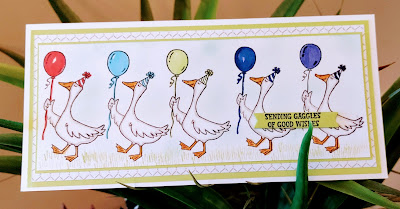
For this sketch challenge I decided to use these cute birthday geese from the Silly Goose stamp set to represent the stripes. The card is a slimline style.  
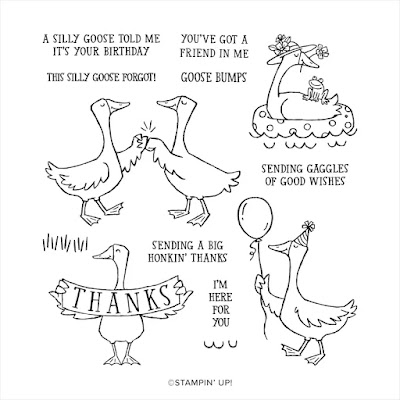
There are thirteen red rubber cling stamps in my stamp set, but this can also be purchased in photopolymer.  I love the sentiments and the geese images are perfect for almost any occasion.  


The inside of the card is pretty plain.  I used my go to Happy Birthday sentiment stamp from the retired Perennial Birthday set.  It's stamped in Parakeet Party ink and I've restamped the birthday goose image in Memento Tuxedo Black Ink.  I didn't colour this one because the blending inks would literally bleed through to the back of the card.  

Details:

Card Base:    Whisper White Card Stock measuring 8 1/2 x 8.  Scored at 4".

Mats:    
  • There are four mats on this card face.  
  • Parakeet Party mat 3 3/4" x 8 1/4"
  • Chicken Wire DSP mat 3 1/2" x 8" the mat is from On the Farm DSP   
  • Parakeet Party mat 3 1/8" x 7 7/8"
  • Whisper White mat 3" x 7 3/4" 
Blends:  
  • Sweet Sorbet
  • Tahitian Tide
  • Parakeet Party
  • Starry Sky
  • Orchid Oasis


Hope you like my interpretation of the sketch. Come back again.  

HAPPY STAMPING!
PENNYTOKENS STAMPIN' SPOT 

Penny Hanuszak, CDN Independent Stampin' Up! Demo


SALE-A-BRATION ENDS FEBRUARY 28TH, 2023 
DON'T MISS OUT! 

Sale-a-bration Flyer
Click here for PDF Version 

More Rewards Flyer 
Click to see Flyer 

Tuesday, February 14, 2023

Love Cats - Happy Valentines Day!

I haven't caught up after January's hectic schedule, so I admit I'm running late with February birthdays and sending off my Valentine's this year.  Most of you will have received your special Valentine's wishes after this post so for that I apologize.  

January went by in a flash, and when it was time to work on Valentine's Day cards, I wasn't prepared.  I didn't purchase any of the beautiful new designer papers (dsp) or valentine stamp sets in the mini catalogue, so I was left wondering what to do.   

Inspiration hit me on Sunday afternoon, while I was reviewing a post on Facebook, featuring a demo who was on a two month mission to use and reduce her unused designer series papers.  That really struck a cord with me, so I searched my retired paper stash for valentine themed dsp, and for coordinating card stock.  All I needed was a stamp set, so I went through my recent purchases and came across one called Loved Cats.  Perfect I was ready to stamp.  

Here are the cards I made:  

For most of my cards I used paper from the "Stacked With Love #137729" 4 1/2" x 6" designer paper pack from Stampin' Up which features designs in Basic Black, Calypso Coral, Crisp Cantaloupe, Real Red and Whisper White.  

Some of my cards also featured paper from the retired "Love Blossoms"  6" x 6" pack which features designs in Blushing Bride, Crumb Cake, Garden Green, Rose Red and Whisper White.  


I also used a variety of stitched layering dies including tags ovals and circles. 


I tried to vary how the designer papers were used.  For the card above I used the Shuffle and Stack method.  Such a great way to use scraps of designer paper in an efficient and fun way.  


I also make a couple of Valentine birthday and anniversary cards each year and for these particular cards I used the above design base and then  added sentiments and embellishments for those special occasions. 

I fussy cut some of the cat images and popped them up with Dimensionals above the embossed band or stacked circles.  

On several of the cards I used the new Cane Weave embossing folder from Stampin' Up!.  Tip:  Did you know that if you're looking for the new embossing folders in the Holiday Mini the quickest way to find them is to look at page 87 of the Mini Catalogue Index?  

The Cane Weave EF is a very versatile embossing folder that will make your backgrounds stand out from the crowd.  I loved using it for these 3/4" scrap strips that I used across the center of the paper joins on several of these cards.  

Tip:  When you're embossing card stock strips remember add an additional 1/8 to 1/3" because they'll shrink a bit in width when you emboss them. Any extra card stock can be snipped off the card layer once it's adhered, but if you don't extend it 99% of the time you'll come up short.   

For the inside layers I cut 4" x 1 x 5 1/4" panels of Whisper White card stock.  To decorate them I added strips of dsp and punched hearts from coordinating card stock or the dsp selection to dress them up.  I varied the Valentine's sentiments on these panels and stamped in a variety of ink colours including: Sweet Sorbet, Real Red, Rose Red and Basic Black depending on the face of the card.  


Well that's it for my Valentine's Day cards for this year.  I hope you enjoyed this selection and appreciate my tips and thoughts on using up designer papers from your stash.  Please let me know how you make use of your scraps and old papers, I'd love to hear from you.  Until the next time..........

HAPPY STAMPING!

PENNY TOKENS STAMPIN' SPOT

Penny Hanuszak, CDN Stampin' Up! Independent Demo 

Shop in My 24/7 Online Store


FEBRUARY HOSTESS CODE:  


Monday, February 6, 2023

On the Farm with Tags

Thanks for visiting today.  My card today features both a sketch from Freshly Made Sketches and a colour challenge from Color Throw Down.  

Here's My Card:

For the panel in the FMS#571 challenge I stamped the Rays of Light background stamp from Stampin' Up! in Daffodil Delight on a  piece of Whisper White card stock and then cut that down to measure 4" x 3" for the panel on the sketch.  For my rendition of the sketch, I turned the design on end with the panel closest to the top as I wanted to adhere my farm scene tag to this piece.  The tag which show cases stamps and die cuts from Stampin' Ups! On the Farm stamp set.  

I was really working against the clock to make the deadline for posting to the FMS challenge, so I didn't realize until I was reviewing this post that I'd adhered the wrong tag on the card front.  It was supposed to be the brown tag in the picture below with the cute little pink piglets on it, so it met the Color Throwdown challenge of pink, green, brown and red.  Oh well.


Freshly Made Sketches #571

Color Throwdown #728

Thanks for stopping by.  Come back again to see the rest of my On the Farm card projects.  

HAPPY STAMPING!

PENNY TOKENS STAMPIN' SPOT

Penny Hanuszak, CDN Independent Stampin' Up! Demo

January Hostess code ends on 
January 30th, 2023  
Don't miss out if you're placing an order less than $200.00 before shipping and Tax apply this Hostess Code GC2ZRNRV and you'll receive a free gift from me and a hand made thank you card.  


Thursday, February 2, 2023

Silly Goose

I have another fun stamp set from the Mini Catalogue to share with you today.  It's called Silly Gooseand you can find it on page 27 of the catalogue.  


TIP:  This stamp set has 13 stamps and is available in either cling (red rubber) or photopolymer finishes.  Make sure you choose the one that's right for you before you add it to your cart.   Here's what you need to look for before putting the order number down:

Here you can see the cling set is order #160734 and
the photopolymer is #160866.  

When you see these icons (circled in red) in the product description
you know that it comes in both cling and photopolymer.   

So getting back to the Silly Goose stamp set, it's one of those you can create some super fun projects with.  There are seven sentiments that cover every occasion and four great line art goose images.  

Here's My Card: 


Supplies:

Stamp Sets: Silly Goose, Thanks a Bunch,

Cardstock:
  • Whisper White for card base 81/2" x 5 1/2", two 3/3/4" x 5" pieces for the stamped image on the front and the sentiment layer on the inside of the card.
  • Two pieces of Daffodil Delight 5 1/4" x 4 for the front and inside layers. The scalloped layer on the card front was cut from the center of one of the 5 1/4" x 5" panels. 
Designer Paper: 
12 x 12 DSP Day At The Farm

I loved all the geese in this design 


INK: 
I stamped the goose on the 3 3/4 x 5" panel with  Momento Tuxedo Black ink.  I coloured the beak and feet with a combination of light and dark Pumpkin Pie Stampin' Blends.  I used a Gray Granite Stampin' Blend to run a thin line inside the outline of the goose and a Light Pool Party Blend around the outside of the line.  I masked off the stamped goose using the new Masking Paper (love it), and then used light Pool Party to blend in the sky.  For the grass I inked up the detailed image of the carrot from Thanks a Bunch and stamped it side ways below the goose to create a grass effect.  For the sign I used the light Pale Papaya Blend and coloured in the background. 


Well I hope you enjoyed this post and the Silly Goose stamp set.  I'm looking forward to playing with it again and creating some fun projects with it for birthdays.  I'd love to hear your thoughts on this set and my card. 

HAPPY STAMPING!
PENNY TOKENS STAMPIN' SPOT


Wednesday, February 1, 2023

There's more to SALE-A-BRATION


Happy February 1st.  There's a whole lot more to celebrate today!  Stampin' Up has added new products that are available with qualified purchases during the month of February during SALE-A-BRATION.  


MORE TO SALE-A-BRATE!

With only one month to go in the biggest sale of the year, Stampin' Up! is now offering even more products during Sale-A-Bration. Don’t miss out on these great products and incredible deals.  Click here to see the latest flyer:


NOTE:  MAKE SURE YOU ONLY USE THE ORDER NUMBERS ON THIS FLYER to order your Free merchandise during this promotion.  If you use regular catalogue numbers, these products will not be free.  

HAPPY STAMPING!
PENNY TOKENS STAMPIN' SPOT

Welcome February and a New Hostess Code


Here's How You Can Be Rewarded For Purchasing 
from My Online Store in February 2023:  

The benefits of shopping at my on-line store and adding my February Hostess Code are:
  • You get to decide when to place your order - my online store is available 24/7.
  • Your new products are shipped directly to your front door and generally arrive within 5-7 days of placing your on-line order.
  • During the month of February 2023 any order of $60.00 (before shipping & handling) is eligible for a FREE product from the SALE-A_BRATION SALE flyer and/or More Products list (starts on February 1st, 2023).  
  • If you order is $120.00 (before shipping & handling) you'd earn two free items.  
  • Place an on-line order with me during the month of February valued between $60.00 to $199.00 before shipping and handling, and apply my February  Hostess Code 6MDHRMWK at the end of your order to receive a FREE stamping reward from me.*
  • Not only will you receive a hand made thank you card for placing the order, but for applying my FEBRUARY HOSTESS CODE at the checkout you'll also receive:  a specially chosen stamping reward from me.
Note: *I'll be closing the Hostess Order option at noon on February 28th, so I can process the hostess code gifts that day.  You'll receive you'll your thank you gift from me within two weeks of the month end.   

DON'T FORGET TO ADD MY FEBRUARY HOSTESS CODE (6MDHRMWK) AT THE END OF YOUR ORDER AT CHECKOUT:

Penny Tokens Stampin' Spot 

Last Free Shipping of the Year - December 9, 10 11, 2024

Heads up, it's time for the last FREE SHIPPING promo of the year! From December 9–11, you can shop and save on all qualifying orders of...