Sunday, March 31, 2024

Happy Easter Weekend


My husband and I are off for a walk around the lake to enjoy the sunshine and have a relaxing day.  Later on we'll go to my brother and sister-in-laws for Easter dinner which we're looking forward to.  

From my family to yours please accept my thanks for all the blessings my followers provide and to wish each and every one of you a safe. wonderful and happy Easter.

HAPPY EASTER

PENNY TOKENS STAMPIN' SPOT


Monday, March 25, 2024

Zany Birthday FMS#628

Well another week has flown by and there's a promise of Spring between the rain drops.  I'm thrilled to see all the cherry trees starting to add some colour and the daffodils in full bloom. It helps to shake the doldrums off.  

I've been trying to build my stash of birthday cards as I have so many friends and family with birthdays in March and April it's hard to keep on top of them.  Almost one or two per day this past two weeks.  I'm trying to use as much of my supplies purchased during the year and using up designer papers from this year's is at the top of my list.  For today's birthday card I used the Freshly Made Sketches Challenge #628 as my base.   

Here's My Card:


I get such a giggle out of the animal characters in the Zoo Crew Designer paper featured on page 132 of the Annual Catalogue.  Click here to see another sweet little ballerina I did for a challenge a week or so ago.  She makes me smile too! 

For today's card I fussy cut the chubby little hippo ballerina and have her as the main star of  my focal.  She's dancing her little feet off on stage.   

Let me know if you enjoyed today's card.  I really enjoy getting comments on my cards.  I'd like to know if you like designer papers that feature cuttable figures such as the little hippo or the elephants on the inside of the card.   

HAPPY STAMPING!

PENNY TOKENS STAMPIN' SPOT
Penny Hanuszak, CDN Stampin' Up! Demo since 2006

Click Here to Shop

STARTS APRIL 9 TO 30TH


Sunday, March 24, 2024

Beautiful Perennial Lavender

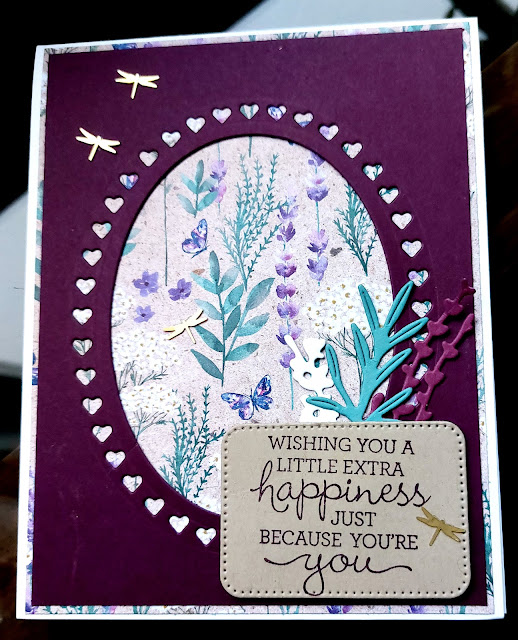
I fell in love with both the Perennial Lavender Suite Collection featured on pages 24 and 25 of the January Stampin' Up! Mini Catalogue the moment I laid eyes on it.  I'm sure the attraction was the beautiful designer series paper and the mixture of samples that were shown, but whichever it was I knew I needed wanted everything in the suite.  

I love every single piece of designer paper in the Perennial Lavender 12 x 12 paper pack.  The combination of crumb cake, very vanilla highland heather and gorgeous grape just speaks to my inner soul.  

Here Are My Cards: 

 I thought I would share a couple of the projects I've made with this gorgeous suite.  

I wanted to showcase this beautiful paper so my first card features a 4 1/8 x 5 3/8 panel of designer series paper on a basic white card base.  I've added a 4 x 5 1/4" layer of Blackberry Bliss card stock that I die cut with the heart die from the Fancy Florets dies.  


The little brass butterflies work beautifully with this designer series paper and its delicate images.  

This fancy fold is called a Cascading fold, and I used the Perennial Lavender DSP and stamp set as well as ephemera from the January Paper Pumpkin kit, and the Cake Fancy stamp set from the January to April Mini Catalogue in the design. 

I love mixing and matching cardstocks and dsp, so for this card I chose a retired cardstock called Just Jade for the base and mats. What a great mix. The Just Jade really worked beautifully with the the purples and crumb cake in the dsp.  


I stamped the "Birthday Wishes" sentiment from the Cake Fancy (#162932) stamp set on the basic white mat in Highland Heather Ink.  The flower and leaf ephemera are from the January Paper Pumpkin kit, and the butterfly is from the Perennial Lavender stamp set and stamped with Gorgeous Grape ink.

This was the first time I stamped with the Cake Fancy stamp set.  This 25 piece Photopolymer stamp set is well worth the investment. It is a Stampin' Up! Distinktive stamp set, which means that the image stamps have a special texture that gives them added depth and dimension in a single step, creating photo-realistic images.

There are multiple flowers and fruit in this set for decorating the cake or using for other designs. I also love the five sentiment stamps which I can mix and match for other celebrations and big achievements besides birthdays. 

For this card I stamped the images with Fresh Freesia, Highland Heather and Crumb Cake inks.  I also used my blends between the layers to close up any gaps caused by not overlapping the image.  Love it! 

Cake Fancy #162932


For the front of the card I mixed the ephemera and Perennial Lavender stamps for the focal point. The sentiment "It's your day" is one I use often when crafting a birthday card.  It's from the "A Good Man" stamp set which retired a few years ago. 

Well that's it for today folks.  I'm going out to enjoy the Sunday sunshine and get some exercise.  Life is not all about papercrafting!  I'll be back again next week and share some more cards made with the Perennial Lavender set.  Please drop me a comment to let me know if you're a fan of these cards and or the suite.  I'd love to hear from you. 

HAPPY STAMPING!
PENNY TOKENS STAMPIN' SPOT 

Penny Hanuszak, CDN Stampin' Up Demo since 2006

Painted Lavender Cascading Fold Card

Today I received an email from a stamper named Susan requesting instructions for a card I posted a while ago called a Cascading Fold card. The card was made by my awesome stamping friend Debbie Evoy.   Susan wants to recreate the card for her granddaughter's birthday.  I thought since I was giving Susan instructions that maybe someone else would be interested in them. 

Here is the Debby's card and link to my post on the Cascading Fold cards I made, using a different technique: 

Click here to see the original post 

Here Is the Card I Made:


Cutting Instructions:

Cardstock A: (MELON MAMBO) 
  1. Cut one piece of A for card base measuring 5 ½” x 5 ½” and score at 4 ¼”, burnish on the fold line so crease is at the outside edge like a normal card.
  2. Cut one piece of A for 2nd layer measuring 5 1/2” x 3 ¾” score at 4 ¼” and burnished at fold line.
  3. Cut one piece of A for bottom front layer measuring 2” x 4 ¼”.
  4. Cut one piece A for inside sentiment layer measuring 3 1/8" x 2 7/8"
Cardstock B (PETAL PINK) 
  1. Cut one piece of B for inside card base mat measuring 5 ¼” x 4”
  2. Cut one piece of B for 2nd layer mat 4" x 3 1/2"
  3. Cut one piece of B for bottom layer mat measuring 1 ¾” x 4”
  4. Small scraps for floral pieces and butterflies. 

Cardstock C (Basic White )

  1. Cut one piece of C for layer on inside of base measuring 3 1/8” x 2 3/4”
  2. Scrap for sentiment

DSP (Meandering Meadows #162735 Online Exclusive): 

  1. Cut one piece of DSP for Inside Base Mat measuring 5 1/8 x 3 7/8”,
  2. Cut one piece of DSP for 2nd layer mat measuring 3 ¼” x 3 ¾”
  3. Cut one piece of DSP for bottom front layer 1 5/8” x 3 7/8”

Assembling Base Layers:  

1.  Adhere the B1 layer to card base mat.
2.  Adhere  DSP1 5 1/8” x 3 7/8” mat to B1 mat.
3.  
Adhere A2 mat 3 5/8” x 3 ¼” to the bottom of the base DSP piece. Leave equal margins around sides and bottom edge.
4.  Adhere C1 mat to A2.  I suggest stamping neutral piece with sentiment and design before adhering it. 

Here's all the pieces of the base mat. 


Assembling 2nd Layer: 
1. Adhere the A2 layer mat to the finished base layer. Fold at the score line and        add adhesive to the back to adhere. 
2. Adhere B2 mat to the second layer base.
3. Adhere DSP 2 piece the 3 ¼ x 3 ¾ to the card B2 mat.


Assembling Bottom Front Layers: 

1. Adhere A3 piece (1 ¾ x 4”) to the edge of the second layer.
2. Adhere B3 piece to A3.
3. Adhere DSP3 to B3
4. Decorate with floral and add sentiment.


Assembling Cascading Layers:  

1. Start with the base card with the folded piece with burnished fold on left side. Line up the 2nd layer so it is even with the bottom and side of the base layer and adhere it by running glue on the back of the fold line.

2. Repeat this with the bottom front layer.

3. Starting with the base cut from the top corner across the diagonal to the 2nd layer

4. Starting with the 2nd layer cut from the corner on the diagonal to the bottom layer.


I hope you found this tutorial easy to work with.  I'd love to hear from you.  

HAPPY STAMPING!
PENNY TOKENS STAMPIN' SPOT
Penny Hanuszak, CDN Stampin' Up Demo since 2006

Click here to shop in my Web Store

Sale Starts April 9th through April 30, 2024

Don't forget to Add March Hostess on
Any Orders Under $200 in March 
Click here to see how to use the Code. 


Saturday, March 23, 2024

Last Chance Retiring Products and Price Increases

Spring is trying very hard to arrive and with its arrival there are always changes.  It's no different for Stampin' Up! when we hit this time of year.  It's out with the old and in with the new.  

The latest announcement from Stampin' Up! is about the retirement of the January to April Mini Catalogue and the 2023/2024 Annual Catalogues retiring and what's called "The Last Chance" lists.  From 9–30 April, you can stock up on your favorite products and save up to 60% on essential craft supplies! 

The Last Chance selection of retiring products will only be available from April 9th to April 30, 2024, or while supplies last, so visit my website and get your orders in before they're gone!  

Annual Catalogue Retiring List 


January to April 2024 Mini Catalogue Retiring List 

A reminder that the 2022/24 InColour selection is also retiring. So if you loved them now's the time to stock up on Sweet Sorbet, Parakeet Party, Tahitian Tide, Starry Sky and Orchid Oasis, before they are gone forever.


Sale Prices Start on April 9th but in the meantime, you can decide what you want to order by browsing through both the Annual Catalogue Retiring List and the Mini Catalogue Last Chance List. I've added the links here:

Download the List to print out and look through your catalogs:

Annual Catalog Retiring List

Mini Catalog Last Chance List

Be Prepared, Price Increases Coming: 

HEADS UP!  It's not often a company lets you know that specific price increases are coming but Stampin' Up! has also given us a heads up about price increases coming with the next catalogue release. 

If you're like me you might want to check your basic supplies and stock up on some of these items before they're sold out or back ordered in April:  

  • Tombow Glue and Glue Dots 
  • Momento and Stazon ink and refills
  • Classic Stampin' Ink Refills 
  • All Coloured Cardstock
  • Basic White Cardstock
  • Punches 
  • Stamp Cut N' Emboss machines and Cutting Plates
  • Watercolour Pencils and Blender Pens 
  • Envelopes 
  • Stampin' Blends 


HAPPY STAMPING
PENNY TOKENS STAMPIN' SPOT
Penny Hanuszak, CDN Stampin' Up Demo since 2006

Click here to Shop Online or E-mail me!


Sunday, March 17, 2024

Happy St. Patty's Day!

Rainbows, a Pot of Gold, Leprechauns green beer and shenanigans are all part of celebrating St. Patty's Day on March 17th. I have a small bit of Irish in my genes, and so I love this special day. But in going through my collection of stamps I don't have any to use for a card. What about you? Do you celebrate this annual occasion? Do you have Four Leaf Clovers or Leprechauns in your stash? I'd love to know.

So, in lieu of the fact that I didn't make a card, I've chosen Henry my trusty ceramic sheepdog to model my favourite chapeaux for the occasion. Sadly I think it looks better on him than on me. 

Well that's enough blarney from me.  It's a beautiful sunny day here in Abbotsford.  And, it's perfect weather for going for a stroll around Mill Lake.  We'll see how hungry we are after that , and maybe head on over to the Townhall Pub in Abbotsford for brunch and to check out the St. Patty's Day festivities. 


HAPPY STAMPING!

PENNY TOKENS STAMPIN' SPOT

Penny Hanuszak, CDN Stampin' Up! Demonstrator since 2006

Click here to visit my 24/7 online webstore: 


Zany Zoo Birthday Card for TSOT642 Challenge

Here's another sketch challenge from Try Stamping on Tuesday which runs from March 5th to 17th.


Card Sketches are meant to be inspirational but each sketch challenge blog has its own rules, so remember to check them out.  For example, I'm able to change this week's TSOT642 sketch by rotating, flipping or changing it from landscape to portrait orientation.  I could even use a mirror image of the design layout and I could replace the sketch shapes with a circle instead of a shamrock, so long as the finished project visibly reflects the original sketch and includes a sentiment. 

So with all that in mind I set out to create my birthday card following these rules and remembering when the link closes so I don't miss out like last time.

Here's My TSOT642 Card: 


This was a very simple card to make once I decided all the elements.  I cut three strips of cardstock in Pool Party and Petal Pink for the angled strips.  The 5 1/4" x 4" layer was embossed with a large dot embossing folder that's available as a 3-D Embossing pack in the Online Exclusives.  


Once again I chose characters from the incredible Zany Zoo DSP pack in the Annual Catalogue.  You can do so much with this paper!  Love it! 

And here's the inside of my card: 


Well that's it for this week.  I didn't actually get a chance to post this to  the TSOT blog post as they had already closed it before the actual link closing time, which was a real bummer.  This is the second time this has happened so I probably won't post to that challenge site again unless I can get my card done really early.  Oh well, it still was fun making it and it'll make someone happy when they receive it on their birthday.  

HAPPY STAMPING!
PENNYTOKENS STAMPIN' SPOT

Penny Hanuszak, CDN Stampin' Up! Demo since 2006


Black and White Anniversary - FMS #669

I'm up for another sketch challenge card, how about you?  Narelle Farrugia is the sketch designer for  Freshly Made Sketches #669  this...