Monday, January 16, 2012

Valentine's Blog Hop - Join the Party!!!

 
Oh what fun!  I just heard Shirley Sumption's hosting a Valentine's Day Blog Hop and everyone's invited to play along.  I had such fun with her Halloween and Christmas Blog Hops that I'm really looking forward to this one.

So, what are you waiting for?  It starts tomorrow January 17th through Valentine's day (Jan 17, 24, Feb 6 and 14).  That's four weeks of fun! 

It's easy to play along here's all you need to know.  I'm running to my craft room now to make a card.  Hope you are too! 

Here are a few rules:

Anyone can  join the fun! 

1. Anything goes, Card, 3D project it just has to be Valentines.

2. Add the Hop to your Post, by using the code from Linky tools.

3. Add the badge to your post with a link to Shirley's blog at http://lookatmycutestuff.blogspot.com
4. Whatever you post has to be new not copied from a previous post or challenge.
Okay that's it.   Hope to see you there.

Penny

What do "Snow Days", "Puzzles" and "Birthday Cards" Have In Common?

How many more times do I have to shovel it?

<><><><><><> <><><><><><> <><><><><><>
View from my office while I'm composing this note. What a sight!
It's snowing out today!.   We woke up this morning to about 6 inches of the fluffy stuff and it hasn't stopped all morning.  My DH's cleaned the driveway twice already, and is dreading the thought of having to do it again.


Guess that means we're stuck inside for as long as this lasts.  I have a grin on my face.  Wanna know why?  Okay, can you see my feet doing the happy dance?  It's because SNOW DAYS are productive days and I get to do my favourite thing........ play in my Stamp Room, have fun and be creative!!!!  Oh yeah, and get caught up on my January Birthday Cards. 

View from my office window to my upper deck.

My back yard.............. buried under a foot of soft fluffy snow!
While I'm stamping he's puzzling.  What a great way to spend a snowy day!
So in keeping with that thought, I've been in my craft room churning them out.  Here are two birthday cards I've made so far this morning.  Hopefully the gals I'm sending these too won't be peeking. Shhhhh.........

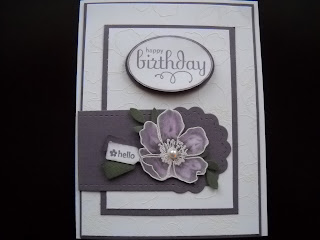
Here's my first Birthday Card of the day.  This little floral number was made with the following products:

Ink:  Perfect Plum, Versa Mark

Card stock:  Whisper White, Perfect Plum and Always Artichoke

Stamp Sets:  Perfect Punches #120517w/120516cm pg140), Happiest Birthday Wishes Hostess Set (#122615w/122617cm pg10), Fabulous Florets (#123025w/1123027cm pg. 107) and  Tiny Tags (118091w/118592cm pg.136).

Accessories:  Jewelry Tag Punch (117190pg 210), Two Tags Bigz Die (115954),  Bird Builder Punch (#117191 pg. 213), Extra-Large Oval Punch (#119859 pg 212), Lace Ribbon Border Punch (122362 pg. 211).  Basic Pearls (119247 pg 198), Dimensionals (104430 pg. 206).  White Embossing Powder (109132 pg. 201)
I've kept the inside of this card pretty basic, by just adding a 5 1/2" strip of Lacey Border punched out of Perfect Plum card stock.  The "A Little Bit Late" birthday wishes sentiment is one of eleven fabulous birthday greetings from the Hostess sets called "Happiest Birthday Wishes".    Ask me how you could purchase or earn this wonderful Birthday Greeting set for Free. 

The Fabulous Florets flower image that is featured here was stamped on Whisper White cardstock with Versa Mark Ink and then heat set with White Embossing Powder.  Both layers of Whisper White Cardstock on the front of the card were stamped randomly with the same image and embossed.  You have to look close to see the fine detail of the embossing on the white card stock. 

The flower image was sponged with Perfect Plum Classic Ink.  The Whisper White tag was stamped with the "hello" image from the Tiny Tags stamp set, and then punched out with the Jewelry Punch. 

The three tiny tags were mounted with dimensionals to give some definition from the plum tag.  The floral image from the Bird Builder punch was punched from Always Artichoke card stock.  A medium sized basic pearl was added to the center of the flower.  This floral arrangement and Jewlery Tags were mounted with dimensionals to the Perfect Plum tag which was die cut using the Bigz Two Tag Die.   

<>  <> <> 
Here's a closeup of the floral image and tags. 
  My second card is made with the Just Believe Stamp set. Here are the products used to complete this card:

Ink:  Baja Breeze, Soft Suede Classic Ink and Markers

Cardstock:  Baja Breeze, Soft Suede, Naturals Ivory Specialty Cardstock (pg. 181 IB&C).

Stampsets:  Just Believe (#116948w/120453 cm pg. 109), Tiny Tags (#118091w/118592cm pg 136), Perfect Punches (#117022w/120516cm pg 140).
Accessories: Framed Tulip Embossing Folder (#121809 pg 218), Silver Brad (#104336 pg. 199) Jewelry Tag Punch(#117190 pg. 210), Extra Large Oval Punch (#119859 pg. 212), 2-Way Glue Pen (100425), Stampin Dimensionals (104430 pg. 206)and Dazzling Diamonds (#102023 pg. 201).


Here's a close up of the detail of the details on the front of the card.  The Framed Tulips Textured Impressions Embossing Folder has created the perfect 5 1/4 x 4" frame for this floral image. 

To create the 2-toned floral image I used Soft Suede and Baja Breeze markers to colour the image and stamped it on a 3 x 4 1/4" piece of Naturals Ivory card stock.  Two-way glue was then applied to the flowers and they were sprinkled with Dazzling Diamonds for a glittery effect. 

The Happy Birthday sentiment from Perfect Punches was stamped on a piece of Naturals Ivory Specialty card stock and then fussy cut around the inner oval. A piece of Baja Breeze was cut out with the Extra Large Oval punch and the sentiment was adhered with dimensionals. 

Before mounting the sentiment to the floral image, 3 jewelry tags in Soft Suede, Naturals Ivory and Baja Breeze were sponged, stamped with sentiments from  the Tiny Tags set, and mounted to the main sentiment with a silver brad.  The jewelry tags were fanned out and layered with dimensionals to make them stay in place.


The inside of the card has been stamped with one of the images from the Happiest Birthday Wishes - Clear-Mount Hostess Stamp set. 

SAB set "Fresh Vintage".  You can earn this set for FREE during the upcoming Sale-A-Bration sales event starting January 24, 2012.............ask me how?

Well that's it for today.  Now back to my card room.  Hope you enjoy these cards and thanks for dropping by.

Penny

Saturday, January 14, 2012

Stampin' Queen's Sketch Challenge - SQSC21

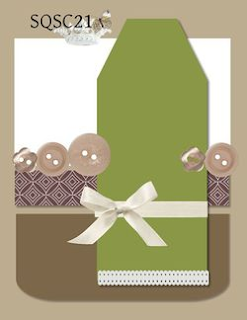
Stampin' Queen's Wednesday Sketch Challenge #21 is out and I know it's going to be a popular and fun challenge.  The designers at Stampin' Queen really give their all in putting together their great renditions of the sketches.  Here's this week's sketch:


When I first saw this sketch it got my "vintage juices going".  I liked the layout and the colours they'd used and I immediately started visualizing how I would put my card together to achieve that same vintage look.  I'm using a fabulous new stamp set called "Fresh Vintage" which you can earn for FREE during the upcoming Sale-A-Bration sales period.

Here's my vintage card: 
My card base is Crumb Cake cardstock.  The next layer of Very Vanilla and Soft Suede cardstocks together only form one layer, because they're split into two separate pieces and adhered at the same level. 

The Very Vanilla piece measures 4 x 2" and was embossed with the Stripes Embossing folder and sponged in Crumb Cake. The Soft Suede piece measures 4 x 2 1/2" and is stamped with images from Fresh Vintage in Rich Razzleberry ink and heat set with Clear Embossing powder. 

Before securing these two layers with adhesive to the card front, I stamped  another image from the Fresh Vintage set which is a smaller version of the "Chamomile Wheel" on page 19 of the Occasions Mini. 

Here's a closer view of the detail on the main tag.  I die cut a second tag from Very Vanilla and then cut a 1/2" piece off the bottom, sponged it with Crumb Cake ink and adhered it to the bottom of the Rich Razzleberry tag.  I didn't emboss this piece.  The main tag is adhered to the card front with dimensionals.

The ribbon and small bow are Very Vanilla 3/8" Taffeta Ribbon (which I wished I had stocked up on before it retired).  Three tags were punched out with the Jewelry Tag and stamped with sentiments from the matching Tiny Tags stamp set (118592 pg 136 IB&C).  They were tied on with some gold cord and popped up with dimensionals.

I love these Rich Razzleberry Buttons.  They're from the Brights Collection of Designer Buttons #119747 on page 197 of the IB&C.  The buttons are attached to the card with large glue dots, and I've used very thin strips of Soft Suede cardstock instead of thread or ribbon for the centers of the buttons. 

Tip: Originally I was going to make buttons using my Buttons #5 sizzlet die cut.  To do this you simple die cut at least 3-4 layers of buttons.  Glue one layer to the next until you have a button sized stack and then do a wash of Crystal Effects over the top to make them all shiny.   
The sentiment is from the hostess set "Happiest Birthday Wishes" #122617 on pg. 10 of the IB&C.  It was stamped in Rich Razzleberry on Very Vanilla cardstock and then punched and layered with the Extra Large (#119866) and Large Tag Punches (#119876) sold on page 209. 

For the base tag, I cut a piece of Rich Razzleberry cardstock using the Bigz Two Tags Punch #115954 pg. 222 IB&C.  This tag was run through the Big Shot in the Perfect Polka Dots Embossing folder (#117335 pg 219) to give it some extra texture and the edges were sponged with Rich Razzleberry Ink. 

The corner element was punched with the Photo Corner punch (now retired), sponged with Rich Razzleberry and then Basic Pearls were added.  I coloured them to match the cardstock with a non SU alcohol based ink marker.
In the background you can see a little more detail of the three stamps I used from the Fresh Vintage SAB set. 
Here's the inside of my card which I stamped in Rich Razzleberry Ink.  The floral element is from the "Fresh Vintage" SAB set (#125117). 

The birthday sentiment, one of my favourite, is from the 2011-2012 Idea Book and Catalogue and it's called "Perfect Punches" #120516.  I can't say enough about this 6 piece stamp set that coordinates with the Round Tab, 1 3/4" Scallop Circle, Scallop Oval, Curly and Modern Label punchs and the Extra Large Oval punch.  Check it out it's great value for your money and is on page 140 of the catalogue. 

 
Okay that's it for today.  Thanks for dropping by to visit and I hope you enjoyed this card.  It was fun to make and I really like this sketch. 

Penny

Spotlighted on Stampin' Queen's Sketch Challenge #20


As you can see by this beautiful little blinky here and on my sidebar my entry for the SQSC20 was one of three spotlighted cards featured this week on Stampin Queen's Sketch ChallengeClick here to check out the other spotlighted cards by Rose-Ellen and Rachel, as well as all the other fabulous entries for the week.

I'm so thrilled this card was spotlighted, as I worked seriously hard on putting all the elements together, and wasn't sure if anyone would really like it. 

So "A Cup of Thanks" to the Stampin' Queens Design Team! This validation just made my day! 

Penny

Monday, January 9, 2012

Start With Something New - Monkey90-Sketch + picture

It's time for A La Card Monkey's newest weekly sketch, Monkey 90 New To You and Sketch.  This sketch is all about using something that's new and unused in your stash, so it can be about anything.  Because Valentine's is coming and I'm in that kind of mood, I chose to do a "romance" theme. 

It wasn't hard to find something new in my stash that I hadn't tried out yet.  One of the perks of being a Stampin' Up! Demonstrator is that you get to pre-order new things, and with my last order, I earned a number of free stamp sets both from the Occasions and the upcoming Sale-A-Bration catalogues.  If you want to know how to earn free hostess or other sets, just contact me for more information.

Okay so to get on with this week's sketch challenge, I first want to begin with the sketch.  Here it is:
Is it a rabbit or a doctored up squirrel?  I had such a laugh over this picture, first because of the little paw on the heart.  That is just so darned cute! 

But then I looked closer and I thought wow, that paw's a little out of proportion to the body and look at those ears...........not typical cottontail ones.  And whoa!  What about that dear little face?  You tell me rabbit or squirrel, I'd like to hear your take on it, maybe it looks like some other little critter.  Maybe I had too much caffeine!  Maybe I just want to see if you read my post! 

I love this little image from the Take It To Heart Stamp Set, but I hadn't used it yet, so it's my something "new".    I know this stamp will be one of my favourites "to go to" from the Occasions Mini.  It just smacks of young romance, but I can also see it being used for friendship.  I'm also in love with these hat pins and had to add one just "because" you can find them in accessories in the Idea Book and Catalogue. 

Take It to Heart is a beautiful 5 piece stamp set that can be used in conjunction with the Hearts Collection Framelits and the Full Heart Punch.  It comes in either a wood mount #12520 or clear mount #125522 set.  You can find it on page 14 of the Occasions Mini Catalogue.

Here's my whole card.  The card base is in Real Red card stock and I've layered that with Basic Black and then used a 1 1/2" strip of Red Glimmer Paper for the top layer and added a 2 1/2 " piece of DSP from the Holiday Mini that's in Very Vanilla and Glimmer Red, that I hadn't used.  It matched perfectly.  My sentiment is from a retired hostess set called "Something to Celebrate" #121955.  The little bow is made with Gros Grain Red Ribbon

Here's a view of the inside of the card.  I cut a piece of Red Glimmer paper with the Scalloped Punch and topped it with some of the DSP, then mounted it on a strip of Basic Black cardstock.  I stamped the Hearts from the Take It To Heart set in Basic Black ink.  It would have been better I think if I'd embossed them with Black Embossing Powder before adding the decorative strip as they were lighter than I intended.  Oh well, I'll do that on the next card  I make like this. 

Okay that's it for today.  Hope you liked my entry even though I took a little license with the sketch design by using hearts instead of circles and changing up the size of the DSP. 

As always thanks for dropping by and let me know if you like it, or not.   I love getting your comments, they make my day!

Saturday, January 7, 2012

Stampin 411: Saturday Sketch Challenge #237 (SSC237)

It's been a while since I participated in a Saturday Sketch Challenge over at Stampin 411.  Don't ask me why.  I've been hit and miss with this group.  I don't understand it because I absolutely love checking out their blog and all the beautiful cards made by the Design Team and other stampers, plus all the helpful suggestions, tutorials and colour challenges. 

Maybe it's because I'm always too busy with family on Saturdays to pay attention.  But that's going to change.  Starting now, I'm going to be adding more of their challenges to my New Year " Must Try" "Must Do" lists.

I seem to be on a role with Birthday cards this month, so I thought I would adapt this sketch for one that's coming up in mid-January.   I'm featuring stamps and accessories from both the Occasions Mini Catalogue as well as a sneak peak at some neat things from the Sale-A-Bration cattie. 
Bordering on Romance #125480(w) or #125482 (cm) pg. 11 Occasions Mini Catalogue
Edgelits Dies - Adorning Accents #125595 pg. 7 Occasions Mini Catalogue

Isn't this a cheery and colourful card?  Just the thing to brighten a wet and dreary January day!  The 5 1/2 by 4 1/4"  card base is cut from Lucky Limade cardstock. The small floral image from the Bordering on Romance Stamp Set was stamped in Versa Mark Ink to create some background interest. 
To create the decorative edge, I used the brand new Edgelits  Adorning Accents Scalloped Edge Die. What fun!  These new dies are a little tricky to work with but they're not as fragile as they look.  To keep the edge straight while running it through the Big Shot I attached the die with mini glue dots over the card stock edge to the plate and then rolled it through the machine.  Voila a beautiful neat scalloped edge!  

Now the scallop looked really good as it was, but I decided it needed just a little more pop.  To achieve this raised image of the scallop, I embossed about 1/16" behind the scalloped edge using the Adorning Accents Embossing Folder Scalloped Edge.  It's one of three awesome embossing folders made specifically for edges.
Adorning Accents Embossing Folders #125601 pg. 7 Occasions Mini Catalogue.

I hand cut the pointed ends of the banner from Poppy Parade cardstock and then layered it with the same beautiful Designer Series Paper used along the inner edge of the card.  It's called Everyday Enchantment Designer Series Paper and will be available after January 24th when Sale-A-Bration begins. 

I changed my take on this sketch by moving the layered square to the right hand side of the card face, instead of centering it.  Poppy Parade, Lucky Limade and Very Vanilla cardstocks were layered for the square element.  Using Versa Mark Ink and Black Embossing Powders I heat set the larger floral image from Bordering on Romance to the Very Vanilla piece.  Poppy Parade, Calypso Coral and Lucky Limeade inks were added to the floral image with an aqua painter. 

A 3/8" Ruffled Ribbon in Lucky Limade (122977 pg. 194 IB&C) was placed in the corner of the square.  A printed designer brad was added to the center of the bow.  Isn't it cute?  It's from the Everyday Enchantment Ribbon and Brad Pack in the Sale-A-Bration catalogue.  These amazing 3/8" printed designer brads come in 5 different designs and there are 5 of each type in the package.............can you say "Great Deal!!!".   I

And finally, here's the inside of my card.  As you can see I added a 1" strip of the DSP to the right hand side of the card.  The Happy Birthday Sentiment is from a set called Perfect Punches.   I've also restamped the floral image in Poppy Parade ink to the left hand side of the card. 
Perfect Punches (#117022(w) or #120516(cm) paged 140 IB&C) is an inexpensive and must-have stamp set simply for how easy it makes creating accents and focal pieces for your projects. Each image coordinates with a different punch, making stamped creations easy as 1-2-3—stamp, punch, adhere. And with a variety of sentiments, you’ll be set no matter what the occasion.   

Well there you have it.  Hope you enjoyed this card and will come back and visit again. 

2012 Search For Hostesses? Want to Party?


With the launch of the new Occasions Mini catalogue on January 4th and the upcoming Sale-A-Bration (SAB) sales event starting January 24th, now is the time to seriously think “party”.  Here’s some more good reasons:

• Do you have a really long wish list?
• Would you like to have a fun morning, afternoon or evening out with your friends?
• Would you like to receive exclusive Hostess stamp sets?  How about FREE SAB sets for you and your guests?
• Are you looking for new creative ideas?
If you said yes to any one of the above items, you should hostess your own Stampin' Up! party! 
 
Hosting a Stampin' Up! party is simple and enjoyable. I will work with you to create a party that's fun for everyone. Here's all you need to do:
  • Set a Date and Time (click here to check out my event calendar).
  • Create your guest list and find out who's coming.   Find out about the easty to use Hostess Guest Tracker on my site
  • I'll contact you before your party to get a count of guests planning to attend so I can ensure that there'll be enough supplies for the fun project(s) we'll be making at your Stampin' Up! party! .
  • For guests who're unable to attend your party, offer them the opportunity to place an order with you.   
  • Enjoy yourself as you have fun with your family and friends. As the hostess, you may choose to provide a treat or snack for the party.  Other options are available - just ask me about them.
  • Pick your Hostess Benefits when you have qualifying party sales. Hostess Benefits mean your wish list is coming true.
  • The order arrives directly at your home, so you and your guests get your goodies quickly.

Stop Procrastinating...........make this the year
you start stamping, and having Fun!!! Email Me to Book your Party: 

MAY 2024 HOSTESS CODE

Welcome to my site and Happy May everyone!    Here is my new Hostess Code for the month:  Every papercrafter needs stuff, but not everyone c...