Wednesday, October 8, 2014

World Card Making Day Open House Projects

Wow, my World Card Making Day Open House on Sunday was a blast!  

I was delighted to open my doors to the twelve great ladies who came. We had ate, chatted, looked at new products, met new friends, talked about classes, made some make n' takes and watched some demos.  

I also had out of town customers participating in my World Card Making day and supplied them with the same make n' takes and access to the Hostess Code for the specials and prize draws.  That's the great thing about being a Stampin' Up! demo, your customers can be anywhere and still participate.

Note:  Due to privacy issues, I'm not including pictures of my guests during the party, only my down line besties.  

How The Day Went:
Speaking of "besties" here are my two, Ethel and Sheri.  These gals are not only great paper crafters and demos themselves, but they just add so much to my team, because of their fun loving nature and thoughtfulness.  

Both arrived before everyone else to help with final setup and food. I was really relaxed before my guests arrived because they gave me time to work through some last minute details while they tried out the make n' takes table and made sure everything I needed was there.  

What a big help!  I must say, I couldn't have made it through the Open House without them!  So take a bow ladies, you certainly deserve it! You did an outstanding job and it was so much fun having you participate.


Make N' Takes: 
 
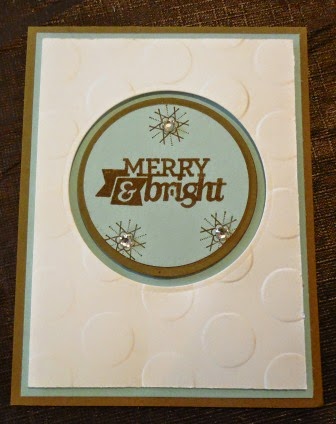
The card base is Soft Suede topped with a 51/4" x 4" piece of Soft Sky.  The 2nd layer is a 3 3/4" x 5" piece of Whisper White that has been embossed with the Large dot Embossing Folder.  To add some depth to this card face, I used the 3" circle framelit to remove a circle from this piece.  I then cut a 2 3/4" circle from Soft Suede and punched out a a 2 1/2" piece of Soft Sky with the 2 1/2" circle punch.  The Soft Sky circle was stamped with the "Merry and Bright" sentiment from the "Christmas Bliss" photopolymer  stamp set in Soft Suede ink and a few snow flakes were added from a retired stamp set called Snow Flurries.  Some Basic Rhinestones were added to the snow flakes and then this circle was mounted with dimensionals to the Soft Suede piece. 

For the inside of the card I added a Whisper White layer that was stamped with the sentiment "Wishing you a Bright &........" from the Bright and Beautiful stamp set from the Holiday Catalogue.  Two clusters of snowflakes were stamped in Soft Sky ink in the corners.  


We also made a Christmas tag using the new Tree Punch and the On Point Embossing Folder.  How cute is this:


The tree images were embossed with the Fancy Fan Embossing Folder. The beautiful glimmer stars were punched out with the Itty Bitty Accents star punch from the Dazzling Diamonds Glimmer paper.  Luv, luv, luv that stuff!

A number of gals said they passed over this embossing folder in the holiday catalogue, because they thought it was just a bunch of geometrics or triangles.  But guess what, along with triangles there are a whole forest of trees lurking in this design.  This just might be an embossing folder for all seasons!
Sheri and Ethel completed the make n' takes themselves so they could ensure all the equipment and supplies needed were there and ready for the first wave of stampers. They were and we were all ready to go when our first guests arrived.
This was my Make N' Take table and guests were able to make both a card and gift tag using the new Tree punch that coordinates with the Festival of Trees stamp set and the Christmas Bliss stamp set.
Everyone got to try out the Envelope Punch Board with Ethel's excellent assistance.  It must have been a hit, several people purchased one. 
Displays: For my Open House, I used the entire basement in my home for displays, make n' takes and refreshment set up.   It made it so much more comfortable than trying to cram into a smaller space.  

My guests were able to browse the catties in comfort and relax and chat.  My Pool table came in handy for a huge display that everyone could walk around and check out.  Here are some pictures of the set up and displays I used.  
The Holiday catalogue is chalk full of wonderful stamp sets and products so this area of the display shows off some of the stamp sets and some samples of what could be made with them.
Paper Pumpkin, Project Life and Clearance Rack items on display.
Here's my cozy "sit a while" area.  It was well used. 
As my guests arrived they each received a goodie bag.
There were some awesome specials offered in October including the one for World Card Making Day  and I wanted to make sure everyone knew all about them, so I made up this display board.

No Open House would be complete without a "clearance table", and in this case it's a table and some stools.  But hey, whatever works!
Along with my sale items we had some of Sheri's fabulous Infiniti scarves on display.  For every scarf sold she donates a percentage to the Run for the Cure.

This is my card making space, all cleaned up for taking orders.
And finally, here are some of my favourite cards on display that I made over the summer months.  Wow did I have fun.  Most of these were made for challenges or for my Stampin' On Tuesday get-togethers. 
PRIZE DRAW WINNERS:

What's a party without door prizes?  Congratulations to Christine H. and to Betty Lee who each won $55.00 in Hostess prizes from my special draw.  Both these gals were very excited when I notified them and have submitted their wish list items, which are now on the way.

Additional winners were:
Jennifer - Stamp Set
Sue J. - Gift card Sampler
Corrine - Stamp set
Arlene - Paper Pack
Nancy -  Dimensionals Pack

Well that's it for my World Card Making day.  I want to thank once again all the great ladies who attended my party and contributed to its fun and success!  You're all so wonderful.  Keep the first Saturday in October marked in your calendar for next year, because I think I'm going to make this an annual event.  
Happy Stampin'
Penny Tokens

Friday, October 3, 2014

SIX Great Reasons to Join Stampin' Up! In October!

Pick a Pack of Paper is Here!
October 1 to 31st, 2014
The only thing better than FREE Designer Series Paper*, is getting six months worth of FREE Designer Series Paper!  How can you get in on this deal.  Well it's simple. 

Join my team between now and October 31st, and you'll receive one FREE package of Designer Series Paper*, every month for the next six months, and so will I.  How exciting is that?

The benefits of being a Stampin' Up! Demonstrator just got even better. Why? Because, if I sign up five new demonstrators during the month of October, I will actually receive a total of one free paper pack per new demonstrator**  and a potential for me to earn 30 FREE packages of Designer Series Paper, well into 2015!  Isn't that awesome!!!!


And you know what that means, I love to share so it would mean more   Giveaways and FREEBIES for you my customers   Everyone benefits.  

* Specialty and Designer Paper Packs are not included in this promo
**Up to a maximum of five new people on my team

Demonstrator Benefits
Product discount
Demonstrators get a 20 percent discount on all Stampin' Up! products, including stamp sets, paper, and accessories. It's a great way to support your love of stamping, paper or digital crafting, home décor - or whatever your passion may be!
 

Extra income
You'll earn extra income based on your sales and recruiting - just how much extra income is up to you. Maybe you want enough income to pay the electric bill every month, or maybe your goal is bigger - the monthly payment for your new car. That's the beauty of the demonstrator experience - it's all up to you! See the Compensation Table for more information.
 

Flexible schedule
This is your business, so you can put as much (or as little) time into it as you'd like!
 

Support from Stampin' Up!
Stampin' Up loves their demonstrators and it shows through the vast amount of demonstrator support materials. Workshop ideas and audio and video trainings on all kinds of topics which are available at your fingertips on the demonstrator website. 


Plus, you'll receive our bi-monthly magazine Stampin' Success which is produced just for demonstrators, and is full of informative tips and beautiful samples.  And, as a member of my team I'll be there along your journey to offer guidance and tips and help you be a successful in your business or happy with your hobby.  So talk to me if you're interested in becoming a Stampin' Up Demonstrator  and I'll give you all the details about this month's promotion and joining my team.

Happy Stampin!
Penny Tokens

Wednesday, October 1, 2014

WORLD CARD MAKING DAY SPECIALS - OCT 1 -6 ONLY!!!!

Big Savings For a Very Limited Time:


Stampin' Up! is so excited about this year's World Card Making Day, that they're having a ridiculous 15% off sale on some of your favourite products! 

From 1-6 October, you'll be able to purchase select ink, paper, envelopes, and adhesive-all at a 15% discount! Select stamps are 20%!

Now is the time to re-stock your supply of paper and basics.  With Christmas right around the corner, this is a perfect time to purchase stamping supplies for yourself, friends or family.  Or how about having someone buy for you..... hint, hint!!!  Check out the flyer here:


Add Hostess Code #HUU7NAWG to your order and you will automatically be entered into my draw at my World Card Making Day Open House on October 5th.  If you're the lucky winner, you will get free hostess gifts!  Don't forget to add the number to your on-line order. 

The Fine Print:
  • Available on demo, customer, workshop, OEX and online orders
  • Color families and Whisper White in the 8-1/2 X 11, along with Medium envelopes, are offered at a 15% discount
  • Fast Fuse Adhesive and refill component are offered at a 15% discount
  • All individual ink pads are offered at a 15% discount
  • Limited offering in stamps will be available at a 20% discount
Deadlines: 
  • By Phone: Monday, October 6, 2014; 6:50 PM (MT) 
  •  OEX/Online orders: Monday, October 6, 2014; 11:50 PM (MT)
Come to my World Card Making Day Open House on October 5th, and you can place an order on-line right now and avoid missing out on this opportunity!  

Reminder:

Use this hostess code #HUU7NAWG on your on-line order between October 1st and 5pm on October 6th,and you'll automatically be  entered into my Hostess Prize Contest for World Card Making Day. 

Happy Stampin!  
Penny Tokens

Friday, September 26, 2014

Fall Banner

Seriously, FALL is my most special time of the year!  I love everything about it.......... the regal colours, the earthy smell in the air, cooler days and falling leaves. 

When the season's change it's nice to acknowledge the transition in some way.  I like to decorate my home and my stampin' cave to commemorate the occasion.  So it was with all this in mind that I set about making a "Stampin' Up" FALL banner. 

Making banners is an easy and fun way to acknowledge the season.  In the following pictures I'm going to walk you through the FALL banner I recently made.

Here it is from start to finish:
Stampin' Up makes celebrating and creating home decor very simple with their variety of awesome kits.  You can check these out on pages 202 and 203 of the Inspire, Create and Share catalogue (IB&C 2014-15).  

For my banner I used the supplies from the Build a Banner Simply Created Kit.  This kit has great value for $24.95.  It includes 18 canvas/paper pennant banners measuring 5" x 7".  There are six each of 3 designs.  It also includes 9 feet of jute twine, plus alphabet and image stencils that will last you forever.  The neat part about this kit is that once you've bought it, you can replenish it with a Refill Kit for only $11.95 that includes the pennants and jute.   

Supplies:
Ink:  Old Olive and Pumpkin Pie for the banners, Gumball Green, Staz on Black ink, and Pear Pizzazz ink for the Glimmer Paper
Card stock:  Pumpkin Pie, Daffodil Delight, Old Olive, Chocolate Chip
DSP:  I used FALL coloured and decorated Designer Series Papers for the lollies and some of the Autumn Leaf cuts.
Accessories:  2" Alphabet Die cuts (retired), Autumn Accents Big Shot Die Cut, Spider Web, Arrow, Hounds tooth, Large Polka Dot and Decorative Dot Embossing Folders, Stampin' Up! buttons in FALL colours, Red, Silver and Gold Glimmer Papers,1" and 2 1/2" circle punches.

Okay so to start making my banner: 
Whether you choose to make a small or a large worded banner like mine, the process will be the same.  You will need to prep your banners, prep your embellishments and get your layout organized and finally you'll need to assemble it.  

I started my project by making a drawing of what I expected my finished banner to look like.  This helped me determine the number of banners I would need and the configuration of each of the pieces needed to complete the project. 

I needed a working surface that was large enough to lay out all the banner pieces together so I used the top of my pool table.  It worked perfectly.  I chose a striped and a polka dot theme with rounded and banner style canvas pennants and alternated them across the length of the banner.  

Step One- Preparing Banners:
Here's a sample of a banner coloured with the striped plastic stencil.  I worked on top of my grid paper, laying out the canvas banner face up and using the grid paper to make sure it's straight, then covered the banner with the stencil, again making sure the stripes were running straight.  I used the eyelets on the banner to hold the stencil in place.

With a little bit of experimenting, I found that using a sponge dauber to apply the colour worked best for me.  I simply start working the Old Olive ink down the pattern on the stencil and making sure that I apply the colour consistently.You can tamp or drag the colour - whatever works for you.
Okay this process goes really quickly.  Here you can see all the stripes coloured in.
In this photo you can see that I've done the same process but have changed the stencil to a polka dot image and have used Pumpkin Pie ink to colour the dots.
This is what the finished piece looks like and it's ready to start decorating.  I coloured all the pieces one at a time and as each one was finished, I laid them out on my pool table ensuring they were in the order they would appear in the finished banner. 
Step Two - Layout and Preparation:
Once all the banners were coloured the process of really decorating them began. In my design layout I chose to have a pennant, a lolly and then a pennant, and followed this layout all the way through.  I needed to accessorize each pennant and each lolly with leaves, buttons and bling, so preparing all this was my next step.  I'm not going to bore you with step-by-step pictures of this process, but this is essentially how I put the banner together:

1.  I could have stenciled the letters in the circles on each of the banners, however I chose to use my Alphabet Bigz Dies to cut out the 2" letters to spell "Stampin' Up!", from Chocolate Chip card stock.  Once all the letters were cut out I placed them on the banners on the pool table so I could make sure I'd cut out everything I needed. 

2.  I decided to add some more colour by covering the circles on the banners   with a paper square.  I used my Squares Collection Framelits and cut squares which I embossed with various embossing folders (see supply list) from Daffodil Delight, Old Olive, Pumpkin Pie and Soft Suede card stocks.  The pieces of card stock measured 3 1/2" x 3 1/2" and because I centered the framelits over the squares I was left with a 1/4" frame after they were cut out, that I used as part of the design.


3. I cut lots of leaves in designer paper, glimmer paper  and card stock using the Autumn Accents Bigz Die Cut and then set them aside with some Stampin' Up! Buttons of various sizes and colours that went with the FALL theme. 

4.  Using the retired Rosette Bigz Die cut I cut out and accordion folded 1" by 11" strips of Designer Paper in Fall colours to create my small rosettes or lollies.  Only one strip is needed for the smaller size lollies.  For the larger ones I cut the strips 2" x 11 and glued two strips together.  I used a silicone mat as a gluing surface and worked with a glue gun. To hold the lollies together I punched out several 1" circles and used these as a gluing base on the back side of the lollie.  

If you've never made a lollie before they are quite tricky to join together. If you don't glue the pieces together properly the DSP will tear or the folds won't go together properly.   To make sure you get it right, here's a link to a tutorial on how to make lollies.  

Step Three - Assembling:

1.  I laid out a piece of silk cord (non - SU) so that it extended across the pool table and dropped at least 3 feet on either side.  The cord was threaded through the eyelets on the banners and an equal distance was left between each of the banners to add two leaf clusters and the lollie.  

1.  I used self adhesive tape to attach the squares and letters of the Alphabet onto the banners, and made sure I burnished each piece to ensure that it would stay glued to the banner.  

2.  I assembled and decorated the lollies and leaf clusters with a glue gun.  Because the lollies and the leaf clusters didn't have eyelets in them to hang them on the rope, I punched out 2 1/2" circles for each lollie and two 1" circles for the leaf clusters, from scrap card stock to attach these elements to the banner rope.  I used the glue gun to attach all these pieces. 


Finished Banners and Lollies: 

Each Alphabet letter has a bit of bling added in the form of basic rhinestones.  Most of them are Stampin" Up! ones coloured with Sharpie Markers, except for the "I" and the "M" which are some dollar store bling.  I also punched out stars from Glimmer Paper and adhered them randomly on the banners with glue dots. 

Each lollie consists of a large lollie on the bottom, a leaf in glimmer paper and a smaller lollie with a button. I coloured some of the glimmer paper with Gumball Green, Pear Pizzazz and Basic Black inks, to bring in more fall colours.  Each leaf cluster consists of a variety of leaf shapes and textures.


This banner was the spacer between Stampin' and Up.  It was fun decorating this piece too.


I really liked the way the banners came together and I had a lot of fun doing each one and figuring out how I would embellish it.  From start to finish the whole project took about 5 hours to complete.  I'm planning on doing a banner for my fireplace for Thanks Giving that either says "Thanks" or "Fall".  I know it will be the perfect decor piece for my Thanks' Giving Day Festivities.  
I know it's difficult to see but here is the entire banner hung on display at our Basics for Babies vendor table area last weekend.  I'll also be hanging it in my stampin' cave for my World Card Making Day event on Sunday October 5th, so I hope to get a better picture of it hanging then.
Fall Challenges: 

And finally, I am entering this banner in two great fall themed challenges this week.  You'll want to click on both of these links and check out all the great projects and cards that are on display. 

1.  SU Autumn Colour Challenge #106

2. The Paper Plunge - Challenge #1 - this is a brand new challenge site folks and my good friend Diane Ison is on the Design Team.  Check out the beautiful fall cards already posted by the design team and send some love their way! 

Thanks again for stopping by and if you have any questions regarding how I assembled the banner just post a comment and I'll get back to you.  
Happy Stampin!
Penny Tokens 

Thursday, September 25, 2014

Hot Pink Anniversary! The Challenge #15

I found a "new to me" challenge blog this week called Always Playing With Paper. They show case a sketch and colour challenge and they post the dimensions of the layers for the sketch.  Now that's pretty awesome.  You can do either of the challenges or mash them up so that gives you lots of options.  

Here's the sketch and the hot colour combo that got my creative juices flowing.  
And, here are the dimensions in case you're interested in recreating the sketch:
Card Dimensions
Card Base: 4.25" x 5.5"
Black Trim: 4" x 2.25"
White Strip: 4" x 2"
Scallops: 1" x 4"

 Here's My Card: 

I opted to use just only the colour portion of this challenge for this Anniversary Card, and let me tell you, I absolutely love the way it turned out.  Melon Mambo and Basic Black together are just so hot! Oh and I love those large Polka Dots!

Supplies: 
Stamp Set:   Happy Hour 
Ink:  Momento - Tuxedo Black, Melon Mambo and Old Olive Markers for the cherries.
Card Stock:  Basic Black for card base, Melon Mambo, Basic Gray and Whisper White.  
DSP:  Silver Glimmer Paper, Back to Black Designer Series Paper (DSP)
Accessories:  Circles Collection Framelits, 2 1/2" circle punch, Large Polka Dot Textured Impressions Embossing Folder, Basic Pearls coloured with hot pink Sharpie,Dimensionals and adhesive. Big Shot and Trimmer.


How'd I Do It:
1.  The card base is cut from Basic Black cardstock and measures 8 1/2 x 5 1/2 and is scored at 4 1/4".

2.  The Melon Mambo layer measuring 4 x 5 1/4" was embossed with the Large Polka Dot Textured Impressions Embossing folder and then adhered to the card front.

3. A strip of 5 1/2 x 11/4" Basic Gray cardstock was layered with a 1
 x 5 1/4" strip of Back to Black designer series paper and then adhered to the card base.

  
4.  For the circles layer, I started with a 3 1/4" Basic Gray layer, followed by a 3" Melon Mambo layer, a 2 3/4" Silver Glimmer Paper layer and finally a 2 1/2" Whisper White circle layer.  The Whisper White layer was stamped with the beverage glass, 3 cherries and Cheers sentiment before being attached to the circle layer.  I offset the Whisper White and Silver Glimmer paper layers. 

5.  I decided to add some pizzazz to the stamped piece by first stamping the cherries and colouring them with Melon Mambo and Old Olive ink markers.  Next I coloured the basic pearls with a dark pink Sharpie Marker and then glued them to the cherry centers.  Although the colour is a bit off, it's close enough to work effectively.  

6. The inside Whisper White panel measures 3 3/4" x 5".   I stamped the "Any hour spent with you is Happy Hour!" image on the top half of the panel, and re-stamped the cocktail glass.  To tie the inside of the card to the outer cover, I adhered a 3/4" x 3 3/4" strip of the designer series paper and finished this off with a 1/4" strip of Melon Mambo cardstock.  
 
I was very happy with the outcome of this card.  This Colour Challenge has to be one of my favourites, and I hope you'll like the outcome as much as I do.  

Leave me a comment to let me know what your favourite colour combo is, and make sure you leave some comments for the Always Playing with Paper Design Team and other participants.  There are some wonderful and inspiring cards posted.

Happy Stampin' 
Penny Tokens

2024-2025 Annual Stampin' Up! Catalogue has launched!

 HAPPY MAY 1ST| Today I'm celebrating and  sharing the launch of the much awaited Stampin' Up! Annual Catalogue which will run from ...