Showing posts with label Watercooler Wednesday Challenges. Show all posts

Wednesday, November 8, 2017

Watercooler Wednesday Challenge #144 - Penny's "All About Birthdays" Challenge

It's time for me to host this week at the Watercooler Wednesday Challenge, and I'm delighted.  I never seem to be able to keep up with all the birthdays that are coming up.  I hope my project will inspire you to create a card or project and enter it in our weekly challenge. 
The WWC144 Linksy is open until 5:00pm on Monday November 14th.  All you have to do is make a birthday card or project and link it to your post through our Linsky.  All the stuff you need to know about playing along is located on the Watercooler Wednesday Challenge Main Page.  So I hope you'll play along.

Here's My Birthday Card:
My card for this challenge is called a Square Easel and I think (IMHO) it's one of the best quick and easy fancy fold cards you can make. This is my stepped up version and my original plain version is below.


Originally my card was very plain, as you can see from these photos but after setting it aside for a day before posting, I added some additional decorations to bring it to life.  Either card would be great, but I must confess, I love the final version the best. What do you think?
Original card without decorations.  Very plain and simple.
This side view shows how the "stopper" holds up the front layer of the card when it's opened.


Standard Dimensions and Assembly Square Easel Card:
1. Choose your base card stock, a contrasting card stock for your layer, and a neutral card stock of DSP for your focal layer.

2. Cut base card stock to 8 1/2" x 4 1/4" and score at 4 1/4" and 6 1/2".

3. Use your bone folder to crease the center fold at 4 1/4" and then crease the next score line to fold as a Mountain fold. Add adhesive to this front fold.

4. Cut a 4 1/4" x 4 1/4" piece of card stock for your card front.  Adhere your card front to the front of the card where you've placed the adhesive.

5.  You need to add a "stopper" to the bottom inside of the easel card that will support the front card piece so that it sits up in an upright position.  For my stopper on this card I used a double strip of card stock. 

For those of you who are visual and need to see how the scoring works on this card, check out Michelle Boyer's great tutorial.  Her picture tutorial takes the guess work out of it and really shows how easy it is to make an easel card. 


Supplies:
Stamps: Tree Rings and Colourful Season,
Ink: Momento Black, Crushed Curry, Lemon Lime Twist, Early Espresso, and Crumb Cake
Card Stock: Lemon Lime Twist, Basic Black and Whisper White Old Olive, Crushed Curry and Old Olive

DSP:  Color Theory DSP, Color Theory Memories and More Pack
Accessories: Big Shot, Trimmer, Tom Bow Glue, Dimensionals, Happy Birthday and Seasonal Layers Thinlet Dies, Glitter Enamel Dots.


 Details For Stepped Up Version:
1.  The card base is Lemon Lime Twist scored and folded as noted above.

2.  For the layers:
  • Cut a 4 1/4' x 4 1/4" layer of Basic Black card stock and adhere to the front of the card base as noted above.
  • Cut a 4 1/8 " x 4 1/8" piece of Lemon Lime twist for 2nd layer and adhered to first layer.
  • Cut a 4" x 4" piece of Whisper White for stamping layer.  Stamp with Tree Rings background stamp with Tuxedo Momento Black ink. Colour this piece with sponge daubers and Crushed Curry, Lemon Lime Twist, Crumb Cake and Early Espresso inks. Adhere to Lemon Lime Twist layer.
3. Cut the "Happy Birthday" sentiment from Lemon Lime Twist and from Basic Black card stock using the "Happy Birthday" Thinlet Die.  Adhere these two die cuts together, offsetting them "just a touch" so you get a shadow effect.  Glue the sentiment to the card center.  
The Basic Black die cut placed just a touch out of step with the Lemon Lime Twist one creates a shadow and depth.  I put some Tom Bow Glue on my silicone mat, just a dollop, and then used a sponge on the back of the lettering to attach the two sets and then repeated this on the back of the back layer before attaching to the card.  The sponge makes it a lot easier to add glue to die cuts that have intricate patterns. 

4. Using the Seasonal Layers Thinlet Die cut out several small leaves in Crushed Curry, Early Espresso and Old Olive.  Sponge the outside edges of the leaves and then adhere them to the front of the card. I also attached some of the small sticker leaves from the Color Theory Memories Pack (top right corner).  Save three leaves for the inside of the card.
The smallest leaves are actually stickers from the Color Theory Memories and More Pack.  The large leaves were cut out with the Seasonal Layers Thinlets.

 5.  For the inside cut a 4 1/8 x 4 1/8" piece of Basic Black card stock and adhere to card base.  Cut a 4" x 4" piece of Whisper White and adhere to Basic Black layer.  Stamp with the sentiment "May all your tomorrows be as happy as today" from the Colourful Season stamp set, in Momento Tuxedo Black ink.  Attach a cluster of three small leaves below sentiment on right hand side. The top leaf is mounted with a Dimensional and the other two are glued flat.

6. Create a ledge for the card front to rest against by cutting a 4 1/8" by 3/4" piece of Basic Black Card Stock and adhering it 1/4" from the bottom of the card. Cut a 1/2" x 4"strip of Lemon Lime Twist and mount it to the black strip with Dimensionals. Add Glitter Enamel Dots along this strip.

And that's all there is to my Happy Birthday card. What do you think? Did you like it? Would you try to make one yourself? I'd sure like to know your thoughts on it as I plan to make more of them showcasing some different decorating techniques. Okay here's one last look:


I hope this post inspires you to join in our weekly challenges. You can click here to return to the Watercooler Wednesday Home Page and this challenge and check out the other Watercooler Design Team Artists birthday designs.

Happy Stamping!
Penny Tokens Stampin' Spot

Wednesday, September 6, 2017

Watercooler Wednesday Challenge #135 - Judy's Feminine "Anything Goes"

Hi everyone welcome to our first Watercooler Wednesday Challenge in September.  It already looks like this month is chalking up to be super busy, at least for me and my family that is.  How about you?   

Judy is hosting our challenge this week and it's a Feminine "Anything Goes".  What fun!  The design team came up with some pretty amazing feminine projects so I hope you'll check them out. 

Here's My Card: 
I still haven't finished all my "Hello" cards yet, so I decided to create another one for a friend of mine who is really into cats. She has two precious fur baby's and they are the light of her life, so I thought it appropriate to say hello with this card which features the "Pretty Kitty" stamp set.


Isn't this just "purrfect"?  I know this card will be well received. 
Supplies:
Stamp Sets:  Pretty Kitty #141864, Cat Sayings SSC1222 Stampendus
Card Stock:  Basic Black, Whisper White, Berry Burst
DSP:  Colour Theory Designer Series Paper Pack #144193
Ink: Berry Burst, Momento Tuxedo Black, Basic Gray, Smokey Slate
Accessories: Big Shot, Paper Trimmer, Aqua Painter, Pinpoint Layers 30065 Memory Box dies, Tom Bow Glue, Dimensionals. 

Details:
1.  The card base is an 11" x 5 1/2" piece of Berry Burst scored at 5 1/2".
2.  The first layer is a 5 1/4" x 5 1/4" piece of Basic Black card stock.  
3.  The second layer is a 5" x 5" piece of Berry Burst Color Theory Paper.There are different designs on the paper but I chose the plain one with just a slight gradation of the colour for this layer.

4.  Cut the following for the cat images from Whisper White card stock:
  • 2 pieces that measure 1 3/8" x 2 3/8" - stamp kitten with wool and kitten with tail on floor
  • 1 piece that measures 2 3/4" x 1 3/4" - stamp kitten looking at butterfly
  • 1 piece that measures 1 1/2" x 1 3/4" - stamp kitten in flower pot 
  • 1 piece that measures 1 3/8" x 1 3/8" - stamp kitten walking
  • 1 piece that measures    7/8" x 1 7/8" - stamp the sentiment "Just peeking.."
5.  Mount those images on Basic Black card stock cut as follows:
  • 2 pieces that measure -  1 1/2" x 2 1/2"- kitten with wool & kitten with tail on floor
  • 1 piece that measures -   2 7/8" x 1 7/8" - kitten looking at butterfly
  • 1 piece that measures -  1 7/8" x 1 5/8" - kitten kitten in flower pot
  • 1 piece that measures - 1 5/8" x 1 5/8" - kitten walking
  • 1 piece that measures - 1" x 2"  - sentiment
Because the sentiment was just a tad to long to nestle in between the squares and rectangles, I mounted it with Dimensionals.  so that it's touching the other blocks. 

6.  To finish the inside of the card I cut a 5 1/4" x 5 1/4" layer of Basic Black card stock.  I topped this with a 5 x 5" piece of Whisper White.  I stamped the Stampendous sentiment and one of the little kittens in Tuxedo Black Ink. 

7.  Once the images were stamped, I coloured them with an aqua painter in Basic Gray and Smokey Slate inks.  Details such as the bows and the ball of wool were added in Berry Burst ink.


I hope you enjoyed this card.  I'm pretty pleased with it and plan to do several more in different colours.  What do you think?  If you like it I'd love to hear from you.  Your comments totally make my day.

If you haven't already checked out the other Watercooler Wednesday design team blogs, simply click here and the link will take you to the main page.  Just click on the name  below each card.  

Happy Stamping!
Penny Tokens Stampin' Spot

Wednesday, August 23, 2017

Watercooler Wednesday #133 - Penny's All About Christmas Challenge


It's time for another Watercooler Wednesday "All About Christmas" Challenge, and guess what?  I'm hosting this week.  

I thought I would start off the Christmas Challenge using the one stamp set that is currently available prior to the Holiday Catalogue going live on September 1st, called "Carols of Christmas".    You're going to see a lot of cards made with this stamp set and matching die cuts and the reason is simple, combined they create a remarkable range of combinations and beautiful stamping experiences.   

Here's My Card:


Supplies:
Stamp Sets: Carols of Christmas #144804, Colorful Seasons #143726, Six Sayings Hostess set #139852(R)
Card Stock: Dapper Denim, Whisper White
DSP: Color Theory Paper Pack - Dapper Denim and White Crackle
Inks: Dapper Denim and Versa Mark
Accessories: Big Shot, Paper Trimmer, Card Front Builder Framelit #144674, Stitched Shapes Framelits (Circle), Snow Flurry Punch #139680, White Embossing Powder, Basic Rhinestones

Details:  
1.  Cut Dapper Denim card base to measure 8 1/2" x 5 1/2" and score at 4 1/4".

2.  Cut a 5" x 4" piece of Whisper White for the next layer and cut out the corner pattern with the beautifully efficient Corner Builder Framelits.  Line up the die close to the edge of the card stock and make sure its even before running through the big shot. Tip:  When you need to make sure a cut is precisely in place use a bit of Washi Tape to hold the die down before cutting.  Works like a charm.  Glue the panel to the card base using a fine detail liquid glue around the edges of this layer and make sure the lines and corners are adhered.  

3.  Cut a 2 1/4" x 4 3/8" Dapper Denim panel and top with a 2" x 4 1/8" piece of the dapper denim crackle design paper from the Color Theory paper pack.  Randomly stamp the small and large snow flakes from the Colorful Seasons stamp set in Dapper Denim ink.  Glue to center of Whisper White layer. 


4.  Cut a 3 1/4" circle from Dapper Denim card stock and a 3" Stitched Circle from Whisper White card stock.  

Here you can see the snowflakes stamped on the designer series paper. 
5.  Stamp the Peace on Earth sentiment in the center of the circle and randomly stamp the small snowflake from Colorful Seasons around the edges of the sentiment.  Note:  I stamped my sentiment and snowflakes* prior to cutting it out with the die and the images were too far apart to show up properly on the cut image.  In future I'll cut my circle first and then stamp on it. Lesson learned. 
*Oops, you can barely see those small snowflakes stamped around the edges of this circle.  Next time I'll cut out the circle before stamping additional images.

6.  Stamp two small snowflakes on a scrap of Dapper Denim card stock with Versa Mark ink and emboss with White Embossing powder**.  Cut out the snowflakes with the Snow Flurry Punch and mount to card face and circle with dimensionals.
When I was stamping this snowflake for my Perpetual Calendar project last month I made a great discovery. The small snowflake in the Colorful Seasons stamp set is almost the same shape as the small snowflake in the Snow Flurry punch.  What do you think?  Pretty close and gives a different look from the die in the matching framelits.   Just sayin'......

**Okay, who put the Very Vanilla Embossing Powder cap on the Whisper White jar?   I didn't really notice this color variation until I was taking pictures of my card.  When I checked my Embossing Powder bottles sure enough there had been a switch-up with the caps.......... another oops?
7.  Cut a 5 1/4" x 4" piece of Whisper White card stock for the inside panel.  Stamp a sentiment in the center.  I used the Merry Christmas to You and Yours from the retired "Six Sayings Hostess Stamp set".  I really love the size and style of the fonts in this set and use them often.  To finish off the inside panel I randomly stamped a couple more snowflakes.
Well there you have it, the first of many cards I'll be making and sharing with you featuring the Carols of Christmas stamp set and Card Builder Framelits. I hope you like it as much as I do and will leave me a comment.

If you haven't already checked out the rest of the Design Team Artists creations this week, I suggest you do so. What a fantastic range of cards and inspiration.
Happy Stamping! 
Penny Tokens Stampin' Spot

Wednesday, June 21, 2017

Watercooler Wednesday #124 - Fiona's Masculine "Anything Goes" Challenge

Well we managed to make it through another soggy weekend here in Abbotsford.  I'm starting to grow webs between my toes.  Too bad it wasn't nicer for Father's Day on Sunday.  It poured most of the day and I know a lot of BBQ's and camping trips were rained out.   Sigh......

This week's challenge at the Watercooler Wednesday is a "Masculine Anything Goes" theme hosted by Fiona.  This challenge will run from June 21st until Monday June 26th at 10:00MT.   I hope you'll join our Design Team (DT) and share a masculine card or project.  We'd love to have you join us this week.

Here's My Card:
This is another Twist N' Pop card made with love for my youngest brother who turns 58 on July 4th. He's an outdoorsy kind of guy who loves nature and fishing, so I thought he'd appreciate this birthday card. Oh and I added images from one of my favourite stamp sets "Bear Hugs" because we've had a bear lurking around in the woods behind our house for the past week. Hopefully he'll keep on trekking down to the river and out into the Valley, so I can get out for a walk soon.
I wanted to send a gift card with this birthday wish so I added a 4" x 2 1/2" piece of basic black card stock for a gift card holder in the top of this card.  I punched a half circle with a 1" circle punch in the center of the card to make for easier access for the gift card.

Supplies:
Stamp Sets:  Bear Hugs, Thoughtful Branches, and Balloon Adventures
Ink: Momento Tuxedo Black for images and sentiments.  Early Espresso and Soft Suede for bears.  Dapper Denim, Tranquil Tide, Watermelon Wonder, Pear Pizzazz, Soft Sky and So Saffron for background scenes and fish.
Card Stock: Crumb Cake, Basic Black, Very Vanilla
Designer Series Paper (DSP): Warmth and Cheer (R) - Clearance Rack 
Accessories: Big Shot, Paper Trimmer, Bear Hugs and Ovals Thinlits, Acrylic Blocks, Wink of Stella, Aqua Painter, Sponge Daubers, Dimensionals, Sticky Strip or Tear N' Tape, Tom Bow Glue. 


The fish, baby bear and sentiments are all from the now retired Bear Hugs stamp set.   Definitely this is one of my favourite stamp sets.  So cute!
Sentiment is from Balloon Adventures.
How It's Made:
My instructions are for this specific card, however they can be adapted for any Twist N' Pop card layout.  I'm a very visual person and while I watched a lot of videos on how this card was made, it didn't come easy for me until I made a paper template I could follow.  I cut my original template from plain white card stock and included all the measurements and placements for the Tear N' Tape placement and score lines. This works for me and I hope it will work for you too. Okay so here we go:

This Twist N' Pop card starts with two 8 1/2" x 11 sheets of Crumb Cake card stock.  
  • From the long side of the first sheet cut:
    • 4 1/4" x 11" card base scored at 5 1/2".  Mark a dot at the center of the score line for positioning the Hinge piece.
    • 10" x 3 1/2" panel scored at 2 1/2, 5 and 7 1/2" for the Picture panel. Fold along score lines and burnish with bone folder. Your piece should have a valley, mountain and valley fold when it's facing upright.  To decorate the picture panels cut the following:
      • 4 pieces of Basic Black card stock 3 1/4" x 2 1/4" - one for each panel
      • 4 pieces of  Very Vanilla card stock 3" x 2" one for each panel.  The two center panels will be stamped with images and/or sentiments, so are left plain.  Do your stamping before adhering.
      • 2 pieces of DSP 2 7/8" x 3 7/8" for the two outer panels. 
      • Once the above layers have been adhered with Tom Bow Glue, flip this picture panel over and put two strips of Tear N' Tape in the top right hand corner of the first panel and on the bottom inside left of the last panel. 
    • Cut a 3/4" x 10" piece for belly band and score it at 2" and 6 3/8" (Note:  you may have to adjust scoring for the belly band dependent on the thickness of the finished card - so don't score until you're finished).
  • From the second sheet create the Hinge Panel:
    • On short side of 8 1/2" x 11 card stock cut an 8" x 3 1/2" piece and score it on the long side at 1 3/4". 
    • On all four sides measure down 2 1/4" and mark with a pencil. Make sure these measurements are exact or your hinge won't work properly.
    • Use your score bar on your paper trimmer to make the X in the center of this piece.  Start from the right side and score a line from the 2 1/4" mark to the corresponding mark on the left hand side. Make sure both marks are sitting in the well of the trimmer before scoring.
    • Repeat this score line but this time go from left to right. Your scored lines should have formed a perfect X in the center of the hinge panel.
    • Fold on the 1 3/4" score line and burnish with your bone folder.  Next fold in on the diagonal lines making sure they line up and once you're satisfied burnish with your bone folder.  You should now have a piece that looks like a house.  Put two strips of Tear N' Tape on the triangular part of the house peak on both sides.  
    • Remove the Tear N' Tape on both sides of the peak.  Carefully line up the peak of the house against the mark you made on the score line of the card base.  Before pressing down make sure the hinge is even on both sides and precisely in the middle with the tip of the peak touching the score line.
    • Close the card base and press down.  Your hinge should now be securely mounted to the inside of your card base. When you open the card base it should open fully. 
  • Adding the panel to the hinge:
    • Open the card base so the hinged piece is lying flat.  Make a small pencil mark so it shows above the score line to help you with placement of the picture panel.
    • Remove the sticky strips from the picture panel and with the decorated side of the picture panel facing upwards center the mountain fold of the panel against the mark made on the card base. Make sure the top edge of the picture panel is not only lined up with the center of the card, but it is also sitting against the top and bottom edges of the hinge piece.
    • When you've got it exactly in the middle and you've lined up everything just press down the sides of the picture panel and they will adhere to the hinge.   Now close the card.  If you've done everything correctly the picture panel and hinge will magically close.  You may have to do it a couple of times to make it move fluidly.   
My Template: 
I'm sharing the drawn out template with you as well as pictures of my actual cut out template pieces.  For easy reference I store the cut out template pieces in a clear envelope so it's handy every time I make this fancy fold card.  Enjoy. 
The measuring/cutting dimensions for the card base, picture panel and belly band of my Twist N' Pop card.
This is the back side of the Picture Panel template and shows wear the Tear N' Tape is placed. 
This diagram shows the cutting and scoring lines for the Hinge Panel as well as the placement of the Tear N' Tape, when the hinge has been folded.  The red dashed line is not a score line in this picture.  You'll see in the cut template pictures below that the two sides of the house are actually split in the center and if scored and folded properly should line up side by side. 

These are my template diagram pieces all cut out.  It makes it easier for me to use as a teaching tool and to jog my memory on placement if I haven't made this fancy fold card for a while. 
This picture shows the reverse side of the picture panel and the right side of the Hinged Panel when it's folded and the placement of the Tear N' Tape.  Don't use too much tape and make sure you've got it placed properly or the Hinge and Picture Panels will not work together.
Here you see the folded hinge panel being placed against the center mark on the inside of the card base.  If I was doing this for real, I would have removed the Tear N' Tape strips from both sides of this panel.  Once I've made sure this hinged piece is lined up evenly on both sides and with the center mark then simply close the card and press down to make sure the adhesive on the both sides of the peak adheres to the card base. 

Once you've adhered the hinged piece and you open the card base it will look like this.  Bear in mind that my sample isn't glued down so it looks bulgy in the center.
Take the picture panel and I fold the two outer panels inward and then set up this panel over top of the "now" adhered hinge panel and line up with the center of the card base. You can see the Tear N' Tape is facing towards the outside on both the top and bottom of the Picture panel.

Once I had it lined up properly in the last photo I removed those strips of Tear N' Tape and simply open both sides of the Picture Panel and press down.  The Tear N' Tape will adhere to the Hinged Panel and Voila you have a Twist N' Pop card.
Well that's it for today Stampers.  I hope you've enjoyed my card and my little tutorial and it was easy to follow.  I'd like to have your feedback if you plan to use my instructions and how they work out for you.  Trust me once it's all cut out and you play with it a bit you'll find it's one of the simplest cards to make.  The main thing is remembering to mark everything for placement and be precise with it.  It's a pain, I know but remember the old carpenter's saying..... "measure twice cut once", as it really applies with this card and will save you from wasting both time and materials. 

If you've come directly here and haven't checked out the other Watercooler Wednesday design team's masculine cards make sure you do, as you're in for a treat.  And remember this challenge is open until June 26th.  We'd love to have you join in.

Happy Stamping!
Penny Tokens Stamping Spot

Wednesday, June 7, 2017

Watercooler Wednesday #122 - Libby's Feminine "Anything Goes" - Isn't It Lovely

Welcome to this week's WWC122 Watercooler Wednesday challengeLibby Fenn's our queen of Clean and Simple is our host this week and is challenging us to create a Feminine "Anything Goes" project.

The WWC122 challenge is open until 5:00pm Mountain Time on Monday June 12th, 2017.  We hope you'll enjoy this challenge and join us by sharing your creation.  Rules and instructions for the Linsky are on the Watercooler Wednesday Home page.

Here's My Card:
My card this week was inspired by my recent participation in a beautiful destination wedding in Puerto Vallarta, Mexico. The wedding itself was fairy tale fantastic and the setting just couldn't have been any better.


Everywhere you looked you were assailed with all the magnificent vibrant colours of nature.  Reds, pinks, oranges, yellows, greens and blues all mashed together and bombarding the senses.  The Bougainville were the true inspiration for this card.


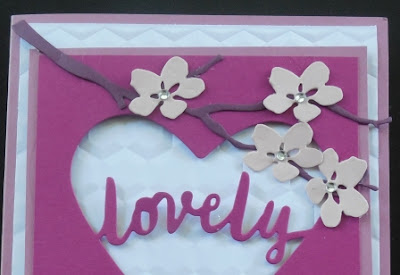
 Here's my card - "Isn't It Lovely":


Supplies:
Stamp Sets:  Floral Phrases #141767
Card Stock:  Whisper White, Sweet Sugarplum, Powder Pink*, Berry Burst*, and Fresh Fig*
Ink:  Fresh Fig 
Accessories:  Big Shot, Paper Trimmer, Hexagon Embossing Folder, Lovely Words Thinlet Dies #143733, Seasonal Layers Thinlets #143751, Hearts Thinlet Dies, Basic Rhinestones, Dimensionals, Tom Bow Glue.

These Adirondack or Muskoka chairs (as they're known in Ontario) from the Seasonal Layers Thinlets set captured my heart the moment I laid eyes on them in the new Annual Catalogue.  They smack of romance, relaxation and togetherness. 

How It's Made:
1.  Card Base:  Cut a 8 1/2" x 5 1/2" piece of Sweet Sugarplum card stock and score at 4 1/4".
2.  1st Layer:  4" x 5 1/4" piece of Whisper White card stock embossed with the Hexagon EF.
3.  2nd Layer: 3 3/4" x 4" piece of Sweet Sugarplum card stock.  Note:  I removed the center of this layer with a 3 1/2" die from the Hearts Thinlet collection.
4.  3rd Layer: 3 1/2 x 4" Berry Burst card stock with the "lovely" thinlet from the Lovely Words Thinlets Dies centered and cut out.  This was adhered to the 2nd layer with Tom Bow Adhesive, making sure the hearts were centered.  The combined layers were adhered to the 1st layer with Dimensionals.
5.  Finishing: Cut out the branch from Fresh Fig and the flowers from Powder Pink using the Seasonal Layers Thinlets and mount to the top of the card.  Add Basic Rhinestones to the flower centers. Cut out a Powder Pink and a Fresh Fig chair and attach below the heart with Tom Bow glue and Dimensionals.
 6.  Inside: Floral Phrases is such a wonderful stamp set and the sentiment "May Your Love Grow Stronger, Deeper and More Beautiful with Every Passing Year" seemed so appropriate for this card.  The inside panel of Whisper White measures 4" x 5 1/4".  The sentiment and floral image from the same set are stamped in Fresh Fig ink.  A 1/2" x 4" piece of Fresh Fig was adhered below the floral image leaving an 1/8" gap.
I hope you've enjoyed today's card.  This card is my own design and I'd love to hear your thoughts on it, comments always inspire me.  And, if you liked this design and want to re-create it please feel free to CASE it providing you acknowledge me by linking to this post.   Thanks again for joining me and the other Design Team members for this challenge.

Happy Stamping! 
Penny Tokens Stampin' Spot 

FREE SHIPPING - ONE DAY ONLY

  MAY DAY!  MAY DAY!  MAY DAY! If you have something on your wish list, or are thinking about stocking up on some essentials, now is your ti...