This is my little creative get away spot in a very hectic world. I love to stamp, meet other stampers and share my inspirations. So come and, sit for a while, explore my site and leave a comment when you can.
Let the magic begin! It's June 1st and the brand new Stampin' Up 2016-2017 Catalogue is finally here. This year's catalogue which runs from June 1, 2016 to May 31st, 2017 is called "Find Your Inspiration". I can guarantee you there is lots of inspiration in this 209 page cattie.
Here are your PDF links to both the Canadian English and French versions of the catalogue. Later today both of these links will be permanently available on the Catalogue menu screen at the top of my home page.
I spent today with my stamping bestie, Sheri for a wonderful "Stamping on Tuesday" session. We both love doing sketch and colour challenges, so when we get together we look at what's current and what tweaks our interest, before settling on a challenge. Today we decided to work on the Create With Connie and Mary sketch challenge #CCMC371.
For me there's nothing like stamping with a friend on a cloudy rainy day to let the sunshine in! And, what a blast we had! I love the collaboration and chit chat that goes on when you're trying out a challenge and of course the awesome food we always have. Today's menu included Chicken Enchiladas that were to die for and Marbled Chocolate Cheese cake. Yum!
Here is the Connie and Marie Sketch for this week:
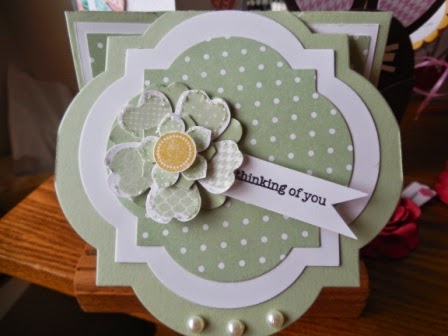
Here's My Card:
Supplies: Stamp Sets: Bright and Beautiful (SU Retired), I Am (SU Retired) Card Stock: Whisper White, Basic Black, Silver Glimmer Paper Ink: Momento Tuxedo Black Accessories: Small Star Punch (R)*, Basic Rhinestones, Thinlets Label Card dies, Small and Large Oval Punches,Trimmer, Lucky Stars Embossing Folder, Big Shot. *(R) means it's retired.
Assembly:
1. I cut the Whisper White card stock for the base to measure 4 1/4" x 11" and scored it at 5 1/2". 2. The Silver Glimmer Paper mat measures 3 7/8" x 5 1/8" and the Basic Black mat measures 3 5/8" x 4 7/8". 3. I dry embossed the black mat with the Lucky Stars Embossing Folder and 8 stars were cut out with the now retired small star punch. This mat was adhered to the Glimmer paper layer with Tom Bow Glue. 4. The sentiment "You Are" was stamped in Momento Tuxedo Black ink on a scrap of Whisper White card stock and then cut out with one of the small label dies from the Thinlet Label Card set(R). 5. Although the card already has a lot of shine from the glimmer paper I added Basic Rhinestones to each of the star centers and to the ends of the label tag to make the card front extra special
6. I layered a 5 1/4 x 4" piece of Basic Black card stock with a piece of Whisper White card stock that measures 5 x 3 3/4". 7. I stamped a medium sized star from the Bright and Beautiful (R) stamp set in the center of the card with black ink. 8. I stamped the "A Star"sentiment from the"I Am...." stamp set onto Whisper White card stock and punched it out with the small ovals punch. The sentiment was mounted with dimensionals onto a piece of Silver Glimmer paper that was punched out with the large oval punch. Note: Dimensionals don't adhere well to glimmer paper so you need to use an adhesive that has a bit of extra bond if you want your paper to stay put. That's it for another fun sketch challenge. I hope you've enjoyed it! If you get an opportunity to try out this challenge yourself go for it. It closes on Thursday. Be sure to drop by the Connie and Mary Blog to check out all the other entries into this challenge. As always there are some great card entries and inspiration. Happy Stamping! Penny Tokens
A lot of our friend's teenagers are involved in basketball, baseball, golf and soccer, so it's not unusual to get requests for birthday cards with an "athletic" theme. A few weeks ago on request, I made a birthday card for a Claudia a fifteen year old who's really into basketball and has great aspirations to earn a basketball scholarship when she goes to university. Her mom gave me some helpful insight into what Claudia likes and doesn't like, which really helped when designing this card. For instance it was really helpful knowing her school colours, bright blue and orange, and that she's not into frilly "girly girl" type cards. So knowing that ahead of time helped me to focus instead on the basketball and banners to capture a real sports style for her card. I hope you like it. I hear Claudia she was thrilled. Here's My Card:
Here's my card and matching envelope. I generally try to do something with the envelope that reflects the card inside. I absolutely love this winged, swirly stamp from the Great Sport stamp set, so it was appropriate to showcase it again on the envelope.
Supplies: Stamp Sets: Great Sport (R), Afterthoughts Hostess (R)
Card Stock: Pacific Point, Whisper White and Tangerine Tango Ink: Tangerine Tango and Tuxedo Black Memento Ink.
The Tangerine Tango card base measures 41/4 x 11 and is folded at 51/2 for a top fold card. A layer of Whisper White measuring 4 x 5 1/4" was embossed with the Perfect Polka Dots Embossing folder and then adhered with Tom Bow glue. Before Embossing this piece I stamped the flourish stamp in Tangerine Tango in the upper portion of this layer.
This center piece started with a piece of Whisper White cardstock and a repeat stamping of the Tangerine Tango flourish stamp. This piece was punched out with the 2 1/2" circle punch. This piece was then mounted on a piece of Pacific Point cardstock that was cut out with the 2 5/8" Circle Framelit. Because the extended wings and flourishes were important to the balance of the card front, I was very careful to line up everything before mounting this layer with dimensionals. The Pacific Point layer was punched out with a 1 3/8" circle punch and then the basketball image was added with dimensionals. The basketball was stamped on Tangerine Tango with Tuxedo Black Memento Ink and then run through the Big Shot with the Perfect Polka Dots embossing folder before it was mounted. Two small rhinestones were added to the outter stars on the image and then the larger star was punched from Pacific Point with the wonderful Itty Bitty Accents star punch. The large star was finished off with a medium sized rhinestone and then adhered with a dimensional.
Aren't these banners just the cutest? They were punched out in Pacific Point and Tangerine Tango card stock with the Banner punch (my new fave punch). I used a very small dollar store star punch for the small star centers. I mounted the banners on a piece of Calypso Coral Baker's Twine with glue dots. The bows were tied and then added separately with glue dots.
I had to turn the flourish image on an angle to fit it to the 5 x 3 3/4 Whisper White card liner for the inside of the card, but it worked okay. I added the basketball with Tom Bow ink so it would lie flat. The sentiment is from the Afterthoughts Hostess stamp set, which is retired.
So I hope you enjoyed this card. Earlier in the spring I made these other sports themed cards using the Great Sport stamp set and a similar style of card. The details are in this post, just click here to take a look.
A "girly girl" soccer card in Melon Mambo and Basic Black
A masculine soccer card that could be used for a teen or adult in Marina Mist, Gumball Green and Black
And finally I couldn't resist showing off this one which I entered in the Connie and Mary Sketch Challenge CCMC213, where I earned a badge for being one of their top 3 picks. This was one of my favourite card challenges this season, and I'm not sure why, but I think it was the DSP and colour mix. At any rate I'm taking the liberty of re-sharing it with you today. Details on this card are on this link.
The Tour De France is wrapping up today and reminded me of my friend who's an avid bicyclist and fan. I know she's going on an end-of-the-summer bicycle rally to the Interior of the Province, so I thought it would be nice to make a Bon Voyage card for her.
In keeping with the real competition, I wanted my card to have a vintage European flair, so I chose rich dark colours for the layers and I needed just the right stamp set to achieve the old world look. And, after searching through my stamp sets I chose Postage Due because of the French Script in the background and the beautiful bicycle image. It seemed fitting. Here's My Card:
Supplies: Ink: Mossey Meadow and Hello Honey Card Stock: Crumb Cake, Mossey Meadow and Hello Honey Stamps: Postage Due and World Tour Accessories: Big Shot, Trimmer, Designer Frames Embossing Folder, Beautifully Baroque, 3/4" circle punch, 1" and 1 1/4" square punches, Crumb Cake 3/8" Taffeta Ribbon, Dimensionals and Adhesive.
Postage Due is a 4 piece stamp set that comes in Clear Mount (126397), Wood Mount (132064) and A Brush Stroke set for My Digital Studio. It coordinates with the Postage Stamp Punch on page 222.
How It Came Together:
The card base is a standard A2 size in Crumb Cake. This was topped with a 5 1/4" x 4" piece of Mossey Meadow cardstock. I double embossed a 5 x 4" piece of Hello Honey cardstock with the Beautiful Baroque and Rectangular Designer Frames* Embossing folders and cut this piece down to 3 1/2" x 4". From the remaining Hello Honey cardstock I punched out three 1 1/4" square pieces and mounted three of the bicycle images with dimensionals on top of them.
** Although the Designer Frames Embossing folders have been retired, they've been replaced by some really cute ones called "Fun Frames". Check them out on page 227 of the catalogue.
These three portions of the bicycle were stamped on Crumb Cake cardstock and punched out with a 1" square punch. The edges were sponged with Hello Honey ink and then they were mounted with dimensionals on a 1 1/4" piece of the embossed Hello Honey cardstock.
The inside of the card was lined with a piece of 5" x 3 3/4" Crumb Cake cardstock that was stamped with the Bon Voyage stamp from the World Tour stamp set (retired.) I stamped the image again on Hello Honey and cut the "Bon Voyage" from this piece and glued it onto the center of the stamped image, for some focal interest. I also added a 1/4" piece of Mossey Meadow cardstock on the right hand side of the card.
I used two stamps from the World Tour and the Postage Due stamp for the Envelope details. On the bottom left hand side of the card you can see the 3/4" circle - it was stamped on Crumb Cake and then punched out with the 3/4" circle punch and added with dimensions to the card front. The complete image of that stamp is also featured on the bottom left hand corner of the envelope.
So what do you think? Do you like this card? If so leave me a comment and let me know what you like most about it. Thanks for dropping by. Happy Stamping! Penny Tokens
You may have seen cards like this on Pinterest or Split Coast stampers recently. It's called a Double Gate Fold card.
I copied my card after watching the excellent video by Dee Slater's of Create With Dee. Dee is so creative and always does a great job of explaining the mechanics of her cards. I liked this card so much I couldn't wait for the video to be over so I could make one myself. Using this design, I made two cards, one for Mother's Day and the other for a Birthday. Both are super cute and really give that WOW factor when they come out of the envelope. Thanks Dee!
Here's My Cards:
This is how the Double Gate Fold card looks coming out of the envelope. What a beautiful card front. I absolutely love, love, love it! It's so feminine and girly-girl that it simply puts a smile on your face.
I used Pistachio Pudding cardstock and matching InColour 2013-2014 designer series paper with Whisper White cardstock. The Flower Shop and Petite Petals stamp sets and coordinating punches make it easy to assemble this lovely flower.
When the card is closed on the inside it looks like this. You can almost feel the anticipation building while the recipient takes off the belly band and opens the card. Sorry for the bad lighting on this photo.
Okay, the suspense is over. Here's the inside view of my card. The hinged part of the gate fold top is achieved using the Window Frames Collection framelits and Big Shot Machine and the carryover of the card front design is perfect. For the inside flower I stamped the base flower and added a single punched Pistachio Pudding flower using the Petite Petals punch. The Daffodil Delight center is mounted with a dimensional.
Supplies: Cardstock: Pistachio Pudding, Whisper White Stamp Sets: Flower Shop,
DSP: InColour 2013-2014 Designer Series Paper in Pistachio Pudding
Ink: Pistachio Pudding, Daffodil Delight, Staz On Black Ink Accessories: Simply Scored Scoring Tool, Paper Trimmer, Big Shot Machine, Pansy Punch, Petite Petals Punch, 1/2" Circle Punch Dimensionals, Adhesive, Window Frames Collection Framelits, Pansy Punch,
Here's my birthday version. I added a few more flowers on the front of this card and some additional basic pearls on the flower centers. When I finished the card I wasn't too crazy about my sentiment choice, so I later swapped it out for the "happy birthday" banner from the Itty Bitty Banners stamp set. Much better!
HOW IT'S MADE:
Using Simply Scored score at 2 1/8" turn the card stock 180 degrees and score again at 2 1/8".
Now turn the piece and score at 4 1/4". This score line will become the hinge part of the card.
Line up one of the 2 1/8" score lines in trimmer and trim to 4 1/4" line. Then turn and trim on the 4 1/4" line 2 1/8". Remove and set aside trimmed off piece for flower petals (see step 12). Repeat on other side.
Set up your magnetic plate or platform in the Big Shot machine and using the 2nd from largest Window Frame Die place it over the square flap at the top of the card. Adjust so the bottom of the die is just beneath the 4 1/4" score line. (if you're above the line and you pass through Big Shot you'll cut off the flap. If you're too far below the score line, the card flap won't close properly).
Place the acrylic plate from the Big Shot over top of the cardstock and die, so it's lined up just to the hinge line and run through the Big Shot.
Trim off the two excess pieces of card stock on either side of the window frame shape with scissors once the die has been removed.
For the front and inside of the card you'll need to cut two Whisper White and two DSP patterned window frames using the next two smaller dies (refer to the picture). Layer these die cuts with adhesive and attach to the front and the inside front panel.
Cut two pieces of Whisper White card stock for the front panels to measure 1 7/8" x 4" and attach to the gate fold panels.
Cut two pieces of DSP for front panels to measure 1 5/8" x 3 3/4" and adhere over the front panels.
Cut a Whisper White panel for the inside of the card to measure 4 x 4. Stamp the panel with a sentiment of your choice and one of the flowers (see picture above for tip on the flower assembly).
For Belly Band cut a 9 1/2" by 1 12" piece of cardstock to match the card base and then cut a 9 1/2" x 1 1/4" piece of DSP and glue to the cardstock piece. Once the belly band is assembled wrap it around the card so one piece overlaps the other and secure together with sticky strip. Make a flower and attach over top of the seam. This band should slide easily off the card - don't make it too tight.
To assemble the flowers for the card front, inside flap and belly band:
Stamp 3 Flower Shop gingham flowers and punch out with the Pansy Punch.
Stamp 3 Petite Petals flowers and punch out with the Petite Petals Punch
On scraps of Whisper White card stock stamp randomly stamp 3 of the gingham flowers with Daffodil ink and punch out just the center of the flower with the 1/2" circle punch. Note: because you only want the centers, you don't need to stamp the entire flower.
Punch out 3 plain cardstock flowers with the Pansy Punch and 3 with the Petite Petals punch (use the two pieces of cardstock removed from the top of the card for these flowers)
Using glue dots stack from the base up a plain card stock Pansy flower, a Gingham Flower, a plain card stock Petite Petal Flower and a stamped Petite Petal flower. Mount a Daffodil Delight center piece with a dimensional. Attach flowers with sticky strip to the front, he inside cover and belly band. Note: I wanted a little glimmer on my flowers to give them some added pop, so I outlined all the petals with Dazzling Details #124117 pg. 166.
Stamp a sentiment of your choice on Whisper White card stock and cut out like a banner. Attach with glue dots beneath the petals.
Okay you should now be able to create your own Double Gate Fold card. Remember to watch Dee Slater's video so you can see how she placed the Window Die, it's much easier to understand visually than my trying to explain it in steps 4,5 and 6 above.
I'd love to hear from you if you made this card or simply a comment on the two that I've made. It's always exciting to hear back from someone who actually used my instructions, as to whether they were understandable and helpful. Have a great stamping day and thanks for visiting my blog! Penny
Stampin' Up! has made one of it's biggest announcements of the year about a new business partnership it has entered into.
Stampin' Up! is excited to tell you they've partnered with the amazing Becky Higgins to bring you the real deal-authentic Project Life products, now in exclusive Stampin' Up! colours and designs.
Check out all the details on my Promotion's Page for this and other exciting news.
Card Stock: Melon Mambo cardstock Basic Black cardstock Whisper White Cardstock Ink: Basic Black Melon Mambo Strawberry Slush Pear Pizzazz Old Olive Accessories: Circle Framelits Window Framelits Perfect Polka Dots Embossing Folder Adhesive Trimmer Big Shot How It's Made: 1. For base cut a piece of Melon Mambo to 4 1/4 x 9 1/4" 2. Score base at 2 1/4, 31/2, 5 1/2 and 6 1/2 and fold back on crease lines so you have a box on the front side. 3. Select the large window frame die and fit it over the box shape on the front of the card. Make sure edges at top, bottom and sides are all even before running the die through the Big Shot. This step creates the lovely bevelled edges on the side of the card.
Tip: You can number your framelits from the center to the outer edge with a Scripto Marker. This makes it easier to identify which framelit you want to use. In this example the largest window frame would be #6.
4. Using your Perfect Polka Dots or Embossing Folder of your choice, emboss the side edges of the card to the crease line. 5. For front layers cut a 4 x 4" piece of Basic Black cardstock and the 3rd frame in the windows framelit set die cut this piece. Center and adhere to the front panel. 6. For the stamped layer cut a 3 x 3 inch piece of Whisper White and die cut with the 3" circle from the Circle framelits. Adhere to the black window frame. Note: If you prefer to do your stamping before you cut this piece out go ahead, as it sometimes makes it easier to center the stamped image.
7. Stamp the large rose solid image from Stippled Blossoms in Strawberry Slush ink on the Whisper White piece. Using a Stamp-a-ma-jig center the lined rose image over the solid image and stamp in Melon Mambo. I created a mask for the rose and then stamped two leaves from the set at the bottom of the rose. Stamp "Best Wishes" from the Petite Pairs set in Basic Black ink.
8. For the back panels cut a Basic Black piece measuring 3 15/15 x 1 15/16" for the bottom layer. Cut a piece of Whisper White measuring 3 14/16 x 1 14/16" and stamp with the two small flowers from the Stippled Blossom set. Note:I created a mask for this flower two so I could layer them and add the leaves more easily. They were stamped using the Stamp-a-ma-jig as in step 7 above. The sentiment "Happy Birthday Wishes" was stamped in Basic Black ink.
I hope you enjoyed today's birthday card and the links to Linda's video. I'll be making more cards with this design and trying other framelits to see what I can come up with. I told you she inspired me! Thanks for dropping by.
Monstermaniacs Clear-Mount Stamp Set 134972 Preferred Price: $14.95
Monstermaniacs, by Doris D., is the second winning stamp set from In With You, Stampin Ups! new stamp set design challenge beta program.
In July, art enthusiasts were given the challenge to create a monster themed stamp set. Voters fell in love with her design and voted the set to victory!
Stampin' Up! will be running ongoing contests and would love your participation! Join the fun at http://inwithyou.ideascale.com
Banners are everywhere these days. Whether it's a celebration for a birthday, a retirement, a business opening, or for a seasonal event like Halloween or Christmas, someone's created a banner to meet the occasion. Stampin' Up! has got on the band wagon with this new trend and created some new kits that make banner making extremely easy for the novice and experienced crafter alike.
Stampin' Up!s Build a Banner Simply Created Kit and Accessory Kits are available from now until January 2nd, 2014 in the Holiday Catalogue. The following video gives a great run down on this new product and was very helpful when I created my first banner.
Build a Banner Simply Created Kit #133507 Price: $24.95 cdn
This great kit comes with the following:
Includes eighteen 5 x 7" blank canvas paper pennants - 6 each of 3 designs (pointed, banner and rounded) . Each of the wonderful flexible, water proof pennants has two grommets already set so it makes stringing it together very simple. No fussing with the crop-o-dile on this one!
9 feet of jute rope to hang the pennant pieces with
A full set of plastic alphabet stencils for creating your words
Three image stencils for decorating the pennants - stripe, dot and chevron designs
Stampin' Spritzer for spraying on ink.
Build a Banner Simply Created Kit #133507 Price $24.95 CDN
If you run out of pennant pieces no problem, simply order the Banner Simply Created refill kit. The refill kit includes another 9 feet of jute rope and 18 blank canvas paper pennants.
Banner Simply Created Kit # 132699 Price $11.95 CDN
With Halloween and Christmas just around the corner, you'll also find two accessory kits that Stampin' Up! has created to compliment the Build a Banner Simply Created Kit. The first is the Halloween Banner and the second is the Christmas Banner Accessory Kit.
Halloween Banner Simply Created Accessory Kit #132698 Price $11.95
Christmas Banner Simply Created Accessory Kit #132697 $11.95
And here's my banner!
Sorry I couldn't get the picture of my banner any larger for you or clearer. I've hung it in my paper crafting room and it is going to be a work in progress as I add some streamers to both ends and some more sparkle.
My banner on the back wall behind our vendor table at the Basics for Babies Scrap-a-thon event on September 14th, 2013.
Supplies & Design for My Banner:
To make the two words "Stampin'" "Up!" I needed 10 Pennants from the Build a Banner Base kit.
One Christmas Banner Simply Created Accessory Kit
Typeset Alphabet Bigz Dies for the Alphabet Letters
3" Circle Framelit Die
Coastal Cabana, Island Indigo and Smokey Slate Stamp Pad inks and Re-inkers.
Coastal Cabana, Island Indigo, Pool Party, Whisper White card stocks and Glimmer Paper
Sponge Daubers
Dimensionals and sticky strip
Hot Glue Gun
Festive Flurry Framelit Dies for Snowflakes
Large and Small Star Punches from Stampin' Up (retired)
11 Feet of Silk White Cord (I decided to use white cord instead of the jute provided in the kit for this project)
Basic Rhinestone Jewels (note I used a lot more than came with the kit)
Steps:
First decide on a theme for your banner, the colours you'll use and the word(s) you will add to your banner.
Assemble all the pieces and accessories and cut out any additional dies you will use on your banner.
Lay out the banner pieces on a table top or along the floor so you can see what you are working with.
Work from the first pennant to the last and be consistent with your colour and design layout.
Note: I cut additional 3" circles from scrap card stock and used them for mounting the lollies and die cuts to the cord. This step created more stability for the banner.
I alternated the pennant shapes and colours starting with a pointed pennant in Coastal Cabana dots followed by a banner shaped pennant in Smokey Slate stripes throughout the entire banner. Each pennant was separated by a lolly or die cut. I applied the ink to the pennants with a sponge dauber.
The
individual letters that form the words "Stampin' Up!" were cut out of
Island Indigo card stock using the Typeset Alphabet Dies. I chose these die cut letters over the stenciled ones because I wanted the letters to be super clean looking. Once cut out, I mounted the
letters on either Coastal Cabana or Smokey Gray card stock that had
been cut out with the 3" Circle Framelit. I used Tom Bow glue on the back side of the letters to adhere them. The dots that you can see on
the letters are actually medium sized Basic Rhinestone Jewels. The
addition of these Rhinestones really made the letters pop.
The additional of glimmer paper snowflakes and stars really softened the look of the banner, and the Vintage Faceted Designer Buttons added a lot of sparkle. For the blue stars, I used a sponge dauber and Island Indigo ink on the silver glimmer paper to turn it into a turquoise blue and then I punched out some large and small stars.
I wish you could see this banner in real life because it's really sparkly and fresh looking and you just can't see that in the pictures. It took me two hours to create this banner and although it intimidated me at first, once I started sponging the ink on the first pennant my initial fear gave way to creative joy. The whole process became a lot of fun and it was exciting to see the progress as the banner came together.
This was such a rewarding process. I hope you enjoyed seeing how this banner turned out.I'm working on a Fall Banner for Thanks Giving and will take pictures as I complete each step.
Today I want to share a tutorial with you on this Flip Card I've made using the new Label Card Thinlits Dies. The theme for this card is friendship and what could be more friendlier than a tea party!
Supplies Used:
Stamp Set: Tea Party 129138 Card Stock: Crisp Cantaloupe, Calypso Coral and Very Vanilla DSP: Venetian Romance Ink: Calypso Coral Tools: Big Shot Machine, Magnetic Platform, Label Card Thinlits, Labels Collection Die Cuts (the smallest label), Elegant Butterfly Punch, Perfect Polka Dots Embossing Folder, Oval from Oval Framelits. Accessories: Basic Pearls, 3/8 Ruffle Stretch Trim in Crisp Cantaloupe, Sticky Strip, Snail Adhesive, Sponge Dauber Cutting Out the Card Base: I personally like the look of the Flip Card when you use 8 1/2" card stock instead of the recommended 5 1/2 x 6 size. I like having the extra 2 1/2" of card stock to write on and when the card is closed, the message area is hidden behind the extra fold. For me, that's really cool and I think it adds even more of a "wow" factor. STEP ONE CUTTING YOUR CARD BASE:
Cut a 5 3/8 x 8 1/2" piece of Crisp Cantaloupe card stock. With the cutting edge of the Thinlits Die facing down, insert the card stock under the flip part of the die and extend the additional card stock over the top of the die.
TIP: Just a note about the width of the paper for this version of a Flip Card. if you have difficulty fitting it through the die, it may be just a smidgen too wide. I found that when I cut my card stock at 5 1/2" and tried to fit the card stock through the die, it was crooked and wouldn't lay flat. To remedy that and make sure that the finished card base was aligned properly with the die, I cut an additional 1/8" inch off the width. As soon as I did that, the card stock fit perfectly through the die, and all was well. So experiment with the size before you start on your actual card to make sure you have the right cut.
In this view you can see everything aligned perfectly, before I roll it through the Big Shot. Make sure before you do any cutting on the new Magnetic Platform and on the regular platform, that you put down a standard plastic cutting pad. Your sandwich from the base up should be:
1. Magnetic Platform/or regular platform
2. Standard Cutting Pad ( a flat one works best)
3. Thinlit placed over single piece of card stock
4. Standard Cutting Pad (a flat one works best)
When you take the card stock out of the Big Shot it will look like this.Although the picture is faint, you can see the fold lines for the flip portion of the card quite clearly. There is also a fold line, albeit a faint one, 2 5/8" from the right side of the card.
STEP TWO: FOLDING THE CREASE LINES
Fold the right hand side toward the center of the card and using your bone folder make a crease. Later on you'll add some card stock and designer paper to make this side of the card look terrific.
Fold the left side of the card towards the center from the second fold line and use your bone folder to make a crease.
Finally fold the first fold towards the card center and use your bone folder to run a crease down the fold. The flip portion of the card will fold towards the center.
This is what your card will look like when everything is folded together. It will be a perfect A2 size card. Wasn't that easy?
STEP THREE: DECORATING YOUR CARD
Here are the basic elements for decorating this card. You will need to cut a 2 1/2 x 5 2/8" piece of Calypso Coral card stock and a piece of Venetian Romance Designer Series Paper 2 1/4x 5 for the panel on the right hand side of the card. Stamp the images from the Tea Party set in Calypso Coral ink on Very Vanilla card stock. You'll need to cut two labels in Calypso Coral ink using the smallest label in the Label Collection Framelits. Before assembling these pieces I used a sponge dauber to distress the edges of all the design pieces.
I embossed both side folds of the card with the Perfect Polka Dot Embossing Folder and left the center part of the card plain except for the stamped image of the teapot which is in Calypso Coral Ink. In this view you can see the small label attached to the swing or flip part of the card. I used the smallest label from the Label Collections Framelits set. It fits perfectly.
In this view I've attached the You're Just My Cup of Tea stamped image from the Tea Party set with dimensionals to the back of the Flip. The image was stamped in Calypso Coral on Very Vanilla card stock. I added a single basic pearl to the center of the flower at the top of the image. Wow this card is really starting to come together!
In this view you can see how I've added the designer paper and Calypso Coral card stock to the front right fold. I also added a strip of 3/8" Ruffle Stretch Trim in Crisp Cantaloupe. Before attaching the trim I ran a strip of Sticky Strip down the outside edge of fold. This ribbon is so gorgeous and on this card adds just the perfect feminine touch.
I stamped a piece of Calypso Coral card stock with the Tea Party image before cutting it out with the Elegant Butterfly punch. Four small basic pearls were attached in the center. Before mounting the butterfly to the front of the card, I used the bone folder to give some dimension to the wings.
In this picture you can see the front Flip with the Tea Party image added on top of the Calypso Coral label. I cut this image out using the second oval in the new Ovals Collection Framelits........ perfect! To add some interest I actually stamped this image twice and then hand cut out the Tea Party banner part of the image and attached it with dimensionals to the face of the image. Three small basic pearls were spaced along the banner to emphasize the words.
To finish the card I added a small strip of Calypso Coral card stock on the front left hand side of the card. I think it adds some balance.
And that's all there was to assembling this very feminine friendship card. I hope you enjoyed it and learned a little more about using the Label Card Thinlits.
I'd love to hear your comments. Thanks for dropping by!