 Welcome to the Creative Circle Design Team's May Blog Hop. If you're new to the crafting world or you're not familiar with our acronym "CCDT" it stands for "Creative Circle Design Team". We are a group of like minded Stampin' Up! demonstrators from around the world who love paper crafting, Stampin' Up! products, SVG or electronic cutter patterns and participating in blog hops.
Our CCDT hop is held on the first Thursday of each month and every 3rd month Liz Holloway, the leader of our group provides a pattern and challenge to create something using her 3D SVG and Silhouette formats.
 A big welcome to Lisa Eisner, the newest member of our Design Artists. Lisa has been a Stampin' Up! demonstrator for many years and brings a wealth of talent and skills to our group. Nice to have you on board Lisa.
Stampin' Up! recently posted their retirement lists in anticipation of the transition to their new Annual Catalogue so our Hop today is appropriately named "Saying Goodbye" and is focused on our favourite retiring products.
This theme was really hard for me, because so many of my favourites will be gone forever as of May 31st. I went back and forth through my supplies and have come up with a collection of items ranging from card stock to dies to share with you. I hope you enjoy my projects and are inspired to create some of your own.
Number of Years:
 Since the Number of Years bundle arrived on the scene in 2016 I've been in love with it's versatility and usefulness for my card making projects.
It definitely fits in the "one of my favourites" categories, for birthday and other special milestone events. I've chosen to showcase both the stamp set and coordinating Large Number Dies in a Graduation card along with some other products that will be retiring too.
 |
| The inside of the card features a sentiment from Picture Perfect Birthday. |
Supplies:
 |
| Number of Years #140653 is a 29 piece Photopolymer Stamp Set that coordinates with the Large Number Framelit Dies. |
Stamp Sets: Number of Years, Picture Perfect Birthday
Card Stock: Peekaboo Peach, Dapper Denim, Wild Wasabi and Whisper White
Ink: Dapper Denim, Wild Wasabi, Peekaboo Peach
Accessories: Tassle from Celebrate Today Balloon Framelits, Oval Dies Nesting, Big Shot, Paper Trimmer, Dimensionals, Mini Basic Pearls
 |
| This card uses Dapper Denim, Peekaboo Peach and Wild Wasabi inks and card stocks that also will be retiring. I love the way these colours coordinate. |
 |
| To make the Large Numbers pop off the page I've used a sponge dauber around the edges of each number in their matching ink colour and have mounted them with Dimensionals. I added small basic pearls to the centers of the flowers and the tassel on the graduation cap. |
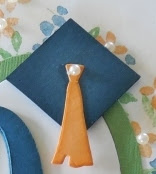 |
| For the Graduation Cap I punched out a 1" square and a tassle from the Celebrate Birthday coordinating dies. I again used the sponge dauber around the edges adhered the tassel with a Glue Dot and then popped it onto the card with Dimensionals. |
 |
| For the inside of the card I cut a 3 1/2" x 4 1/2" piece of card stock and temporarily taped it to the center of the Whisper White Panel as a mask. I randomly stamped the Number of Years floral images around the mask. I sponged Peek A Boo Peach ink around the outside edges of the panel and over the floral stamping. I removed the mask and stamped the sentiment from Perfect Birthday in Dapper Denim Ink. This panel was layered onto Dapper Denim and adhered to the card base. |
Truly Tailored & Guy Greetings Twist & Turn Cards:
For these next two cards I'm showcasing a smaller style card called a Twist and Turn card. It fits in a standard A2 envelope and uses an 8 1/2 x 5 1/2" piece of card stock for its base.
My inspiration for making these cards is twofold. I was preparing to enter a fancy fold challenge using the Twist and Turn design but I needed a template. I found a tutorial by Dawn Griffith's Stampin' Studio blog from 2015 when she created a card using the Guy Greetings stamp set. I loved her design so much I decided to CASE it but with a few subtle changes of my own.
Guy Greetings Twist and Turn Card:
My first Twist and Turn card features the Guy Greeting Stamp Set. My favourite image in this set is the vintage car. It makes me think of Bonnie and Clyde and all those old black and white movies from the 40's.
 |
| For my card I combined Naturals Ivory and Basic Black card stocks with a map image paper from Going Places a retired Stampin' Up! DSP stack. The edges of the DSP were sponged with Basic Black ink before they were layered onto the Basic Black layers. |
 |
| I stamped the Vintage Car image on Naturals Ivory card stock with my Misti and then cut the image and mounted it on to the square with Dimensionals. |
 |
| I stamped the "Happy Birthday" sentiment from Guy Greetings in Versa Mark ink on a scrap of Natural Ivory and embossed it with Black Embossing Powder. I loved how this image turned out. I punched the embossed sentiment out with the Tailored Tag Punch and then mounted the tag onto a scrap of Basic Black fussy cutting within an 1/8" around the edges. The tag was pasted directly to the designer series paper. |
 |
| For the inside panel I stamped off the car image twice and then stamped it on the bottom right corner. I inked up the "Hoping Your Birthday is as Grand As You" from Guy Greetings and stamped through the center of the car. In retrospect I should have heat embossed this sentiment too as the Naturals Ivory card stock is grainy and doesn't take a stamped image as clearly as an embossed one. |
Supplies:
Stamp Sets: Guy Greetings and Truly Tailored
Card Stock: Natural Ivory (R), Basic Black
Ink: Momento Tuxedo Black and Versa Mark Ink
Accessories: Paper Trimmer, Tailored Tag Punch, Black Embossing Powder, Heat Gun, Detailed Scissors, Dimensionals, Tom Bow Glue.
 |
| Guy Greetings #138828 Available in wood, clear and photopolymer in English and French. One of Stampin Ups! best masculine stamp sets, ever! |
True Gentleman Twist and Turn Card My second Twist and Turn card features products from the True Gentleman bundle from the 2018 Occasions Catalogue. Most of the products from this catalogue will be retired May 31st, 2018.
 |
| I started with a Dapper Denim card base followed by a layer of Tranquil Tide card stock. I'm going to miss these colours as they are so awesome for masculine cards. I really love the crisp clean and beautiful designs in the True Gentleman DSP, and ordered an extra pack to keep in my stash. |
 |
| True Gentleman Designer Series Paper |
 |
| I embossed the sentiment "Happy Birthday" from Guy Greetings in Very Vanilla EP on a scrap of Dapper Denim card stock. I cut the ends of the strip with my scissors and mounted this tag with Dimensionals. |
 |
| I stamped the sentiment "Wishing You a Dapper Day" in Tranquil Tide ink on the inside panel. |
Supplies:
Stamp Sets: Truly Tailored
Card Stock: Dapper Denim, Tranquil Tide
DSP: True Gentleman Designer Series Paper
Ink: Versak Mark, Tranquil Tide
Accessories: Paper Trimmer, Tailored Tag Punch, Dimensionals, Very Vanilla Embossing Powder, Heat Gun, Tom Bow Glue
Coffee Cafe Masculine Gift Card Holder:
For this next project I'm spotlighting the Coffee Break Designer Series Paper, a very special stamp called Stylized Birthday, and one of my favourite dies called Lots of Layers. I'm sad to say these are all retiring.
 |
| This card has a Chocolate Chip card base and the first layer is Soft Sky. Both of these colours are retiring in the Color Revamp the end of May. I've added a chevron design paper from the Coffee Break DSP pack as a top layer. Details on how to make this card are available in my WWC #168 Helen's Feminine Anything Goes challenge. |
 |
| I'm going to truly miss this Stylized Birthday sentiment when it's gone. It's one of my larger birthday sentiments and has such a wonderful curly font. The coffee pots and coffee cup are from the Coffee Break Designer paper. There are many wonderful papers in this pack featuring coffee items. I fussy cut the coffee pots but used the Coffee Cups Framelits Dies to cut out both paper cups. I've added Dimensionals to mount these to the card front and inside of the card. The swirl behind the sentiment is the coffee stain image from Timeless Textures stamp set. |
 |
| The inside of the card has layers of DSP completing the base layer and the half layer that forms the gift card holder. I punched a half circle with the one inch circle punch in the center of the gift card holder for easy access. I love the colourful polka dots and how they match up with the chevron paper so well. Great colour combination. |
 |
| I'll be tucking in a Starbucks gift card when I send out this card, but I wanted something to write my birthday wishes on so I cut a 3 1/4" x 4" piece of Whisper White card stock to go into the gift card holder portion of the card too. I stamped some more of the coffee swirls in the corners with Early Espresso ink and stamped a two-toned sentiment from the Birthday Celebration stamp set that goes perfectly with this card. I used Early Espresso for the "Come Let Us Sit Together and Drink" and the "Coffee" in Tranquil Tide. |
Supplies:
Stamp Set: Stylized Birthday, Timeless Textures, Birthday Celebrations (R)
Ink: Tranquil Tide, Early Espresso
Card Stock: Chocolate Chip, Soft Sky, Whisper White and Coffee Break DSP
Accessories: Big Shot, Stitched Shapes Oval Thinlet Dies, Ovals Thinlets, Coffee Cups Framelits Dies, Sizzix Scalloped Oval Die, Detailed Snips, Dimensionals, 1" Circle Punch
 |
| Coffee Break DSP |
 |
| Stylized Birthday |
Flying Home Birthday Wishes:
My final card for this hop is a birthday card stamped with the Flying Home stamp set from the Occasions Catalogue.
 |
| The card base is Tranquil Tide and the next two layers are in Berry Burst and Lemon Lime Twist that were dry embossed with the Berry Burst Embossing Folder. |
 |
| I had fun colouring these images from the Flying Home stamp set on Watercolour Paper. I cut out the panel with the Lots of Layers Thinlet dies. I only wanted a small margin of colour around the outer edge of the label so I glued it to some Tranquil Tide card stock and fussy cut within 1/8" around the outer edge. Dimensionals were added to the back of the label. |
 |
| The sentiment "With Many Wishes Just for You" is from the Birthday Wishes for You stamp set. I stamped it on a scrap of Basic Black card stock with Versa Mark ink and embossed it with White Embossing Powder. I hand cut around the banner and then adhered it to the front of the layered piece with Tom Bow Glue. |
 |
| I stamped the "Happy Birthday" from Stylized Birthday on the inside panel of this card in Momento Tuxedo Black ink. A few little birds were added and some sequins to finish this panel. |
Supplies:
Stamp Sets: Stylized Birthday, Flying Home, High Tide
Card Stock: Tranquil Tide, Berry Burst, Lemon Lime Twist, Very Vanilla and Watercolour Paper
Ink: Momento Tuxedo Black, Pear Pizzazz, Wild Wasabi, Soft Sky, Pool Party, Soft Suede, Chocolate Chip, Bronze, Bemuda Bay, Rose Regal, Daffodil Delight, Real Red, Tranquil Tide
Accessories: Big Shot, Paper Trimmer, Dimensionals, Lots of Layers Thinlet Dies, Petal Burst Embossing Folder, Sequins, Tom Bow Glue, Embossing Buddy, Heat Gun, Very Vanilla Embossing Powder, Scalloped Circle Punch, Sponge Daubers.
I hope you enjoyed my projects today and will take the time to comment. Did I show case any of the stamps or products that you are sad to see retired? There are so many and it's so easy to get attached to different sets.
I hope you'll visit the rest of the Creative Circle Design Team too and see what they've showcased. Their projects are truly amazing. You can use the links below.
Until next time .......
Happy Stamping!
Penny Tokens Stampin' Spot


