Wednesday, January 3, 2018

Creative Circle Design Team January Blog Hop - Love Is In the Air


Hi stampers and welcome to the first Creative Circle Design Team blog hop for 2018.  Our hops are held on the first Thursday of each month, and there's always a new and creative theme. 

Here is My Project:
This month's theme is Love Is In The Air and it since I have a February wedding coming up, the timing was perfect for creating a wedding/gift card holder.
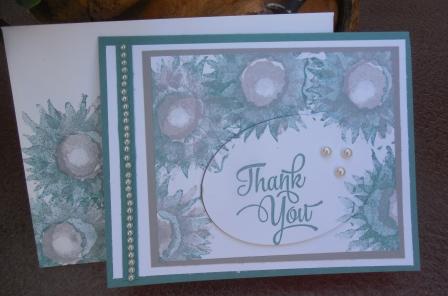
Here is the front view of my wedding card.  I've decorated it with images from the Lift Me Up stamp set.  

This is the back view of the card.  When you pull the tab at the top a gift card holder slides out.  The pocket is made with Stampin' Ups! Mini Treat Bag die cut.

The inside of the card is unique because it has an acetate divider page which separates the back and front of the card. 

Supplies:
Stamp Set: Beautiful Bouquet and Lift Me Up
Ink: Smokey Slate, Momento Tuxedo Black
Card Stock: Whisper White, Smokey Slate and Basic Gray
Other Papers:  Silver Glimmer paper, DCWV Elegant Holiday Paper
Accessories: Big Shot, Paper Trimmer, Dimensionals, Tom Bow Glue, Mini Glue Dots, Basic Pearls, Lots of Labels Thinlets, Up and Away Thinlets, Mini Treat Bag Thinlets, Stitched Shapes Framelit Dies.


Details:
I have not included the details in this post  for the front of the card.  You can find them by clicking here, to see an earlier post I did for the Watercooler Wednesday Blog Hop.


I did however add a gift card holder to this card using the Mini Treat Bag  and Lots of Labels Thinlet Dies.  The gift bag was cut from Whisper White card stock, assembled and glued to the back of the card with sticky strip adhesive.  I added a 3 3/8" x 4 3/4" piece of Silver Glimmer Paper, topped with a 3 1/4" x 4 5/8" piece of Designer Series Paper to the front of the bag.  


I inked up the medium sized hot air balloon from Lift Me Up in Smokey Slate and then stamped off twice on a scrap of paper before stamping the image on a piece of Whisper White card stock. Next I stamped over top of the balloon with the sentiment "Wishing You a Day of Love and Happy Memories" from the Beautiful Bouquet stamp set in Tuxedo Black ink. I cut out the sentiment with the largest circle in the Stitched Shapes thinlet die set. I stamped the heart from the Lift Me Up stamp set in Smokey Slate and cut it out with the matching die and added it to the bottom left side of the heart. I also added some small clouds and a hot air balloon cut from silver glimmer paper to finish off the detail on the gift card bag.
Lift Me Up Stamp set coordinates with the Up and Away Thinlet Dies.  Order #142896


Stitched Bouquet Stamp Set #143666


For the gift card holder I cut out the largest label from the Lots of Labels Thinlet set in Whisper White.  I cut a 3 1/4" x 4 1/2" piece of Whisper White and a piece of the Designer Series of paper and attached them over top of the label only leaving the tap part showing.  I cut a 2" x 3 1/4" piece of designer paper and glued it to the bottom of the designer paper side to hold the gift card.  As an after thought I also cut the top of the label again in Silver Glimmer Paper and glued it to the back of the label top.  


Thanks again for dropping by and I hope my card inspired you to try this acetate peak a boo card.  It's a really fun technique and is unbelievably quick and easy to assemble.  Make sure you check out the other blog designers at the CCDT home page or click on the links below.  Lots of inspiration is in store for you. 


*


Happy Stamping!
Penny Tokens Stampin' Spot 
 

Watercooler Wednesday Challenge #151 - Charlotte's Feminine "Anything Goes" Challenge

Happy Wednesday everyone!  I hope you've had a terrific Christmas and New Years.  Life's been hectic around our house with lots of seasonal activities and not much time for stamping, but now it's time to shake out the cob webs and start a whole new season of challenges at Watercooler Wednesday.  Are you ready?

Before we get started I want to give a shout out to Helen Finlay from Queensland, Australia, who is joining us this challenge as our newest design team member.  Welcome on board Helen!

Our very talented Charlotte Ehrukainen, is our first hostess of the year and is challenging us to create a "Feminine" Anything Goes project, so we hope you'll play along with us.


Here's My Project:
One of my 2018 New Years resolutions is to "buy less and use more" and my goal is to incorporate more designer papers into my projects and use up some of the scraps that I seem to be hoarding. 

Today's monochromatic feminine birthday card is based on that resolution.
By cutting a series of DSP scraps into squares and mounting them on matching card stock I was able to cover the front panel of the card.  The pattern layout works for either a side or top fold card. 
The birthday wishes have been stamped on the inside. All in all, this was a super fast and easy card that can be put together in assembly line fashion and would make nice cards for card gift boxes or packages. I plan on making a lot more of these cards.

Supplies:
Stamp Sets:  Half Full, Beautiful Bouquet
Ink:  Old Olive 
Card Stock:  Old Olive and Whisper White
Designer Series Paper:  Merry Little Christmas DSP
Accessories:  Big Shot, Rectangle Stitched Dies,  Paper Trimmer, Dimensionals,  Sticky Strip, Wink of Stella, Sponge Dauber.

How It's Made:
1.  The Old Olive Card base measures 8 1/2" x 5 1/2" and is scored at 4 1/4".

2.  I cut two 5 1/4 x 4" pieces of Whisper White for the first and inside layers.

3.  Cut 1 1/2" x 1 1/2" squares from Designer Paper.  Use 3 patterns and cut two from each design. Cut one  3/8" x 5" strip of DSP. Use a sponge dauber and Old Olive ink to sponge the edges. 

4.  Cut 6 squares of Old Olive card stock measuring 1 5/8" x 1 5/8" and one strip 1/2" x 5".  Sponge the edges of these pieces with Old Olive and then glue the DSP squares and strip to same. 

5.  Attach the squares and strip to the card front with adhesive leaving a small amount of white space between the squares and sides of the white panel.  Before attaching decide how you want your patterns on the squares to align.

6.  On a scrap of Whisper White stamp the "Wine Improves with Age...." image in Old Olive ink. Colour the grapes with Wink of Stella to add a little sparkle. Fussy cut around the label's edge.


7.  Cut a 3" rectangle from Old Olive and attach the label with dimensionals.  Add sticky strip to the back of the rectangle and attach to the center of the card.

8.  On the inside Whisper White panel stamp the "Happy Birthday" sentiment from the Beautiful Bouquet set towards the top of the panel.  Stamp the sentiment and wine bottles towards the bottom half of the panel.  Attach to the inside of the card.


And, that's all there is to this card.  Very easy.  I hope you'll try out this paper piecing technique.       
Just a reminder to stop by and check out the rest of the Watercooler Wednesday Design Team's contributions to this challenge. For details on how the other Watercooler Artists created their projects, just click on the name underneath each photo and you will be taken to that blog post.  This challenge ends on Monday January 8th at 5:00pm MST. 

Happy Stamping!
Penny Tokens Stampin Spot

Wednesday, December 20, 2017

Watercooler Wednesday Challenge #150 - Heidi's Masculine Anything Goes - Two Week Challenge

Hi stampers!  Christmas is just around the corner and I don't know about you, but I'm way behind this year with my card making and Christmas preparations.   I've been thrown off schedule with all the events happening where I live and company, but I wouldn't have changed it for the world.  Life happens!  

With that in mind, this week's Watercooler Wednesday challenge is going to span two weeks instead of our regular one week, to accommodate everyone's busy schedule and Christmas week.   I think everyone will give a round of applause to our Administrators for arranging that.  I know I will.  

Remember this Linky doesn't close until Monday, January 1st, 2018 at 5 p.m. Mountain Standard Time, so you've got plenty of time to get crafting.   All you need to do is follow a few simple rules and link up your post to our blog using the Linky.  Check out the details on Watercooler Wednesday Challenge blog's home page. Hope you'll join us.

Here's My Card:
 

This week I'm adding to my Masculine birthday stash and have chosen a country western theme for those male friends and relatives who are "a little bit country". 

Supplies:
Stamp Set:  Country Living, Basic Butterfly and Cupcakes Clear Stamps, Howdy from Artful Impressions
Card Stock:  Whisper White, Crumb Cake, Early Espresso
DSP and Specialty Papers:  Coffee Break DSP, Gold Foil 
Ink:  Early Espresso, Crumb Cake and Momento Tuxedo Black, H2O Twinkles
in brown shades
Accessories:  Big Shot, Paper Trimmer, Circle Dies, Sponge Daubers,Stamp-a-ma-jig, Tom Bow Adhesive, Dimensionals, Aqua Painter.

When I began making this card I couldn't decide whether I wanted to showcase the boots or the guitar from the Country Living stamp set but after a few trial runs, I wound up doing a bit of both. 
 
Country Living Stamp Set
The Details:
The card base is an 8 1/2" x 5 1/2" piece of Crumb Cake card stock that was scored and folded at 4 1/4".  I added an Early Espresso layer that measured 5 1/4" x 4 followed by a 5 1/7" x 3 7/8" piece of the coffee ring paper from the Coffee Break Designer Series paper pack. 


I added three more layers to the card front  a gold foil, an Early Espresso and a Whisper White.  When I was trying to decide how to feature the guitars, I began stamping using my Stamp-a-ma-jig to place the guitars end to end on a larger sheet of Whisper White card stock.  I stamped the guitars in Early Espresso and coloured them with a wash of Crumb Cake and the H20's.  

I had a small Artistic Impressions stamp that said "howdy" that I thought would lend to the country feel and I stamped it randomly between the guitars with Early Espresso ink.  

I splattered Crumb Cake and Early Espresso inks over this panel to give it a weathered look.  When I finished stamping I cut this panel to 3" x 4 1/2" and adhered it to a piece of Early Espresso that measured 3 1/8" x 4 5/8".  This panel was attached to a 3 2/8" x 4 6/8" Gold Foil panel with Dimensionals.  The Gold Foil panel was glued to the center of the DSP panel. 

Love those boots.  I started out by stamping the boots with Momento Tuxedo Black ink on a piece of Whisper White card stock and then I applied a wash of Crumb Cake ink with my Aqua Painter.  I layered on Early Espresso and some of my H2O inks in various shades of brown to finish off the design.  In real life the boots look pretty leathery which was the look I was going for.  The boots were added to the front layer with Dimensionals.


I stamped the "Happy Birthday" sentiment from my Cupcake Clear Stamps set on a piece of Whisper White card stock and cut it out with a 1 1/4" circle punch. I sponged the edges of the circle with Early Espresso.   I cut additional circles from Early Espresso and Gold Foil and layered the sentiment to them.  The Dots are from my stash and I can't remember the Manufacturer.  

The inside of the card features the "Happy Birthday" sentiment from the Basic Butterfly stamp set, some more of the Coffee Break paper and a spare guitar that was left over from my earlier efforts.  After I took the pictures of the inside of the card I actually added a 1/4" x 5" strip of Early Espresso to cover the meet lines between the DSP and the White card stock.  It was an afterthought but worked well.

Well that's it for today's post.  Just a simple card, but I know it will make one of our friends very happy. How about you, do you struggle with themes for your masculine cards?  Do your like the country theme in this card?  I'd love to hear your thoughts on this and my card.

If you haven't already done so don't forget to drop by and check out the awesome masculine cards contributed by the rest of the design team.  They're pretty stunning and inspiring.  Just click here to return to the Watercooler Wednesday WWC150 Challenge.  Thanks for stopping by!

Happy Stamping!
Penny Tokens Stampin Spot

Wednesday, December 13, 2017

Watercooler Wednesday Challenge #149 - Marsha's Occasions Challenge

Wow a new challenge hosted by Marsha and a brand new theme which we think you'll love.  This challenge is all about "Occasions" - you know Halloween, Christmas, Valentines, Anniversaries, Weddings, Birthdays, 4th of July ......you name it.  What ever occasion fits your need, this will be the challenge week  to show off your project.


Here's My Card:
We've had lovely new neighbors move into our park and last week they held a wonderful Open House to introduce themselves and meet everyone.  I wanted to make a special card to not only welcome them to our "neighborhood", but also to thank them for their hospitality and such a fun evening.  

Here is my "Welcome to the Neighborhood' card. 
Supplies:
Stamp Sets:  In the City Photopolymer Stamp Set, One Big Meaning
Card Stock:  Whisper White, Basic Black, Smokey Slate
Ink:  Momento Tuxedo Black, Cherry Cobbler, Soft Sky, Smokey Slate, Lemon Lime Twist, Garden Green, Tangerine Tango, Hello Honey, Dapper Denim. Daffodil Delight, Calypso Coral, Pool Party
Accessories:  Acryllic Blocks, Detailed Scissors for Fussy Cutting, Dimensionals, Tom Bow Adhesive 

In the City is a 60 piece Photopolymer two step stamping set that is only available  through Stamping Rewards and is in the 2017/18 Annual SU Catalogue.


Details:

In the City is a really fun photopolymer two-step stamp set with 60 images that present endless possibilities for creating cards and projects. When I first got this set I couldn't decided which of the images I wanted to use, so rather than sweat about it, I just sat down and began stamping on scrap paper. 

I store my pre-stamped images in a photo case.  Perfect!  When I'm watching TV I can fussy cut out the images of my choice and keep them safe in this case. 
What a fun afternoon I had and this was such a great way to get to know the stamp set.  The two-step stamping requires two sets of ink - one for the line image and one for the colour portion of the image. You can also colour the images or add details with markers or the new blendabilities.   By stamping all the line art first,  I was able to stamp a lot of the images and have them on hand for making card projects.  
Simply a great way to use up all those scraps of Whisper White I had hanging around!

The beauty of pre-stamping and colouring is that I can pick and choose what buildings, trees, or vehicles I want to use at  a later time. You can also load up an acryllic block with multiple images for the first step and stamp them all at one time. Later you can go in and colour them with the second stamps or by hand with a marker. 


1.  Start this card with an 8 1/2" x 5 1/2" piece of Basic Black card stock.  Score and fold at 4 1/4".
2.  The second layer is a 5 1/4" x 4" piece of Whisper White.
3.  The third and final layer is a piece of Smokey Slate card stock cut out with the 4 3/8" x 3 3/8" Pinpoint Rectangles Die Cut (memory box).
4.  The sentiment Welcome to our Block is from the In The City stamp set too and was perfect for this card.  It was stamped on a scrap of Whisper White in Momento Tuxedo Black ink.  The strip measured 1/2" x 2".  This was mounted on a piece of Smokey Slate and Basic Black card stocks and adhered to the center bottom of the card face with Dimensionals.  
5.  Various building shapes, trees and vehicles  were added with Tom Bow adhesive and Dimensionals. 
6.  A 5 1/4" x 4" panel of Whisper White was cut and adhered to the inside of the card.  I stamped a "thank you" image from the One Big Meaning stamp set in the center of the page.  Sorry I can't show you, I didn't take a picture of the finished page before giving the card away.  Trust me it looked good.
7.  I stamped another Thank You image from this set on the envelope front as I was hand delivering and I wanted it to look good too.  

And that's all there was to this card.  I know I'll be using these sets lots as they're so much fun and so easy to use together.  I hope you enjoyed this post and my card and that you'll leave me a comment.  

Don't forget to drop by the Watercooler Wednesday main page and see the wonderful "Occasions" cards submitted by the other members of the Design Team.  Lots of inspiration there.  We're also searching for a new Design Team artist so if you're interested check out how to apply.  All the details are at the top of the here.
Happy Stamping!
Penny Tokens Stampin Spot

Wednesday, December 6, 2017

Creative Circle Design Team's December Blog Hop


Welcome to the Creative Circle Design Team's December Blog Hop.  If you're new to the crafting world or not familiar with the acronym, CCDT stands for "Creative Circle Design Team". This is a group of Stampin' Up! demonstrators from around the world who love creating using electronic cutters for their designs as well as Stampin' Up! products and who love to participate in blog hops.  

We hop on the first Thursday of each month and every 3rd month Liz Holloway, the leader of our group provides a pattern and challenge to create something using her 3D SVG and Silhouette formats.

The teams' challenge this month ties in with Christmas and is to create a Church of our choice using Liz's pattern but it must include some type of holder for cards, a mini album, candies or even home decor.


Here is My Project:
For anyone who lives in or who has been through the Sumas Washington area you may be familiar with an old landmark church on the way to Mount Baker that was turned into a pub in its later years called the "Holy Smoke".  This was the inspiration for my church design.  My holder is for Christmas cards.  Enjoy!
In this picture you can see the drawer which opens on the backside of the church open and holding the cards.

Supplies:
Stamp Sets: Hearts Come Home

Inks: In Colour 2017-18 Markers (Lemon Lime Twist, Berry Burst, Tranquil Tide, Powder Pink, Fresh Fig),Momento Tuxedo Black, Versa Mark 
Card Stock: Whisper White, Basic Black,White Glimmer Paper
Accessories: Big Shot, Paper Trimmer, Liberty Bell, Dimensionals, Sticky Strip, 1 3/4 Circle Punch, Gold Thread. Stitched Shapes Die Cuts, Detailed Gate Thinlets Die, Sponge, Tom Bow Glue


Details:
I won't be providing measurements for any of the church assembly since it's all covered in Liz Holloway's design package.  But, the following are some of the things I added to my design for the challenge portion of it.  

I made a small box half box to fit inside the church and hold two battery operated candles.  The Church fits over top of the lid of the box and the box holds the church in place.
This is the insert for the support box for the church and holds the candles in place.
In this photo you can see how the church fits over top of the support box.  I actually attached the support box to the center of the drawer platform I made and it very effectively holds the church in place. 

In this photo you can see the base of the church is now mounted to the drawer.  It works similar to an easel card box.  The drawer is located at the back of the church and has a little bead pull to open it.  The drawer will hold four cards and envelopes.
Here you can see the cards inside the box and the drawer pull on the outside.  the platflorm is covered with glimmer paper so it looks like snow. 
When I was decorating my church, I opted to add three windows to the back of the church which was quite plain. 
This view shows the church off the platform.  I created a fancy door and scroll work on the sides and back of the church using the Detailed Gate thinlet die.  I cut one full gate from Basic Black card stock and then cut it down to three pieces of gridwork and the door portion.  I really liked the addition of these pieces to the overall look of the church. 


This is a closeup of the door.  It is cut from the top center of the Detailed Gate.  I mounted it on Whisper White card stock and cut around the design to form the door.  This was added with dimensionals to the front of the church.  The wavy lines you see on the church panels were made with the Seaside Embossing folder.  I wanted to give the appearance of wood siding on the church.
I absolutely love this Detailed Gate and the fact that it's not just for Halloween.  This beautiful die is from the Holiday Occasions catalogue and is only available until January 2nd, 2017.  It is product # 144669.
Here is my night view of the church.  The candles are on and you can see the lights flickering through those cute little vellum windows.  Unfortunately I don't have a closeup of the windows but them were assembled with the SVG cut outs and the vellum was coloured with this years In Colour Markers to give a pretty glow.

I found the degree of difficulty with this SVG design high but achievable and it was a fun project to tackle. I hope you've enjoyed my post and will check out the other design team artists to see their incredible projects.


Happy Stamping!
Penny Tokens Stampin' Spot  

Watercooler Wednesday Challenge #148 -Heidi's Feminine "Anything Goes"

Hi Stampers.  Wow the time is zipping by and once again it's time for the Watercooler Wednesday challenge.  This week's challenge is hosted by Heidi Weaver and she's challenging us to make a Feminine "Anything Goes" card or project. 
We hope you'll join in the fun and enter one of your own creations.   All you have to do is make a Feminine themed card or project and link it through your  post to our Linsky and follow a few simple rules.  What could be easier?  All the stuff you need to know about playing along is located on the Watercooler Wednesday Challenge Main PageOur Linksy is open until 5:00pm  Mountain Time on Monday December 11th.  


Here's My Feminine Card:

Supplies:
Stamps: Painted Harvest, One Big Meaning
Ink: Lost Lagoon, Smokey Slate
Card Stock: Lost Lagoon, Smokey Slate and Whisper White
Accessories: Big Shot, Paper Trimmer, Ovals Framelits, Stitched Rectangular Dies, Basic Pearls, Dimensionals, Tom Bow Glue.


Some Details:
1. The card base is an 8 1/2" x 5 1/2" piece of Lost Lagoon card stock scored and folded at 4 1/4". Lost Lagoon is a retired In Colour from Stampin' Up!

2. The first layer of this card is a piece of Whisper White card stock measuring 4" x 5 1/4" and adhered to the card base.

3. The third layer is a 4 3/4" x 3 3/4" piece of Smokey Slate card stock adhered to the top right hand side of the card leaving a 1 5/8" gap on the left hand side.


4.  The final layer is a 3 1/2" x 4 1/4" piece of Whisper White.  This layer is stamped with the Painted Harvest two step sunflower around the outer edges and top of the panel.  The first layer of the flower is Lost Lagoon followed by Smokey Slate for the second flower and the inner part of the flower is Smokey Slate.  
5.  Before adhering the panel in step 4, stamp the "thank you" sentiment from One Big Meaning in the middle white space on the panel.  Cut out this piece with a 3" oval from the Oval die cuts set.  Once the main panel is adhered to the Smokey Slate panel, attach this oval with Dimensionals in its original slot.  Add three medium sized Basic Pearls to the side of the oval. 


6. Cut a 1/4" x 4" strip of Lost Lagoon and adhere it to the center of the white margin on the left hand side. Run a strip of Basic Pearls down the center.

7.  For the inside of the card cut a 5 1/4" x 4" panel of Whisper white.  Stamp the sentiment "Your Kindness...." and a couple of the flowers in Lost Lagoon and Smokey Slate inks.  Make an envelope to match.
I have to apologize for the poor quality of these photos.  They simply don't do the card justice.  Apart from that I hope you've enjoyed this card.  I simply love these flowers and the soft muted images you can obtain by matching two coordinating colours.  I'd love to hear from you so please let me know if you like these images too.  

Make sure you check out the other design team artists and their beautiful creations in this week's challenge. 
Before I go just a reminder that we're looking for a new Design Team Member to replace Libby Fenn's on our team.  If you're interested all the details on how you can be considered are on the beginning of this post.  Check it out here.
Happy Stamping!
Penny Tokens Stampin' Spot

2024-2025 Annual Stampin' Up! Catalogue has launched!

 HAPPY MAY 1ST| Today I'm celebrating and  sharing the launch of the much awaited Stampin' Up! Annual Catalogue which will run from ...