Sunday, May 7, 2017

9 Tips for Using the Eastern Medallion Thinlet Dies


Yesterday was National Scrapbook Day and although I'm not a big scrapbooker, I do like to celebrate the day by inking up my stamps and creating something special.  What fun and a good excuse to spend time in my craft room.

I was thrilled to share the afternoon with one of my besties, Debby Evoy who is also a Stampin' Up! Demonstrator in the Abbotsford area.

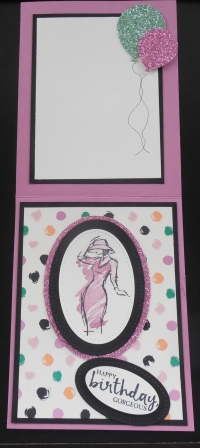
It was a great afternoon of yakking, stamping, sharing tips, laughter and smiles.  The latter actually influenced and inspired me to create this "hello" card.

Here's My Card: 
This is the first of many Eastern Palace Suite cards I'll be sharing during the month of May.  It's my own original design.
 
Sometimes it's nice not to add a sentiment to the inside of the card, so I didn't stamp anything I just added the two strips of stamped card stock at the bottom to tie in with the front panel of the card.  

Supplies:
Stamp Sets:  Eastern Beauty Photopolymer Stamp Set and Nailed It (R)
Inks:  Fresh Fig (New), Lemon Lime Twist (New), Tranquil Tide (New)
Card Stock:  Tranquil Tide, Fresh Fig, Whisper White, Gold Foil
Accessories:  Big Shot, Acryllic Blocks, Paper Trimmer, Dimensionals, 2" Circle Punch, 2 1/2" Scalloped Circle Punch, Stitch Shapes Circle Framelit Dies, 1/2" Circle Punch, Eastern Medallions Thinlet Dies.

Eastern Medallion Thinlet Dies:
Before we look at what went into making the above card I want to give you some tips regarding the Eastern Medallion Thinlet Dies .  First of all, there are 14 individual dies with multiple options for layering.  I don't know about you, but although it's exciting to think of all the variations I wasn't sure where to begin.  

I began by cutting out a 4/78" x 6 1/4" piece of Magnetic sheeting to hold all the dies in place.  I numbered each of the dies with a bright pink Sharpie Pen, so I could see at a glance which die I was using.  Here are some pictures of my dies and during the next few weeks when I refer to these dies it will be by number, for example:  Combine dies #1, 2 and 3 to make a particular configuration.   
Here's the Magnetic Sheet I use to hold all the Eastern Medallion Thinlet DiesNote: when you first get the dies they are attached to a sheet of thin card stock with scotch tape, that is very strong and it's difficult to easily remove them. Be extremely carefully removing them because you don't want to bend or warp the dies. Here are some close-up pictures of the dies and how I numbered them.

Fig 1.  Dies 1-3 starting from the smallest die in the center.
Fig 2.  Dies 4-6 starting from the smallest die in the center of  the flower.

Fig 3.  Dies 7-9 starting with the die that looks like a driedel.

Fig 4.  The small flower is #10 and the larger flower is #11.

Fig 5.  These smaller individual dies were numbered 12-14.

When I began cutting out the various dies I was surprised that some of them didn't cut all the way through the paper.  I wasn't expecting that. See the examples below.  Figures 6, 7 and 8 show how the individual dies look. 
Fig 6.  You can see from this picture that circles 1 through 6 do not cut through the paper. The reason for this is that when you layer the dies together as in Figures 1 to 4 above, you'll get one solid medallion.  If you want to separate them and use the die shape in some other way you can use coordinating punches or dies to cut them out.

Fig 7.  In this sample you can see that two of the dies #s 8 and 10 do not cut through the paper entirely, while 7,9,11,12,13, and 14 do. 

Fig 8.  These are the negative images from the above die cuts.
Fig 9.  In this picture you can see that only the petals have cut through the card stock on the first flower image. To remove the whole flower from the card stock you need to snip the small pieces of card stock in between the petals to remove it. I used my small detail cutting scissors. I marked the cutting area on the second flower with white ink.  The blue flower shows what it looks like when it's free of the card stock. 

Assembly:
Card Base: I cut an 8 1/2" x 5 1/2" piece of Tranquil Tide card stock and scored it at 4 1/4" for the A2 card base.

1st Layer:  I cut a piece of Fresh Fig to 5" x 3 7/8".  Note:  Before adhering this layer to the card stock I punched out a 2" Stitched Shape Circle and a #10  Fresh Fig flower layer.

2nd Layer:  I cut a piece of Gold Foil to 4 7/8" x 3 3/4".  Before adhering to the Fresh Fig layer I punched out a 2" Scalloped Circle and a #14 small floral layer.

3rd Layer:  For the final layer I began with a 4 x 5 1/4" piece of Very Vanilla card stock but later reduced this piece to 4 3/4" x 3 5/8". I used the overage  for the designer strip on the bottom inside of the card. I stamped my own background by randomly stamping the small and medium circle stamps from the Eastern Beauty Photopolymer Stamp set in Fresh Fig and Lemon Lime Twist.  I randomly stamped the "hello" sentiment in Tranquil Tide. 

Large Medallion:  I started with a 2 1/2" Tranquil Tide Stitched Shapes circle layered with a 2 1/2" Scalloped Gold Foil circle, a 2" Fresh Fig Circle, and a 1 3/4" Very Vanilla Stitched Shapes layer.  I stamped the sentiment "to think of you is to smile" in Fresh Fig ink.  

Small Flower Medallion: The small flower medallion was made by cutting out and layering two #10 die cuts - the bottom one in Tranquil Tide and the top one in Fresh Fig.  Next I cut a Gold Foil layer using die #14.  I stamped one of the cute little smiley face icons from the Nailed It stamp set in Fresh Fig ink on Very Vanilla card stock and cut it out with a 1/2" circle punch.  I popped up the center on a Dimensional.  
Inside Panel:  A Very Vanilla panel measuring 4" x 5 1/4" was cut and adhered to the card base.  A 1/4" strip of the background paper was adhered to a 1/2" piece of Fresh Fig card stock and then adhered to the bottom of the card panel.  I didn't stamp a sentiment at this point because this card could be used for various occasions such as Thinking of You, Happy Birthday, Congratulations or Just a Note.  

Well that's the end of today's post.  I hope you enjoyed it and I've provided some helpful hints on using the dies.  I will continue to provide tips and tricks for using this set creatively over the coming weeks.  I'd love to hear your comments and whether you find this kind of tutorial useful.  

Happy Stamping! Penny Tokens Stampin' Spot  

Saturday, May 6, 2017

Eastern Palace Bundles - Pre-Release Promotion May 1st to 31st


Have You Heard About This Early Release?  

Stampin’ Up! is offering some great products through an early release!  

That’s right!  You can order select items from the Eastern Palace Suite NOW.... no waiting for the catalogue release on June 1st!  There are two great bundles being offered – and both are totally AMAZING! 

CLICK HERE for all the details and don’t miss out because this die and stamp set bundle are going to open up a whole new adventure in stamping.   


If you are new to the world of stamping and want an excellent starter kit this one is for you.  The combination of products in this suite will provide you with hours of stamping fun.  The only thing you need to get started are some Acryllic Blocks.
 
Bundle contains: 7 Items
*Eastern Beauty Photopolymer Stamp Set
*Eastern Palace Specialty Designer Series Paper
*Eastern Gold Vinyl Stickers
*Fresh Fig Classic Stampin’ Pad (new In Color!)
*Lemon Lime Twist Classic Stampin’ Pad (new In Color!)
*Tranquil Tide Classic Stampin’ Pad (new In Color!)

*Very Vanilla Note Cards & Envelopes (new!)  

Eastern Palace Premier Bundle #147207 Price $134.75 
This bundle is perfect for the advanced stamper although it works for a beginner too - just more stuff to play with.

This bundle includes: 11 Items
*Eastern Beauty Photopolymer Stamp Set
*Eastern Palace Specialty Designer Series Paper
*Eastern Palace Card stock Pack
*Mini Tassels Assortment
*Eastern Gold Vinyl Stickers
*Fresh Fig Classic Stampin’ Pad (new In Color!)
*Lemon Lime Twist Classic Stampin’ Pad (new In Color!)
*Tranquil Tide Classic Stampin’ Pad (new In Color!)
*Eastern Medallions Thinlits Dies
*Very Vanilla Medium Envelopes
*Very Vanilla Thick Card stock (new!)

Click Here To Shop Now
Happy Stamping!
Penny Tokens Stampin' Spot

Wednesday, May 3, 2017

Watercooler Wednesday Challenge #117 - Heidi's Feminine Anything Goes


It's been nothing but rain, rain and more rain here in the Fraser Valley for the past few months, so although we've got lots of Spring flowers in bloom, we've had an incredible lack of sunshine.  Lets hope the month of May brings a new weather outlook.

Speaking of change, the Watercooler Wednesday Challenge Blog is undergoing some changes too.  The first change is that our Guest Design Artist, Heather Hopson, is taking a break for the summer and hopefully will rejoin us in the Fall. Thanks Heather for inspiring with all your great cards, posts and comments.  Have a terrific summer!

The Watercooler Wednesday Design Team is also excited to announce is the addition of Fiona Whitehead and Judy Markowitz . These two very talented gals have participated in many of our weekly challenges and demonstrated some pretty impressive paper crafting skills. A big shout out and welcome for these two!  

Another change I'm excited about is the lineup for our challenges is changing beginning this month.  Make sure you check out the side-bar on the Watercooler Wednesday Challenge Blog for the new weekly challenges.  I'm sure you're going to be as excited as I am.  Love it! 

Heidi Weaver is starting us off by hosting our first "Feminine" Anything Goes theme challenge. Since we've been covering the boys pretty regularly it seemed only fair that the "girls" get spotlighted too.  Isn't this a great addition to our line-up?  

This challenge is open from May 3rd and the link closes at 5pm Mountain time on Monday May 8th.  I hope you'll join us for this challenge, by linking up your Feminine Anything Goes card.

Here's My Card: 
I've really been wanting to try out the Beautiful You stamp set from Stampin' Up! and this new challenge was the perfect opportunity to get it inky.  Regretfully I'm also showcasing the soon to be retired Balloon Pop Up Thinlet die.

I cut out the DSP with the Balloon Pop Up Die and mounted in on Basic Black card stock. I also used the balloon images from this die cut to cut out the two Mint Macaroon Balloons.  The Sweet Sugar Plum Balloon was cut out with the Double Balloon punch.  I stamped the dancing girl on Very Vanilla card stock and fussy cut out the image with my detail scissors. 

Supplies:
Stamp Set:  Beautiful You #143637
Card Stock and DSP: Very Vanilla, Basic Black and Sweet Sugarplum card stock. Playful Palette DSP Stack #141657, and the now retired Sweet Sugarplum and Mint Macaroon Glimmer papers. 
Ink:  Tuxedo Momento Black, Mint Macaroon, Sweet Sugarplum, and Blushing Bride.
Accessories:  Blender Pen, Big Shot, Trimmer, Tom Bow Glue, Dimensionals, Balloon Pop Up Thinlet Die, Stitched Shapes Oval Dies, Large Oval Punch, Double Balloon Punch, Project Life Black Marker.

The inside of this card is a little unusual in that the free writing space is on the back of the front panel.  I've added another stamped design and birthday sentiment to the bottom inside panel.  Sometimes it's just nice to change things up!   In my opinion, the inside just adds to the WOW factor in this card lay out.  
In this view you can see the whole inside of the card.  Unfortunately it was difficult to photo graph so this image is very small.
I love the openness of this panel and the two balloons.  There is plenty of writing space left for the sender to express their good wishes for the day!  The balloons were cut out with the Double Balloon punch.  The Mint Macaroon balloon is glued to the panel and the smaller Sweet Sugarplum balloon was added with a Dimensional. I drew the strings free hand with a Project Life marker.

This is the bottom inside panel and I've chosen to add one of the stamped female images and the sentiment "Happy Birthday Gorgeous".  I love how the paper from the Playful Pallet stack really adds a soft colourful touch to this card. 
Well that's it for today stampers.  If you have any questions about the layout of this card or the products used please don't hesitate to email me at pennyhanuszak@telus.net or leave a comment on this post.  I'd love to hear from you. 


Happy Stamping!
Penny Tokens Stampin' Spot

Wednesday, April 26, 2017

Watercooler Wednesday Challenge #116 - Kath's Masculine "Anything Goes" Challenge

This week's Watercooler Wednesday challenge #WWC116 is a Masculine "Anything Goes" theme hosted by Kath.   

If you're like me, you're probably always on the lookout for ideas and samples of masculine cards.  This is  especially true with Father's Day looming in the months to come and so many male birthdays on my calendar.

So, my card for this challenge features one of the more masculine stamp sets from Stampin' Up! called "The Wilderness Awaits"I'm sad to say this set is retiring the end of May 2017, and I wanted to give it a last hurrah!  What better way than to combine it with one of my favourite fancy fold techniques. 

Here's My Card:

This card, called a "Twist and Pop" is one of the more favourite fancy fold cards this year. I've found that making one of these cards is like pulling together a special story and they're such a challenge.  I love making these so much that I'm planning on featuring this card style in my upcoming "Father's Day" Masculine card class, so stay tuned for details. What fun! 


Supplies:

Stamp Sets: The Wilderness Awaits #139365*, Here's to Cheers #142101*, Badges and Banners #141610, Avant-Garden (SAB 2017 (R), Gorgeous Grunge #130517*, Stylized Birthday #141828
Card Stock:  Very Vanilla, Tip Top Taupe, Early Espresso
Ink:  Early Espresso, Tip Top Taupe, Crumb Cake 
Accessories:  Trimmer, Big Shot, Woodland Embossing Folder #139673, Brayer, Stitched Framelits - Ovals and Circles*(R),  Stitched Shapes Framelits #145372, Banner Punch, 1 1/4" Circle Punch, Large Oval Punch (R).
Note:  All Supplies Marked with (*) are retiring at the end of May 2017 or as long as supplies last. (R) refers to accessories that were previously retired.


For the inside top card panel, I repeated the Woodland Embossing folder layer but used the debossed side to add some interest. I cut a layer of Very Vanilla card stock with the Stitched Shapes Oval Framelits for the "Happy Birthday" sentiment. 
The sentiment was stamped with the Stylized Birthday single stamp. I'm a big fan of this large bold font and find it really works well on masculine cards. 
To finish off I stamped some of the Gorgeous Grunge splotches randomly in Tip Top Taupe on the sentiment and added some more Gold Metallic Star Embellishments. I cut a larger oval of Early Espresso card stock with last years retired Ovals Framelits and mounted this with Dimensionals.

 
Because the card stock is relatively heavy on this card and I want to hold the twist part inside until the card is fully opened, I've added a belly band to give it some stability.  I cut a piece of Very Vanilla with the smallest Stitched Shapes Oval and stamped the "for you" sentiment from the Wilderness Awaits stamp set, leaves from Avant-Garden and splotches from Gorgeous Grunge.  The two small metallic stars give it a bit of pizazz on the card front.  Note:  the Early Espresso oval was cut using the old original large oval punch. It worked perfectly for this layer. 
I really like the four panels inside of the Twist and Pop Card.  You can use them to tell a story with your stamps and sentiments or add photos..... pretty much anything you want to decorate and personalize the card.  The bottom panel was left plain except for the small leaf stamp in the bottom corner.
The Elk's image from the Wilderness Awaits stamp set was repeated for this panel and some splotches from Gorgeous Grunge were added.

This panel was stamped with the Badges and Banner stamp set and the image was cut out with the coordinating Banner Punch

This panel was stamped with the Here's to Cheer's stamp set  and Gorgeous Grunge.
This is a mirror image of the Elk from The Wilderness Awaits that was stamped on acetate and then transferred to the Very Vanilla panel.  It isn't as dark as I would have liked it, but the image came through pretty clear.  The "No. 1" is such a cute little stamp and is from the Badges and Banners.  It was cut out with a 1 1/4" circle punch.
Well that's it for today's card challenge.  I hope I've inspired you with today's card and you'll take the time to leave me a comment.  Let me know if you've ever tried this fancy fold before.  It can be tricky, but with practice and proper positioning it is a terrific card style.  I plan on making a lot of these Twist and Pop cards in the coming weeks.

If you haven't participated in our Watercooler Wednesday challenges before I hope you'll give it a try.  Our challenges are posted on Wednesdays and are open until the following Monday.  If you haven't already checked out the Design Team artists I hope you will, they've posted some amazing samples this week.

Happy Stamping!
Penny Tokens Stampin' Spot

Thursday, April 20, 2017

Wacky Watercooler April Blog Hop - Retirement Means Goodbye

Hi everyone, thanks for coming to visit my site.  It's time for our "Retirement Means Goodbye" Wacky Watercooler Blog Hop.  All of us are sad to see retirement time come around because it means some of our favourite stamp sets and products will be gone forever.  We thought we'd give some of those a last hurrah and share them with you.  I've attached a link to the Retirement List at the end of this post in case you want to check it out.

This hop runs from Thursday April 20th through the 22nd and features five design artists, who have created some outstanding projects for you. It's a circular hop so whether you've come here from the super talented Marsha Reed's Coffee Pot Stampin Cafe blog or started at the beginning, if you follow along you'll eventually wind up where you started.

Project One: Oh So Succulent Flower Pot Card
I am going to miss the Oh So Succulents Stamp Set and Die cuts so much when they retire at the end of May. I can't get over how beautiful these succulent flowers are and how easy they are to assemble. Here is my rendition of a card I made (see below) at a Stamp Camp earlier this year. I really like my pumped up version.

Stamp Sets:  Oh So Succulent Bundle" and Banners For You
This is a picture of the bundle but these products could be bought as separate products.

Card Stock:  Mint Macaroon*, Tip Top Taupe*, Watermelon Wonder*, Honey Dijon*, Whisper White
Ink:  Perfect Plum, Mint Macaroon*, Tip Top Taupe*, Watermelon Wonder*, Honey Dijon*
Accessories: Succulent Dies*, Big Shot, Paper Trimmer, Bo Ho Chic Embossing Folder*, Paper Snips, Basic Rhinestones, Honey Dijon Striped Ribbon*
Note:  All items with an (*) are retiring May 31st or as long as supplies last.
 
This picture shows the card jacket and the inside panel together. 
The inside panel has the Happy Birthday sentiment from the Oh So Succulent Stamp Set stamped in Tip Top Taupe. The florals are attached to this panel with Dimensionals. 
Here's the original card I made at Cheryl LeFore's Stamp Camp in February.  I fell in love with the beautiful succulents and the colour mix - Old Olive, Calypso Coral, Mint Macaroon and Sweet Sugarplum.  I decided to make my own template for a card class and CASe Cheryl's card.  What fun!  
Here are the two cards together.  Mine is in the foreground.  I increased the size of my template to accommodate a larger inside panel and embossed the flower pot with the retiring BoHo Chic Embossing Folder.  I changed the floral colours to Mint Macaroon, Watermelon Wonder, Tip Top Taupe and Honey Dijon and added a Honey Dijon Striped Ribbon.  Finally, I added Basic Rhinestones to the flower centers to give them a bit more pizzazz.


Project Two: Timeless Love Gift Card Holder

I'm very sad to say that the Timeless Love stamp set from the Annual Catalogue is Retiring. This has been my go-to set for Anniversary's this season. My project is a combination Anniversary Card and Gift card holder. I was inspired by Diane Barnes No-cut Patterned Paper Gift Folder, which uses only a 12 x 12 sheet of designer paper to create a unique special occasion folder.

This is what the card looks like from the front.  It has a belly band holding it shut.  I've used the beautiful Floral Boutique Designer Series Paper which is retiring March 31st and the Timeless Stamp Set that's also retiring.
I love the font that is used in the Timeless Love Stamp set and the beautiful floral designed images match perfectly with this paper.

Supplies:
Stamp Sets: Timeless Love #139408
Timeless Love Stamp Set has five images that are perfect for anytime you want to express your love.  This set comes in wood and clear mount versions.

Ink: Night of Navy 
Card Stock:  Night of Navy and Whisper White
DSP:  Floral Boutique Designer Series Paper*
Accessories:  Trimmer, Big Shot, So Detailed Thinlet Dies* an embellishment piece (retired).
The belly band slides off the folder.

Inside the folder are two pockets each containing a 5 1/4" by3 3/4" card.  On the left hand side is a Happy Anniversary card and on the right is a gift card holder that's made with the So Detailed Framelit Dies that are also retiring.
This is what the folder looks like when the cards are removed.
The gift card can slip behind the So Detailed die cut and fits just right.  I've stamped another flower image from the Timeless Love stamp set and the sentiment Congratulations. 
There's enough room to write a personal note on this card but an additional piece of Whisper White card stock could be added to the reverse side if more writing or room for a group signature. 
Everything slides into these pockets so well. 


Well you've come to the end of my projects for this hop and I hope that I've inspired your creative side in some way.  Now it's time to move on to the wonderful Heidi Weaver's blog so she can wow you with her projects.  Or, you can go back to the beginning of the hop at the Watercooler.  Whichever way you go have fun and remember to leave some comments along the way..... we love hearing from you.  Let us know what you're sad to see retiring. 
http://heidistampinalong.blogspot.ca/


http://www.coffeepotstampingcafe.com/2017/04/wacky-watercooler-april-blog-hop.html

http://wackywatercoolerstamping.blogspot.com/


Happy Stamping!
Penny Tokens Stampin' Spot

Paper Pumpkin Alternatives April 2024 and Sketch Challenges

The past week was so busy that time literally flew by.  I have a number of projects on the go, including working on my April 2024 Paper Pump...