Tuesday, December 27, 2016

Seven Cards I want to share

What is it about receiving cards?  

Cards are such an important way to share friendship at any time and any occasion during the year.  But especially at Christmas. 

I can't even begin to express how much it means to my husband and I to receive them. It's so exciting to reach into the mail box and discover some special envelopes.  These cards bring sunshine and smiles to our day, and just knowing someone has taken the time out of their busy lives to acknowledge us and share some of their seasonal updates makes us happy! 

I  must admit that at this time of year there are some cards that stand out from the rest and I pick them up over and over.  They are the hand crafted cards and today I want to share seven such cards.  I was amazed and thrilled with the love that went into each and every one of these cards.

Card One by Betty Lee: 

I really loved this card stamped with the Reindeer from the Stampin' Up Cookie Cutter Christmas stamp set. Betty Lee has punched out the cute hat in from Red and Dazzling diamonds glimmer paper and the Stampin' Up! Jolly Hat Builder Punch.  What a great card Betty Lee!  Loving it!

Card Two By Debby Evoy:
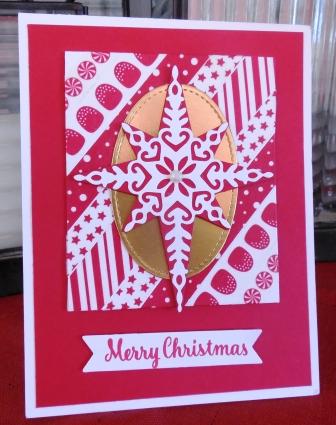
Isn't this a gorgeous combination of the Stampin' Up! Starlight Thinlet Dies and Candy Cane Lane Designer Washi Tape. I totally loved the design! Great way to use the Washi tape Deb!  This card was made by mygood friend and fellow demonstrator Debby Evoy from Abbotsford BC. 

Card Three By Elise:

My sweet and talented sister-in-law Elise from Vancouver, BC made this super cute card with fun foam stickers.  We loved it Elise.  Beautiful inside and out, just like you! 

Card Four by Cheryl LeFore:

Every year I receive an amazingly beautiful card from the very talented Cheryl LeFore, a Stampin' Up Demo from Laquinta California.  Cheryl was Stampin' Ups! Artisan of the year in 2012, so it's such a thrill to get one of her creations.  I love all the elements Cheryl's used on this card and the background snowflake stamping.  Cheryl, thanks for thinking of me!

Card Five by Heather:
My sister Heather's been participating in the Merry Monday Christmas Card challenges and the Watercooler Wednesday weekly challenges during 2016 and has made some simply amazing cards. This very cute card features some happy little "snowbirds" and snowflakes inside and out.  It brought a smile to my face Heather.  Super cute!  Thanks so much!

 Card Six by Ethel DeTemple:

I'm totally loving this Christmas card made with the Jar of Love Stamp Set and Dies set and Cookie Cutter Christmas Designer Series Paper.  Ethel you did a fabulous job with this shaker.  It's so perfect!  Thanks so much for this fun card!  My good friend Ethel is also a Stampin' Up! demonstrator in the Surrey Fleetwood area of BC.  
Card Seven by Phyllis:


Our last card is from another good friend Phyllis, who lives in the Okanagan.  Phyllis created this stunning die cut card featuring products from Stampin' Up! and Karen Burnston die cuts.  This card took my breath away Phyllis when I pulled it from the envelope.  Wow!  Simply beautiful! Thanks so much!

Well, there you have it for today.  Beautiful and much appreciated cards from friends that I love!  Thanks everyone for making my Christmas memories in 2016! 

Happy Stamping!
Penny Token's Stampin' Spot 
Merry Christmas Everyone!

Saturday, December 24, 2016

Merry Christmas Wishes

Christmas Eve that magical night of nights has arrived.  Hopefully all your shopping and preparations for Christmas day are behind you and now you can sit back and relax with your family and friends.  

I've been busy making my White Chocolate Gumdrop Fudge and Butter Tarts today and getting ready for a mexican lasagna feast later tonight.  It's always so wonderful to get together and share the season with good friends!  

Merry Christmas everyone and thanks for supporting and following me during this past year.  I hope you'll continue to return to this site in 2017.  

All the Best to You and Yours!!    

Wednesday, December 21, 2016

WWC99-Marsha's Clean and Simple (CAS) Make It With Hearts Challenge

Wednesday has rolled around again and it's time for the last WWC99 Watercooler Wednesday challenge  of the year since this challenge will run from December 21st through to January 2nd, 2017.  This Clean and Simple (CAS) challenge is being hosted by Marsha and it's all about "hearts". 

Just so you know the Watercooler Design Team Artists decided to lower our expectations for our CAS challenges so all you need to do is enter an uncluttered card with lots of open space and minimal layers and embellishments and you can play along.  We hope you will join in the challenge! 
 
Here's My CAS Card:
Supplies:
Stamp Sets:  Merry Mice, Bear Hugs, and Love Sparkles*
Ink:  Cherry Cobbler, Crumb Cake, Early Espresso, Delightful Dijon, Basic Black Archival Ink, Flirty Flamingo and Smokey Slate
Card Stock:  Cherry Cobbler, Cansun 90lb Watercolor Paper
Accessories:  Big Shot, Trimmer, Bear Hugs Thinlets, Aqua Painter, Baby wipes, Scissors, Dimensionals, Tom Bow glue, Tear and Tape.
The Merry Mice stamp set is from the Holiday Occasions catalogue and will retire January 2nd, 2017.  It's currently on sale in the Year End Extravaganza.  Product #42154
The cluster of hearts behind the little mouse is supposed to be a balloon bouquet. The "love you" heart is from the Bear Hugs stamp set and is cut out with the Bear Hugs Thinlet heart die. 

I bet you're wondering where that fancy double-outlined heart came from aren't you? Well, I got it for free when I attended Stampin' Up!s OnStage Presentation in Vancouver.  It's from a delightful new stamp set called "Love Sparkles" and will be available in the new Occasions catalogue, just in time for Valentine's Day.
Bear Hugs Stamp Set #39546 in the Annual Catalogue
Assembly:
1.  The Cherry Cobbler card base was cut to 8 1/2" x 5 1/2" and scored at 4 1/4". 

2.  I cut three pieces of Watercolor Paper, for the layers.  The first layer measured 4" x 5 1/4" and the second layer measured 3 3/4" x 5". The final layer which measured 4" x 5 1/4" was for the inside of the card. 

3.  I stamped the mouse image from Merry Mice with Black Archival ink on the second layer of watercooler paper. Note:  After inking up the image and before stamping, I wiped the ink off the stocking hat and piece of scarf that poked out below the mouse's arm because I didn't want them to show up on the finished card.  I just used a baby wipe to take the ink off. 

4.  I stamped a second image of the mouse on a scrap of watercolor paper and again wiped away the hat and scarf portions of the image before stamping.  I fussy cut away the bottom portion of the mouse, and the hat leaving his face, upper body and arms in tact.  And, I cut away the portion of the book top between the mouse's hands so I could insert the little red heart. This portion of the mouse was coloured the same as the base and it was mounted with dimensionals after the stamping on the base layer was finished.
 
I fussy cut out a second image of the to portion of the mouse so I could layer it on top of the original layer.  This is just a sample so it isn't cut very neatly.... it's just to give you the concept.
5.  I painted the mouse image with Cherry Cobbler, Crumb Cake, Flirty Flamingo, Early Espresso and Delightful Dijon inks, using a fine tipped aqua painter. I repeated this colouring on the portion of the mouse that would be layered later on.

6.  Because I'd eliminated the stocking hat from the second mouse image I needed to replace it with something else.  To do this, I stamped a reindeer head from the Cookie Cutter Christmas set and cut off the portion between the horns to make a little cap.  I coloured this with Delightful Dijon and then added it with a piece of dimensional to the top of the mouse's head to form a cap.  
I just wanted the portion of the deer head that is coloured in yellow.  I drew a line along the bottom of that image with a Basic Black marker and cut it out.  This became the cap on the mouse, all the rest of the

7.  I stamped the mouse image on a Post-It-Note and fussy cut this out for a mask.  I applied the mask over the mouse and stamped the heart images.  I also stamped masks for the hearts so I could layer them.  They were all stamped in Cherry Cobbler Ink.
Masks stamped on Post-It-Notes.

8.  Once the inks had dried I attached the upper portion of the mouse with dimensionals. I punched out a little red heart using the punch from the retired Itty Bitty Punch Accents set and attached it between the mouse's hands with a piece of dimensional.  I used an aqua painter and Smokey Slate ink to outline the mouse image and give some depth to the background.  Some of the Cherry Cobbler ink ran a bit so I just lightened and blended it into the background.


Note: After I made the above card, I thought I should have used flowers instead of the heart, so I had to try out that look. Voila here's what that version looked like.
The floral bouquet in this sample is from the Bear Hugs stamp set. 

9.  The layers were glued together with Tom Bow Glue and then attached to the card base with Tear and Tape.  The inside of the card was finished with the remaining Watercolor paper layer. 

Well that's it for this year! I hope you've enjoyed this card along with others I've contributed to the Watercooler Wednesday Challenges and that you'll continue to follow and contribute your cards to this site.  I'd love to hear your thoughts on this card and my little tutorial explaining how it was assembled.

I also hope you'll visit the other Watercooler Wednesday Design team sites and leave them some comments too.   It's so inspiring for us.   

Happy Stamping!
Penny Tokens Stampin' Spot

Wednesday, December 14, 2016

WWC98 - Kath's Color Challenge

Whew!  This week just flew by and once again it's time for the Watercooler Wednesday Challenge.  This week it's hosted by Kath and she's chosen a very festive colour challenge.  The colours you need to use in your card are:  Early Espresso, Silver, Gold and Whisper White. 

Here's My Card:  
I'm not sure which was more challenging, trying to decide what I would create for this week's challenge or taking the pictures of it.  

I still had a bunch of Christmas cards to make so I decided to work with two of my favourite stamp sets this season and a technique called "3 layer stamping" to design this  fun and festive card.  Oh and just so you know, I did use all the colours in the challenge.  It's extremely difficult to see that the Reindeer are Gold Embossed, but trust me they are. One of the reasons for this is that the Silver Foil reflects so much light that it made it difficult to photograph and you're going to have to wait until the end of this post to discover the other reason.  You'll be surprised!

Supplies:
Stamp Sets:  Cookie Cutter Christmas #142043, Merry Mice #142145
Ink:  Early Espresso, Versa Mark, Smokey Slate
Card Stock:  Early Espresso, Whisper White, Silver Foil and Gold Glimmer Paper
Accessories:  Big Shot, Paper Trimmer, Heat Gun, Gold Embossing Powder, Embossing Buddy, Bunch of Banners Framelit Dies #141488, Cookie Cutter Punch, Dimensionals, Tom Bow Glue and Basic Rhinestones


Assembly:
1.  Cut the Early Espresso card stock to 8 1/2" x 5 1/2" and score at 4 1/4".

2.  Cut the following layers of Silver Foil card stock: 5 1/4" x 4", 4 1/2" x 3 1/4" and 3 1/2" x 2 1/4".
Note:  I always cut out the centers of fancy foils or glimmer paper, because they are two precious to waste, and also because it reduces the amount of weight for mailing.  This is what my foil layers look like after they are cut.  I have a set of rectangular dies that I use to cut out the centers, but you could do this with a paper trimmer.  The lighting is very poor but trust me these layers are silver. 
3.  Cut the following layers of Whisper White card stock:  5" x 3 3/4", 4 1/4" x 3", 3 1/4" x 2".  Cut a 3" by 2" piece to stamp an extra reindeer image. Cut a 5 1/4" x 4" piece for the inside of the card.

4.  Working with the Whisper White layers place them one on top of the other and center each layer.  I hold them in place with a dab of re-positioning glue on the back side of the two smaller layers.
5.  Now the fun part.  Once I had the layers properly aligned, I randomly stamped the reindeer head from the Cookie Cutter Christmas stamp set with Versa Mark ink.  Make sure your ink is juicy. When you stamp the image you are stamping right over the layers.  Apply Gold Embossing Powder shake off and heat set the images. 
Cookie Cutter Christmas stamp Set #142043
6.  Stamp the star image from Merry Mice in Smokey Slate ink, randomly across the layers. 
 
Merry Mice #142145

7.  Stamp the reindeer head on the 3" x 2" piece of Whisper White with the Versa Mark Ink, add the Gold Embossing Powder and heat set.  Cut out the image with the Cookie Cutter Punch.
 
Cookie Cutter Punch #40396  Note:  This punch will soon be out of stock. 

8.  Punch out two bows using the Cookie Cutter Punch from Gold Glimmer Paper and attach it to the middle of the punched out reindeer's head.  Add a basic rhinestone to the center.  Set this piece aside.  Note: the second bow is for the inside of the card.

9. Starting with the smallest Whisper White layer, glue it to the smallest Silver Foil layer, then repeat with the next sized layers and finally glue the group of layers to the Early Espresso card base.  Make sure you are lining up your images (antlers, ears etc.) so they join one area to the next.

10.  Adhere the punched out reindeer head to the center of the card using dimensionals.  

10.  Stamp the sentiment "It's Time To Deck The Halls" from the Merry Mice stamp set in Early Espresso ink on a scrap of Whisper White and cut out with the Bunch of Banner Framelit Dies and Big Shot machine.  Adhere with dimensionals.  Add two basic rhinestones on the end of this banner and scatter some extra rhinestones randomly on the card front. 

11.  For the inside of the card cut a 5 1/4" x 4" piece of Whisper White card and stamp the sentiment "Wishing You a Festive Season" from Merry Mice and the reindeer head in Early Espresso ink.  Stamp some stars in Smokey Slate.  Add the Gold Glimmer bow to the reindeer's head and add a basic rhinestone.
Stamping on inside of the card.
Okay, if you've been waiting to find out what the second reason is that the Gold Embossing doesn't show up in the pictures, read on.  Today I learned the hard way while I was in the process of embossing the images that my Gold Embossing Powder which I've had for some time, had gone bad.  What does that mean?  Well, although the powder heat set, the silica had lost it's oomph or it's ability to turn the powder into a shiny gold surface and it remained flat and dull on the surface.  Bummer!  From now on I'll be testing my Embossing Powders  before using them.  What about you?  Have you ever had this happen to you?
I hope you enjoyed this card today and my short tutorial.  Layered cards are one of those neat techniques that you can always rely on  to give a simple wow to your cards.  I hope you'll leave me a comment and let me know what you think of this card.  And, don't forget to check out what the other Watercooler Wednesday Design Team artists have created for this week's challenge. 

Happy Stamping!
Penny Token's Stamping Spot

Wednesday, December 7, 2016

WWC97 Penny's Sketch Challenge

This week, I'm happy to be hosting the sketch challenge at Watercooler Wednesday and I hope you'll play along. Here's the really fun sketch I've chosen WWC97:

Here's My Card:  
If you're a follower of my blog, you'll know I'm a big fan of masculine cards and so today I've created a masculine birthday card inspired by this sketch.  I chose a new to me stamp set called "One Wild Ride", and oh what fun I had with it!

When I looked at this sketch the layout of the elements simply screamed movement and so choosing to stamp the motorcycle was simply a no-brainer. While I was stamping "Born to Be Wild" was pumping through my brain so it made it even more fun. This song speaks volumes for the era I come from.  In case you can't remember here are the lyrics:
    Born to be Wild by Steppenwolf 
Get your motor runnin'
Head out on the highway
Lookin' for adventure
And whatever comes our way
Yeah Darlin' go make it happen
Take the world in a love embrace
Fire all of your guns at once
And explode into space

I like smoke and lightning
Heavy metal thunder
Racin' with the wind
And the feelin' that I'm under
Yeah Darlin' go make it happen
Take the world in a love embrace
Fire all of your guns at once
And explode into space

Like a true nature's child
We were born, born to be wild
We can climb so high
I never want to die

Born to be wild ........Born to be wild 

Supplies:
Stamp Set:  One Wild Ride

Inks:  Smokey Slate, Basic Black Archival Ink
Card Stock:  Basic Black, Whisper White, Smokey Slate and Peach Parfait (R)
Accessories:  Trimmer, Dimensionals, Acryllic Blocks, Wink of Stella

Assembly:
Card Base: 8 1/2 x 5 1/2" piece of Smokey Slate scored at 4 1/4"
First Layer:  5 2/8" x 3 2/8" piece of Basic Black card stock
Second layer:  5 1/8" x 3 1/8" piece of Peach Parfait card stock 
Third Layer:  5" x 3" piece of Whisper White card stock

Stamping:
1.  I stamped the motorcycle in the bottom right corner of the Whisper White layer in Basic Black Archival Ink and then stamped the sentiment "Birthday Wishes to the Leader of the Pack" above it with the same ink. 
2.   I stamped the "smudge" image from this set in Smokey Slate randomly around the background of the Whisper White piece to add some texture. 
3.  I stamped the tire track twice (end to end) on a 1/2 by 5 1/2" piece of Smokey Slate card stock and I used the Wink of Stella pen to give it some sparkle.  I used a corner rounder to round the ends of this strip and then glued it to the bottom of the Whisper White layer.


One of the best features of the card for me is the "Life's A Journey" badge.  Earlier this year I'd bought the Best Badge Punch as part of the Badges & Banners bundle on page 89 of the Annual Catalogue.  I was delighted to know  it also co-ordinated with the One Last Ride Stamp set.  What an awesome punch image. 


I used Basic Black, Whisper White and Peach Parfait card stocks to create this multi-layer badge. 

1.  For the first badge layer I stamped the badge on Peach Parfait.  I punched it out with the Best Badge punch and then cut the banner in half on the lines above and below "journey".  I also fussy cut around the badge pieces right to the black line and clipped out the little banner points on either side of the word "journey" and set them aside. 
2.  Next I stamped the badge twice on a piece of Whisper White and punched them out with the Best Badge punch.  I cut the word "journey from one of the white badges and clipped the sides of the banner into points. 
3.  To assemble I used the whole Whisper White badge as a base and glued the top Perfect Parfait badge piece in place, then glued the Whisper White word "journey" in the center of the badge, and the bottom Perfect Parfait piece of the badge.  To finish it off I fitted in the little banner points that I had set aside on either side of the word Journey. 
4.  I cut two more badges out of Basic Black card stock and cut them into quarters so I could extend the layer outside of the badge.  
5.  I mounted the finished layered badge with dimensionals to the card.  

6.  For the inside of the card I cut a piece of Whisper White card stock to measure 5 1/4 x 4 and stamped Happy Birthday (no name stamp)  and the Route 66 image from One Wild Ride on it.  

I was very happy with the way this card turned out and will be adding this WWC97 sketch outline to my "must use again" file.  I hope you liked it too and found my instructions helpful.   

I hope you've checked out the other design team artist's creations at the Watercooler Wednesday blog too, as they've come up with some great ways of using this sketch too.  Until the next time.....

Happy Stamping!
Penny Token's Stampin' Spot  

Thursday, December 1, 2016

Closeout Sale - Stampin' Up!


It's here..........the final sale of the year!  Happy December Everyone!

Starting TODAY and running through January 3rd, 2017, Stampin' Up! is offering hundreds of products at up to 60% off during their Year End Closeout sale. 

What does this mean for you?  Well, it's the beginning of a huge sell off of current high-inventory products, clearance products and retiring Holiday catalogue items. 

So, if you, your stampin' craftin' friends or family (husband or boyfriends - hint, hint) are still looking for stocking stuffers and crafty gifts they can look no further!


Stampin' Up! is offering great deals on everything including from stamp sets, bundles, paper, punches, framelits now until January 3rd, 2017. This sale is absolutely AWESOME! 

Hurry though, Accessories (Everything Else) and Clearance Rack items are only available while supplies last!!!  

Visit my on-line store to and check it out the YEAR END CLOSEOUTS!
HAPPY STAMPING!
Penny Token's Stampin' Spot

Masculine Birthday - Adventurous Sky FMS#

Welcome back and thanks for visiting my blog.  Today I have another masculine birthday card to share with you that features a soon to be rel...