Earlier in the day I'd printed off some of this past week's sketch and colour challenges, so we spent some time looking at various ones before deciding to do the Create With Connie and Mary CCMC319 challenge.
Although we both worked on the same sketch you'll see that our cards are totally different, and that's the whole point of doing a challenge. To check out Sheri's card click here. I hope you'll also check out the wonderful cards from the CCM design team and other submissions and leave them some comments.
Here's the Sketch:

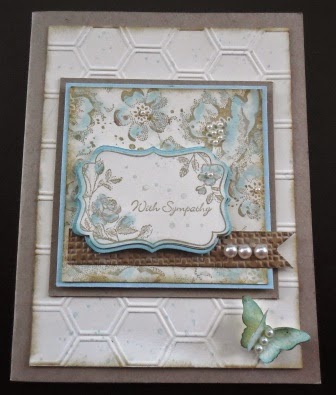
Here's My Card:

Supplies:
Stamp Sets: Kinda Eclectic, Teeny Tiny Wishes, Full of Life (R)
Ink: Momento Tuxedo Black, Smokey Slate
Card Stock: Pink Pirouette, Smokey Slate, Basic Gray, Whisper White, Silver Glimmer Paper
Accessories: Beautiful Baroque Embossing Folder, Beautiful Wings Embosslit, Oval Framelits, Bitty Banner Framelits, Elegant Butterfly Punch, Basic Rhinestones, Trimmer, Glue Dots, Dimensionals, Sticky Strip.
How I Assembled It:
1. The card base was cut from Basic Gray card stock measuring 8 1/2" x 5 1/2" and folded at 4 1/4".
2. The Pink Pirouette layer measures 3 1/2" x 5 1/2" and was embossed with the Beautiful Baroque Embossing Folder. Before adhering this piece to the card base, I put sticky strip down each long edge of the layer and adhered strips of Silver Glimmer paper that measured 1/2" x 5 1/2". I attached this whole layer to the card base with sticky strip.
3. The oval layers were made by cutting out two ovals, one in Smokey Slate and one in Silver Glimmer paper, with the #2 framelit from the Ovals Collection Framelits (see picture below). Using the #3 size framelit I cut out a Basic Gray oval. The smaller Smokey Slate and Silver Glimmer Ovals were offset so that the glimmer one only slightly shows on the left side of the Smokey Slate oval. I used Glue Dots to adhere the glimmer paper to the cardstock, and then dimensionals were added to the back. Once this piece was attached to the larger oval then the entire element was mounted to the bottom left of the card with sticky strip.

4. The butterfly from Kinda Eclectic was stamped in Smokey Slate ink on Smokey Slate card stock and then punched out with the Elegant Butterfly Punch. I punched out butterflies in Basic Gray and Pink Pirouette using the Beautiful Wings Embosslit and then adhered them below and above the stamped butterfly image.

 |
| Beautiful Wings Embosslit is one of my favourite die cuts. Just look at all those cute little butterflies |
 |
| Kinda Eclectic is a 6 piece stamp set that comes in clear and wood mount styles. |
5. The sentiment Happy Anniversary from the Teeny Tiny Wishes stamp set was stamped in Momento Tuxedo Black ink on a small strip of Pink Pirouette card stock. This piece was then cut out with the Bitty Banners Framelits and adhered to the Oval with glue dots and dimensionals.

 |
| The Bitty Banner Framelits are ideal for making small framelits. They match the Itty Bitty Sentiments stamp and can be purchased for 15% off as a bundle. |
 |
| Teeny Tiny wishes is an ideal 24-piece sentiment stamp to have in your collection. It covers almost every occasion. This set comes in wood, clear and brush stroke versions (MDS). |
6. For the inside of the card I used a 3 3/4" x 5 " piece of Whisper White card stock with a stamped sentiment from the retired Full of Life stamp set. The sentiment I'd chosen was a love theme, however I have to confess that somehow I grabbed the wrong stamp and didn't realize it until I added the pictures to this post. Can you see my red face? It's glowing with embarrassment.
Don't worry before I give this to the lucky couple that are celebrating their anniversary, I'll be redoing the inside of the card. Lol! That's a new one on me!

Okay here's one last look at this card. Hope you'll leave me some comments and let me know what kind of goof ups you've made that have left you with a red face. I'd love to hear about it, and will reward the funniest story with some card candy.

Happy Stamping!
Penny Tokens


 I
I