Wednesday, January 25, 2017

WWC103 Gail's Masculine Challenge - Anything Goes

It's a Masculine Challenge this week at the Watercooler Wednesday Challenge blog site hosted by Gail Allen.  

Hope you'll join us in creating and linking up your project to WWC103.  This is an "Anything Goes" challenge provided your project is "masculine".

I'm  using One Wild Ride for my masculine themed card today in honour of a wonderful man named Tommy Knight who recently passed away.  Tommy was a motorcycle enthusiast all his life so I thought it was fitting that I create a "thinking of you" card for his beautiful wife using this set.  


Here's My Card:
This Triple Time Layer Technique card may be a little heavy on the sentiments on the card front but both apply to this great gentleman.  The inside of the card is very plain. 


What's different about this triple layer card is that after stamping the images on the white layers as per the technique, I stamped the badge, banner and motorcycle again on some scraps of Whisper White, cut them out and layered them over the original stamping with dimensionals. 

I did this for two reasons:
  1. I think that images such as the ones in "One Wild Ride" are thicker and tend to lose some of their great detail when they're stamped over multiple layers. 
  2. And, layering the images really brought them forward and added the  dimension I wanted for the card front.  
The measurements for my card are:
 Black Mats and Base:
  • 8 1/2" x 5 1/2" Basic Black card stock base scored at 4 1/4"
  • 3 1/4"x 4 1/2"
  • 2 1/4" x 3 1/2"
White Mats:
  • 4" x 5 1/4"
  • 3" x 4 1/4"
  • 2" x 3 1/4"
The first time I ever did this technique back in 2013, it was after watching an awesome Youtube video produced by the wonderfully talented Sandi McIvor.  Sandy's a long time successful Stampin' Up! demo from the Portland Oregon area. Sandi provides all the basic steps for creating a triple layered card.

Supplies:
Stamps:  One Wild Ride, Thinking of You sentiment stamp from Inkadoodle
Ink: Momento Tuxedo Black
Card Stock: Whisper White and Basic Black
Accessories: Trimmer, Big Shot, Best Badge Punch (#140633), Bunch of Banners Framelits (#141488), detailed scissors for fussy cutting out the bike, dimensionals, Tom Bow Glue 


 Dedicated to Tommy Knight, who'll always be the leader of the pack.  Glad I got to meet you and Karleen on your journey Tommy.   
If you haven't checked out the other Watercooler Wednesday Design Artists for this challenge make sure you go back and see what they've created.  There are some totally awesome cards in this week's challenge.  
Happy Stamping!
Penny Tokens Stampin' Spot


Thursday, January 19, 2017

Wacky Watercooler January Mini Hop Number Two - Occasions and Sale-a-bration


Well, here we are at mid-January already and it's time for the second Wacky Watercooler Mini Blog Hop.  This second hop of the month, continues to show case new products from the Occasions 2017 and Sale-a-bration catalogues I know you're in for some awesome surprises.  We have an awesome group of design artists who've created many inspiring projects for you. 

So, grab a beverage, curl up in your favourite seat and let's get started. Our blog hop works on a circular basis so no matter where you start, if you continue hopping from blog to blog you'll eventually wind up where you started from.  You can also go to the home page for the Wacky Watercooler by clicking here or on the "home" button at the end of my post and you can work through the list of hoppers at your leisure.   

There are thirteen participants in this mini hop which lasts from January 19th to 21st.   If you've arrived from the talented Gail Allen's blog Stamping And Other Stuff, I'm sure you were impressed with her great projects. 

Project One:  Urban District 
If you followed me on the last blog hop you'll know that I was a display artist at Stampin' Ups! Vancouver OnStage in November and had the pleasure of designing with products from the new Urban Underground Site featured on pages 46 to 48 of the Occasions Catalogue.  
Urban District Stamp Set


Here are my samples featuring Urban District and other products from the suite. 
This Father's Day card is one of my favourites from the set I designed.  It features the big bold letters from the Urban District stamp set and show cases how well it works with other stamp sets and products.  The card base is Basic Gray card stock and the first layer was achieved by stamping the Hardwood Background stamp in Basic Gray on Very Vanilla Card stock and swiping it with Delightful Dijon and Basic Gray stamp pads to create a weathered look.  I also used three of the largest Banner Framelits to create a center banner for the lettering.  These banners were embossed with the wonderful Hexigon Dynamic Embossing Folder.  I love the deep crisp texture this embossing fold brings. The "DAD" letters were stamped in Basic Gray on Very Vanilla card stock and then hand cut out with my detailed scissors.  Love all the little designs on these stamps.  There's a lot you could do with them. 
In this project which could be a special birthday or Father's Day box card, I again showcased the word "DAD" but I stamped the letters with Delightful Dijon and used a sponge dauber to add some depth to the lettering.  I also cut out the centers of the letters using an Exacto knife and cutting pad.  This weekend I will add a post that provides more pictures and the "how to's" of assembling a rectangular box card, so I hope you'll come back and see it.
The next card features the  "Diagonal Stripe Background Stamp.   stamped in Basic Gray on Very Vanilla card stock.  What an impact this makes on the card front.  such a quick and easy card.  The Hexagons are stamped on Very Vanilla, Delightful Dijon and Basic Gray card stock and grouped together in the beginning of a Hexagon shape.  I've also used some of the Metallic Enamel Shape star embellishments in the top and bottom corners of this card.  Love them! 
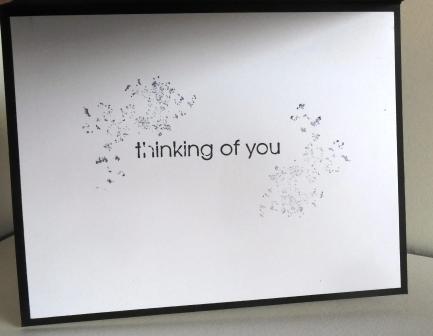
I really love the great sentiments that are included in the Urban District stamp set and so for this card decided to show case the verse "The only thing better than having you as my dad......" with the Hedge Hog images from the Love You Lots hostess stamp set.  The grass image is from the Thoughtful Banners (retired) stamp set.   Although this card is pretty clean and simple (CAS) it conveys the message of how loved this father is.  

I was also required to make at least two scrapbook pages for my  display boards at Onstage and so I enlisted the help of a great neighbor and friend to showcase the Urban District Collection for these pages.  Oh what fun I had taking these photos and building these scrapbook pages. Barry was such a good sport!

The two pages were designed using a combination of the Urban District and Nailed It stamp sets from the Urban District Collection as well as Gorgeous Grunge, One Wild Ride and Timeless Textures stamp sets from the annual catalogue.  I also made good use of the Build It, Swirly Scribbles and Circle Framelits and Urban collection embellishments.  Everything worked so well together.  

Speaking of working well together, I loved how the Hexagon Diagonal Embossing Folder and the Build It Framelit Dies cut and embossed the Silver Foil so well. I felt like I was in the tool department at Lowe's or Sears, because the images looked so real.  Check out that silver ruler in the bottom page and the nuts and screws. The same ruler framelit was used to create the Delightful Dijon hexagon ruler in the first page.  Talk about versatile. I really wish you could see a better closeup of all the details in these scrap book pages. 
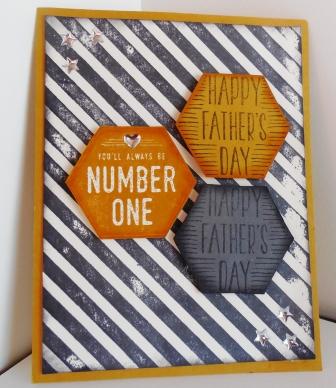
This great card also incorporates the Urban District Stamp Set as well as Gorgeous Grunge and Work of Art stamp sets.  I love the "Number One" hexagon image in this set because of its denim look surface when it's stamped. This image would also look awesome stamped in Dapper Denim or Night of Navy inks.  I also added just a hint of "manly" bling to this card with the Metallic Enamel Shape embellishments.  Those silver stars are simply perfect.
My final card in the Urban Collection showcases another level of the "DAD" lettering by adding Silver Embossing Powder.  Wow did the details ever pop!  Once again I fussy cut out the lettering as above and popped the letters up with dimensionals on the Delightful Dijon DSP.  I dry embossed with the Lucky Stars Embossing folder on Basic Gray and the Delightful Dijon card base.  The little gold dots are from the Metallic Enamel Shape embellishments.  Perfect! 

Project Two:  Sending Love Suite
Earlier this week I attended Cheryl LeFore's stamp club and we made two gorgeous Valentine cards.  I've made some subtle changes to Cheryl's version which I'm going to share as my second project today.
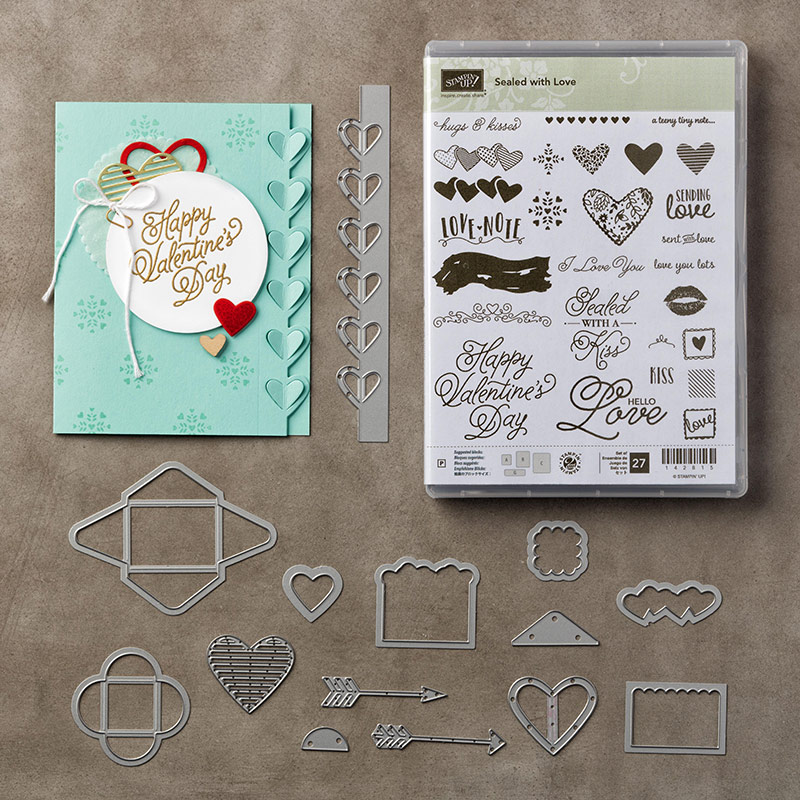
The Sealed With Love Bundle which saves you 15% off original cost includes the Sealed With Love stamp set #142815 and the Love Notes Framelit Dies #142752.  There are 14 beautiful dies and 27 stamps included in this bundle. 

Happy Valentine's Day Card:
Cheryl's original project was a 4-sided card. I decided to make a simple A-2 card with products from the original project. Here's my card:
The card base is Whisper White.  The adjoining panels from Cheryl's project were cut apart and adhered to the card front.  I love both of these panels which feature the Sending Love DSP paper pack and the heart framelit from the Love Notes Framelit Dies.
 

I love the new double-sided Lace Doilies. They are printed in Very Vanilla on one side and Whisper White on the reverse side.

Supplies:
Stamp Set:  Sealed with Love #142815
Ink:  Real Red 
Card Stock:  Real Red, Whisper White, Sending Love DSP paper pack
Accessories:  Big Shot, Trimmer, Love Notes Framelit Dies, Basic Pears,
Lace Doilies #142793, Adhesive

Easel Valentine Card:This second Valentine project again uses The Sending Love products.  Here it is:
The Easel base is made from a 3 1/2 x 10" piece of Real Red card stock that is scored at 6" 7 3/4" and 9 1/2".  A second piece of Real Red Card stock has been cut to 3 1/2" x 6  and is scored at 1/2"  The two Real Red pieces are attached with tear tape.  

For the contrasting panel cut a Basic Black piece to measure 3 1/8" x 2 1/2" and a 3" x 2 3/8" Whisper White piece.  The white piece was embossed with the new Falling Petals Textured Embossing Folder from the Falling in Love Suite.  This panel should be attached before the bottom box is.
The box on the front of this card measures 3 3/4 x 8 1/2" and is scored at 3 1/2", 4", 7 1/2" and 8". Once scored apply glue to the three back panels and attach to the front of the easel card. For the design layers The black card stock measures 2 7//8" x 3 1/8" and the panel of Sending Love DSP measures 2 3/4" x 3".
The Basic Black belly band measures 1" x 5 1/8" and a panel of DSP that measures 3/4" by  5 1/8" was added.  It's tied with Red and White ribbon from the Sending Love Ribbon Combo Pack.  This is really awesome 1/8" grosgrain ribbon. 

I added a Whisper White panel to the back of the card that measures 3 1/4" x 6 1/4".

Well that's it for me today.  Please make sure you check out the rest of the Design Team Artists Projects by clicking on the icons below and let me know how you enjoyed my projects.


HAPPY STAMPING!
PENNY TOKENS STAMPIN' SPOT 

Wednesday, January 18, 2017

WWC102 - Libby's Clean and Simple Challenge

Hi Stampers!  Christmas is over and the month of January is zipping by.  If you're like me you're thinking of making some Valentine's cards in time for this next big occasion, but haven't quite started. 

If so,  Libby's Clean and Simple Challenge WWC102 at Watercooler Wednesday may give you some added inspiration and fire up your creative juices. Her clean and simple theme is LOVE in Red and White.


Here's how to play along with the Watercooler Wednesday Clean & Simple Challenge. Our rules have just been updated, but they're simple to follow.
  • Show lots of open space
  • Use minimal layers
  • Use minimal die cuts
  • Use minimal embellishments.  
  • If you're not sure what to make, look at the samples created by the Watercooler Artists, they're sure to give you some clues and inspiration. Make sure you link your card or project up by Monday January 23rd, 5:00pm Mountain Time.   And, above all else, have fun stamping and creating!

Here's My Card:
Initially when I pulled out my Cherry Cobbler and Whisper White card stocks I was planning to make a Valentine's Day card for this challenge.  However,  I also needed an anniversary card for a wonderful couple who were married on Valentine's day so changed up my plans and instead created an Anniversary   card:

Instead of using heart images for this card I decided to incorporate the flowers from the Oh So Succulent Stamp set, and I think this was a good choice.  The flower shapes are beautiful and look good as single stamped images instead of two-stepped stamping.  All in all I'm happy with how this card turned out. Here's a view of the inside of the card:
Supplies:
Stamp Sets:  Oh So Succulent, Jar of Love
Ink: Cherry Cobbler
Card Stock: Whisper White and Cherry Cobbler
Accessories: Trimmer, Corner Rounder punch, Basic Rhinestones, Dimensionals, Adhesive
#142992 Oh So Succulent Stamp set
I really like how these flowers turned outSometimes  you really have to look at the stamps in a set and think of other ways of using them.  In this case I liked the large flower images and can visualize them in different colours, not just in the colours of succulents.  

I also really like the Jar of Love stamp set, which is where this "love" sentiment comes from.  The bold script captures your attention right away and ties in with the more delicate flowers.  
#141587 Jar of Love 37 Photopolymer stamps

Just a thought, but an alternative way of creating this card front, if you wanted to step it up would be to stamp the panel of flowers on vellum instead of the Whisper White card stock.  You could also  add more of a pop of colour by using a sponge dauber to colour in the flowers on the reverse of the vellum, and then adhering the floral panel to the card front. 

Thanks for dropping by.  I'd love to hear what you think of this anniversary card and how I've used the Oh So Succulent stamp set.  Remember there are lots of ideas on the WWC102 - Libby's Clean and Simple Color Challenge for even more inspiration. 

Happy Stamping!
Penny Tokens Stampin Spot

Thursday, January 12, 2017

8 Pretty Pocket Cards for Free - Sale-a-bration Time!

Sale-a-bration has been in full swing since January 4th and it's going strong. If you haven't checked out the flyer yet, just click on this link and have a look at all the free products available when you place a $60CDN order.  
Sale-A-Bration runs from Jan 4 to Mar 31, 2017

If you're like me after looking through the flyer I'm having a hard time deciding what to choose. Do I want a stamp set?  Do I want ribbon?  Do I want to colour? It's so hard to choose because everything in the flier looks like something I want.  When I finally made up my mind, my first choice was the fantastic Pretty Pocket Card kit and here's why. 

The Pretty Pocket Card Kit (item # 143832) on pages 18 and 19 of the Sale-A-Bration Flyer offers you a wonderful place to start.  Why would I want to select this kit?  My thought is that you're getting a lot of value with this kit and it doesn't matter whether you're a new or seasoned stamper looking for a fun and rewarding way to spend a few hours. You'll find it with this kit because everything you need to complete it is included, and it's oh so pretty.  

Here's a short video to introduce you to all the great fixings that come with this kit:
What's In the Kit:
The Pretty Pocket Card Kit includes enough product to make:
  • 8 pocket card bases with adhesive strips
  • 8 die-cut printed card inserts
  • 8 white envelopes
  • 2 die-cut adhesive sheets with sentiments and flowers all pre-printed
  • 4 yards of Whisper White Solid Baker's Twine
  • it coordinates with Calypso Coral, Pool Party, Rich Razzleberry, So Saffron and Wild Wasabi inks and card stocks if you decide to make alternate cards and projects.  
An alternate way of using this kit.
Happy Stamping!
Penny Tokens Stampin' Spot

Wednesday, January 11, 2017

#101 Watercooler Wednesday - Jean's Color Challenge

The second week of every month is a color challenge at the Watercooler Wednesday blog and this one is hosted by the incredible Jean Fitch.  Jean has chosen to mix Bermuda Bay, So Saffron and Sweet Sugarplum along with a Neutral of choice for this challenge.  What a great color combination:
Here's My Card:
Although these are spring like happy colours, I'm using them today for a sympathy card. 

I'm dedicating and giving this card to a friend who's just lost her husband and soul mate of many years and the service was today.   I'm hoping the bright colours in this card will bring some light back into her world. 


Supplies:
Stamp Set:  Nature's Wonders (2002) Retired Set, The sentiment stamps are non-Stampin' Up! rubber stamps
Card Stock:  Whisper White (Neutral), Bermuda Bay, Sweet Sugarplum, So Saffron
Ink:  Bermuda Bay, Sweet Sugarplum, So Saffron
Accessories:  Trimmer, Big Shot, Tom Bow Glue, Dimensionals Stamp-a-ma-jig and Layering Squares Framelits.

 Assembly: 

1.  The Whisper White Card Base measures 8 1/2" x 5 1/2" and was scored at 4 1/4".
2.  The Sweet Sugarplum layer measures 5 1/4" x 4" and was adhered with Tom Bow glue.
3.  The Whisper White layer measures 5 1/8" x 3 7/8" and was adhered with Tom Bow glue.
4.  I stamped the floral image in Bermuda Bay, Sweet Sugarplum and So Saffron inks on scraps of Whisper White card stock.  I cut them out with  a plain 1" x 1" die from the Layering Squares Framelits.  
5. The next layer was another Whisper White square cut with the the 1" x 1" Scalloped Edge Framelit. This scalloped square is about 1/16th" of an inch larger than the plain square die, so you just see a little fringe of the scallops around the edge of the stamped piece.  This was adhered to the stamped square with Tom Bow glue. 
6. Die cut the next largest scalloped square in each of the three solid colour card stocks and adhere them to the image of the same colour. 
7. Mount the finished squares to the card face with Dimensionals.

8. The sentiment "Thinking of You" was stamped in Sweet Sugarplum ink and centered below the scalloped squares.  I used the Stamp-a-ma-jig for straight placement. 
9. The inside of the card was stamped with the full floral image in the bottom right hand side of the card. The sentiment "With Sympathy" was stamped just above the floral image, and again I used the Stamp-a-ma-jig.    
Well that's my card for today.  Please leave me a comment if you think this card is worthy.  I hope you'll also check out the other design team members cards over at the WWC101 - Watercooler Wednesday challenge blog.  

Happy Stamping! 
Penny Token's Stampin' Spot 

Thursday, January 5, 2017

Wacky Watercooler Celebrates the Occasions Catalog and Sale-a-bration “Take One”

Happy New Year everyone and welcome to the first Wacky Watercooler Blog Hop of 2017. This is such and exciting time of year! For the next three days (January 5-7th) we're holding the first of two blog hops this month, in celebration of the arrival of the Occasions 2017 Spring catalogue and the arrival of Sale-A-Bration! 

If you've joined us for the first time, our Blog Hop runs in a circular fashion, so it doesn't matter where in the list of participants you begin. If you continue going to the next blog you'll eventually wind up where you started. So, if you started at the beginning of the hop you've arrived here from the very talented Marie Green's blog. Weren't her projects just fantastic?


Party Animal Suite


Bev Gajsek from Chilliwack BC and I were delighted to share a Display Board at Stampin' Up!s On Stage Vancouver in November 2016.


Bev created her fabulous display using products from the Party Animal Suite. She totally inspired me with her fun interpretation of this suite. She created such over the top amazing cards and 3-D projects, that I had to share them with you. Everything was so well co-ordinated, especially the stamp set and pop-up birthday cards. Here is a look at Bev's display and cards:
Bev's Display Board


Here's My Card:
This card is so colourful.  It's sure to be a hit!  The Party Animal Designer Paper is a perfect mix of colours and designs.

These Party Animal Embellishments are so much fun.  They come in a package of 16 and there are 8 each of two designs - this balloon or a cute little party hat.  I also love this 1/8" Taffeta Ribbon.  It's awesome to work with.  I coloured the Confetti stamp image with a Tangerine Tango marker and stamped it inside and out on the card.  I know this will become one of my favourites this year because it's just the right size to add some extra pizazz to your cards.

Supplies: 
Stamp Set:  Balloon Adventures Stamp Set
Ink: Crushed Curry, Pacific Point, Emerald Envy, Tangerine Tango and Whisper White
Card Stock and Paper: Party Animal Designer Series Paper,
Accessories:  Balloon Pop-Up Dies, Trimmer, Big Shot, Tom Bow Glue, Washi Tape, Party Animal Embellishments.

The Balloon Adventures photopolymer stamp set comes with 17 image and sentiment stamps and coordinates with not only the 8 piece Balloon Pop-Up Dies but also with the Balloon Bouquet Punch. It doesn't get any better than that! Here's what the stamp and dies look like:
 

For more exciting samples check out this video by Brandi Barnard from Stampin' Up!

Urban Underground Suite:Collection:
When Stampin' Up! confirmed I had been picked to be a Display Board Artist in November at the Vancouver OnStage I was over the top excited. They told me I'd receive a "top secret" box of new products from the Occasions 2017 catalogue to design my display with.

Well, I was on pins and needles waiting to receive my supply box and see what I would be designing with. When it finally arrived in September and I opened the box I'm sure you could have heard me screaming with delight from Abbotsford to Vancouver. It was over the top and this was one of the best experiences of my stamping career.

I instantly fell in love with the new products I received, which included the Nailed It and Urban District stamp sets, the Build It Thinlet Dies and Hexagon Dynamic Embossing Folder. To make it even better Stampin' Up! also provided me with a co-ordinating card stock pack some of the Urban Underground Embellishments and Urban Underground Washi tape. The rest was up to me and I had such fun creating 15 projects to put on display and to share with you.

The Nailed It Stamp Set is awesome!  You'll love it for your masculine cards!

The Build It Thinlet Dies makes it so easy to but out the stamped shapes and mix and match papers and card stocks for your designs.  I had so much fun with these dies. 
The Hexagon Dynamic Embossing Folder is out of this world.  It embosses on card stock and foil papers, and looks great on both sides. 

Urban District - the perfect Father's Day and Birthday stamp set. 
My Display Board for OnStage Vancouver:
Here are My Cards Featuring Nailed It: 
The cards below all feature elements of the Nailed It Stamp Set, Build It Thinlet dies and the Hexagon Dynamic Embossing Folder.  The card stocks used are a mixture of Delightful Dijon, Basic Gray, and Very Vanilla.  I've also used Silver Foil, Basic Rhinestones and Gold and Silver Metallic Metal Shapes to add additional bling. 


I hope you've enjoyed the cards I've created using my favourite products so far from the the Occasions 2017 catalogue.  I will provide more details on some of the cards in the coming weeks and will feature the Urban District stamp set in the next Wacky Watercooler Blog Hop which will take place on January 19th through 21st.  Be sure to come back and visit.  


Well what do you think?  I'd love to have your comments and answer any questions you may have.  

Now it's time to see what our next blog hop artist Priscilla Iver has been up to.  Just click on her name or the NEXT link below to see what she's her terrific samples.  Thanks again for joining us at the Wacky Watercooler Mini January Blog Hop part one.  Until next time, happy stamping!  

Priscilla Iver
 
Marie Green


Wacky Water Cooler

Happy Stamping!
Penny Tokens Stampin' Spot 

Happy St. Patty's Day!

Rainbows, a Pot of Gold, Leprechauns green beer and shenanigans are all part of celebrating St. Patty's Day on March 17th. I have a sma...