This is my little creative get away spot in a very hectic world. I love to stamp, meet other stampers and share my inspirations. So come and, sit for a while, explore my site and leave a comment when you can.
Want to stamp but aren't sure if you want to make an investment in stamps, ink and paper or more? Looking for a relaxing hobby but don't know what you want to do? How about stamping? Stamping for card making, scrapbooking, home decor or 3-D paper creations, is an addictive and fun way to spend your spare time. And, it's so rewarding!
If you're hesitating about commitment, then maybe it's time to think about Paper Pumpkin's monthly paper crafting kits, they may be just the right solution for you.
How does it work? Well each month after joining Paper Pumpkin you will receive a kit with everything you need to make a super project. That's right, ink, embellishments, stamps, whatever. Your investment will only be $24.95 per month plus sales tax (shipping is included).
Special Offer for New First Time Subscribers: Stampin' Up! has just announced that from now until September 10,
first-time Paper Pumpkin subscribers can skip to the savings with 50% off their
first two months!
This is such a great deal and great way to try out Paper Pumpkin on a trial basis. If you decide to continue subscribing after this offer expires you can keep your creativity going for the standard $24.95 CAD + tax per month (shipping
included).
All you have to do to take advantage of this offer is to visit PaperPumpkin.com and join! Use promo code: HALFOFFand sign up
by Thursday, September 10, 2015, at 11:50 PM (MT).
Oh and make sure you choose me as your demonstrator, because I'll provide free help if you want it when making your projects.
When I was looking through this week's challenge blogs, I came across Bev's Special Folds Challenge on the Wacky Watercooler challenge site.
I love getting creative with fancy card folds, so this challenge was right up my alley and made me want to play along too.
Here's My Card: Since I have a whole slew of Fall male birthdays hanging in the wings, I chose to make a fancy fold male birthday card. Choosing the Guys Greetings stamp set for this card was another easy choice.
Supplies: Stamp Set:Guy Greetings Ink: Soft Suede Card Stock: Sahara Sand and Soft Suede Accessories: Scalloped Oval punch, Large Oval punch, Scalloped Border Punch, Detail Scissors, Woodgrain Embossing Folder (TIEF), Circle Framelits, Big Shot machine, Trimmer, dimensionals and adhesive strip.
Measurements:
5 1/2 x 4 1/4" piece of Soft Suede for card base
5 1/4" x 9 1/2" piece of Sahara Sand card stock scored at 2 1/2" and 51/2"
5 1/4" x 1" strip of Soft Suede for Scalloped Border layer
1/8" x 5 1/4" strip of Soft Suede for inside border
Additional Sahara Sand for stamping two sets of hats
Special Fold Design: The design of this card is called an Altered Z fold. I first saw this design in a video posted by Dawn Griffiths (see link at the end of this post), and later on Pinterest. This is a very fast and easy fun fold card and can be adapted for any occasion.
I placed a small pencil mark on the inside of the top and bottom of the circle inside the card so my "guy" image would show well through the opening.
Add caption
I used my 2 1/2" Circle Framelits to cut the whole through the two layers of card stock. The "guy" and the sentiment "To A Classic" were stamped in Soft Suede ink.
Don't you just love these hats? I stamped them once in a continuous line on the right edge of the inside of the card. Using a separate piece of Sahara Sand card stock, I punched them again and then fussy cut and adhered the individual hats with small pieces of dimensionals, to the first stamped images. I also added a 1/8" strip of Soft Suede card stock above the hats, to give some separation between the writing space and the hats.
Note: If you look at the picture of the stamp set above you'll see there are two sets of hats in the Photopolymer image. From past experience, I found it really difficult to stamp the hats in a line without getting a halo on my work, so I chose to separate the solid stamp into two stamps by very carefully cutting in between the images.
I love the old fashioned font they've used for the sentiments in the Guy Greeting stamp set. I used Soft Suede ink for the "Happy Birthday"
greeting and the sponging around the oval and mounted this piece with
dimensionals to the background oval. The background layer was punched
out with the Scalloped Edge Oval punch. Note: When mounting
the greeting layer on the card front make sure the glue only goes half
way on the oval so it doesn't show from the inside of the card. The
scalloped edge on the left of the card front was punched from a 5 1/4 by
1" strip of Soft Suede card stock using the Scalloped Edge Border
Punch. Once this piece is in place, the front flap is secured with
adhesive.
The Woodgrain TIEF adds a nice manly texture to the front of the card. I have to say I found it difficult to emboss this part of the card, it wouldn't fit sideways in the embossing folder. To compensate for this I had to emboss one side of the circle, remove and reposition the embossing folder and run the second side through the Big Shot. This actually worked out okay and it's difficult to see where the join is.
I love these little
hats! I think this grouping added a nice finishing touch to the card
front. They were fussy cut and mounted with dimensionals.
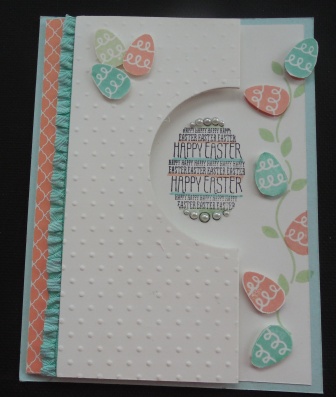
So that's it for my challenge card this week. I hope you liked my special fold technique. If you want more specific information on how to make this Altered Z Fold card just take a look at this card I made last Easter and use the links to see a video by Dawn Griffith.
You can find this card here and a link to Dawn Griffith's video showing how to make it. Enjoy!
I want to share what happened to me this week. It's not a pretty story. It left me feeling weak in the knees, trembling, and if that's not enough feeling sorry for myself. What could have caused this terrible mixture of feelings? Missing this week's Weekly Deal of my dreams, that's what!
On Tuesday this week, when I posted the Weekly Deals I confidently told you I'd be ordering the Little Numbers Thinlet Dies that were on sale for $18.75 a savings of $6.25. So I did what I usually do, wait until the weekend to order. Imagine my surprise when I opened the screen and the dies weren't there. They were da, da, da........
I almost did the Meme SCREAM!!!!!
So the moral of this sad tale is that if you really, really, want something for your stamping collection and you see it on sale for a really good price, don't delay like I did or you might miss out. The bonus deals sale is only in effect until August 3rd, 2015.
Check out the Weekly Deals & Clearance Rack on my blog every Tuesday. They're easy to find on the Weekly Deals tab of my home page, either in the side bar or on the top menu bar.
It seems everyone really liked the small gift box I posted in the Wacky Watercooler July Blog Hop post this past weekend, so as promised here are the instructions on how I made it.
I can't take all the credit for this tutorial however, as my friend Sandy showed me how to make my first box with the Gift Bag Punch board. Her example was based on a video by a UK demo named Linda Parker. Linda's version is made with 12" x 12" card stock and she shows some really cute samples on her video to give you an idea of how versatile this punch can be.
What You Need to Make It:
8 1/2 x 11 Card Stock for box base
Coordinating DSP
Simply Scored Score Board
Gift Bag Punch Board
Trimmer
Bow Builder Punch
Adhesive - Sticky Strip or Tom Bow Glue and Glue Dots
Assembly: 1. Cut the card base to measure 6 3/8 x 10 7/8".
If you haven't used the Gift Bag Punch Board yet, here is Stampin' Ups! introductory video which demonstrates how to use the punch and the various elements of it. It will help you understand how this wonderful tool works.
In this view you can see that I have punched out on the score lines and at the edges of the card stock on both sides.
On the long side of card stock line up the 1 3/8" score line with the starting line on the gift bag punch board and punch. Move the card stock to the next score line (3 1/4") and punch, move to the next score line (6 1/8") and punch, and then move to the last score line (8") and punch.
Line up the very right edge of the card stock on the start line and punch.
Flip the card stock and repeat the process in the previous step.
4. Use your bone folder to burnish all the score lines.
5. Put glue strips on the tabs or use Tom Bow glue as indicated in this photo and then assemble box. Make sure that the sides are even and square before you press down on the sticky strip to secure it. This last step is essential for getting your box to sit squarely.
6. Once the box is assembled you'll want to decorate it. I've listed the card stock and DSP sizes below for layering mats and dsp. You could eliminate either of these steps dependent on the look you are going for.
Decorating the Front, Back and Sides of the Box:
I like to decorate my boxes with card stock mats layered with a coordinating designer series paper. The photos below show where the mats would be added to the box.
Cut Card StockPanel mats as follows:
1" x 3 1/4" cut one for front lid panel
1 1/2" x 3 1/4" cut one for top lid panel
2 1/2" x 3 1/4" cut two for front and back panels
1 3/8" x 2 5/8" cut two for bottom side panel
1 1/8" x 1 3/8" cut two for side top lid
Cut DSP panel mats as follows:
7/8 x 3 1/8" cut one for front lid panel
1 3/8" x 3 1/8" cut one for top lid panel
2 1/4" x 3 " cut two for front and back panels
1 2/8 x 2 1/2" cut two for bottom side panel
1" x 1 1/4" cut two for side top lid
Use Tom Bow adhesive to glue the mats together then glue to the box.
For Banner on Lid:
The Banner Triple Punch gives you triple the banner options in one punch.
You can make banners in three widths--1", 1-1/2", and 2"--in any length.
Just slide the paper in, punch, and get perfectly notched banners (or
gift tags, bookmarks, belly bands) every time. Here I've used it to make the banner on the lid of the box:
1. To make the banner:
Cut a 2" x 4 1/4" piece of card stock and punch out banner shape
Cut a 1 1/2" x 4" piece of coordinating dsp and punch out banner shape
If you want a third banner cut a 1" x 3 3/4" piece of card stock and punch out same as above.
2. Adhere the 2 or 3 banners together with sticky strip. Line up the back edge of the banners with the back edge of the box lid and gently press the front edge of the banner over the front end of the lid. Turn the banner over and using the Simply Scored score board make a crease where you see the fold line. On my box the crease line was approximately 2".
Here you can see the three banners that were stacked and adhered to the top of the lid with sticky strip. The part that extends over the top to the front of the box lid was glued down with a small piece of sticky strip to hold it in place.
This is what the box lid looks like from the inside once the banner has been added.
3. If you want to secure the box lid to the box base you can add a Velcro sticky back fastener. This is optional. See photo for placement.
Here's My Finished Gift Box: I didn't particularly care for the plain card stock banner on the top of the box and so I added some cherries to it, to match the smaller ones in the Cherry on Top Designer Series paper used for the panels. The large cherries were from a stamp image in the Button Buddies (retired) stamp set. I fussy cut them out and glued them on with Tom Bow glue.
I added a small Watermelon Wonder bow that was punched out with the Bow Builder punch. It's assembled with glue dots and was adhered to the front of the lid banner.
More Samples:
Here are some additional samples of gift boxes and bags that I've made over the past few weeks, with the help of my friend. A big hats off to Sandy Stoyanowski who first showed me how to use the Gift Bag Punch and then loaned it to me for my Open House and subsequent classes, while mine has been on back order. Can't thank you enough Sandy!
This little cutie is made with the same dimensions but I didn't layer the card stock and DSP panels, I only adhered DSP. This box base is Island Indigo card stock and the beautiful paper is from the Bohemian DSP collection.
The card base for this box is Crisp Cantaloupe (retired In Colour 2015). The panels are made with Strawberry Slush card stock and All Abloom Designer Series Paper (retired). The bow was cut out of Pistachio Pudding DSP from the All Abloom Collection.
Well that's it for today. I'll have some other gift bags and boxes to show you once I have my very own Gift Bag Punch Board and can play with it at my leisure. I think this is one of the best tools that I've used in a while not only because it was so useful, but because it was a lot of fun. Before I go I'd just like to add that I think it's important if you're going to make bags and boxes that you keep templates that you can use for reference. I have several now and it makes life so easier when you don't have to re-create the wheel every time or look for videos and tutorials on line. Here's the template I made for this box and it has all the measurements all in one glance.
If you enjoyed this tutorial or had difficulty with it please let me know, I'd love to hear about your experiences with the Gift Bag Punch Board and this little gift box. Any tips you can share are also appreciated. Happy Stamping! Penny Tokens
Welcome to the July Wacky Watercooler Blog Hop. You're in for a treat! We have 13 hoppers sharing their wonderful projects, which will include a Christmas in July theme, a CASED project and a project using a Punch. Hope you'll visit all the sites and leave some comments and encouragement.
This is a circular blog hop so if you continue along you'll eventually get back to where you started. This blog hop runs from today July 16th through Saturday July 18th, so visit as many times as you wish and let your friends know it's happening.
Christmas in July
Are you counting off the days until Christmas yet? I know I am. For my featured "Christmas in July" project I chose to use a stamp from the Merry Everything stamp set as my focal point. This is a great little stamp set that was carried over from last year.
I started with a standard A2 Bermuda Bay card base followed by a Silver Foil mat. I hated to waste that beautiful foil sheet by hiding it under another layer, so instead punched out my two trees from the center. I embossed the White mat and Silver Foil trees with the Bo Ho Chic TIEF. This embossing folder is quickly becoming one of my favourites.
I kept the inside of the card pretty clean and simple by just stamping and embossing one tree image from the Festival of Trees stamp set and the sentiment " May Happy Moments and Cherished Memories Surround You with Joy This Season", from the Wondrous Wreath stamp set.
For the shaker portion of the card I used a piece of Bermuda Bay DSP from the Cherry On Top paper pack. Even though the DSP used for the front of the shaker box isn't a Christmas paper, it works really well with the Bermuda Bay and Silver Foil card stocks. The decorative window was punched out using the Note Tag Punch. I stamped the sentiment with Versa Mark ink and heat set it. I added Bermuda Bay sequins to the mixture of Frosted Sequins and a few crystal seed beads to give some more action to the shaker. A small strip of Silver 1/8" ribbon was added to the bottom.
CASE THE CATALOGUE:
When the powers that be at Wacky Watercooler Blog Hop decided our second project would be CASEing from the Catalogue I was thrilled. I grabbed my glasses, catalogue, a cup of Java and headed for the back yard to search for my next project.
Since I was looking for some "Artistic Expression" I went to the section bearing the same name in the Share the Fun Annual catalogue and found what I was looking for on page 118. Here's the card that inspired me:
When I bought the Work of Art stamp set last year I made a ton of cards and used it in a lot of projects, and then it got lost on the shelf. Stamping with this set again reminded me just how much I like the wonderful shapes and paint swatches in this 11-piece set. Here's my card:
I pretty much copied the original placement of the stamping but I changed the ink and card stock colours to make it a little more masculine and added some detail with the large splatter stamp from the Gorgeous Grunge stamp set.
Here you can see the gold embossing on the sentiment. It really makes the word "you" stand out.
I added Basic Rhinestones to the centers of the gold sequins for extra shine and because my Gold Metallic thread hasn't arrived yet, I used a retired Stamping gold thread to make the loops. Note: When you want to add loops under a button or a sequin, begin with a glue dot on your card surface and use that as a base for bringing your loops around to and stabilizing them
For the inside of my card I used the Gorgeous Grunge splatters stamped off in Delightful Dijon and Early Espresso inks. The sentiment "You are a fabulous work of art" was stamped in Early Espresso.
Use a New Punch:
I've been using the Gift Bag Punch Board, the Banner Triple Punch and the Bow Builder Punch a lot since the catalogue was launched in June, so I thought I would combine the three of these great tools to make a cute little gift box for my third project.
Here it is:
This adorable little box measures 3 5/8" x 3" and is the perfect size for tucking away a sweet treat or small gift for that special person on your list. Since the friend I made this for is really into animal prints I chose a piece of dsp from the new Go Wild Designer Series Paper Pack to decorate the box.
The Banner Triple Punch makes it so easy to make perfect banners every time by eliminating the guess work.
I used the Bow Builder Punch to make a single bow for the front of the box and added a Basic Rhinestone to the center.
These boxes are super easy to make with the Gift Bag Punch Board. I'll be doing a post next week showing you templates and ideas for many different projects you can make with this very versatile tool, so I hope you'll come back and visit.
Everything from envelopes to gift bags and card holders can be made with the Gift Bag Punch Board.
Well it's time for you to move on to Bev's awesome blog "Stamp With Bev". I know you'll enjoy her projects!