Showing posts with label Wacky Watercooler. Show all posts

Thursday, January 5, 2017

Wacky Watercooler Celebrates the Occasions Catalog and Sale-a-bration “Take One”

Happy New Year everyone and welcome to the first Wacky Watercooler Blog Hop of 2017. This is such and exciting time of year! For the next three days (January 5-7th) we're holding the first of two blog hops this month, in celebration of the arrival of the Occasions 2017 Spring catalogue and the arrival of Sale-A-Bration! 

If you've joined us for the first time, our Blog Hop runs in a circular fashion, so it doesn't matter where in the list of participants you begin. If you continue going to the next blog you'll eventually wind up where you started. So, if you started at the beginning of the hop you've arrived here from the very talented Marie Green's blog. Weren't her projects just fantastic?
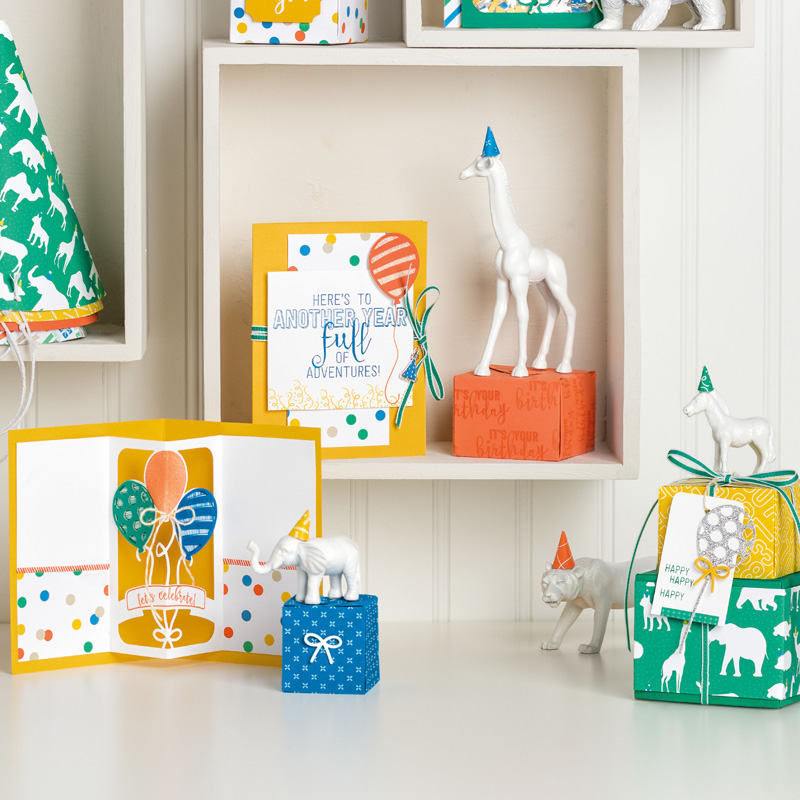

Party Animal Suite


Bev Gajsek from Chilliwack BC and I were delighted to share a Display Board at Stampin' Up!s On Stage Vancouver in November 2016.


Bev created her fabulous display using products from the Party Animal Suite. She totally inspired me with her fun interpretation of this suite. She created such over the top amazing cards and 3-D projects, that I had to share them with you. Everything was so well co-ordinated, especially the stamp set and pop-up birthday cards. Here is a look at Bev's display and cards:
Bev's Display Board


Here's My Card:
This card is so colourful.  It's sure to be a hit!  The Party Animal Designer Paper is a perfect mix of colours and designs.

These Party Animal Embellishments are so much fun.  They come in a package of 16 and there are 8 each of two designs - this balloon or a cute little party hat.  I also love this 1/8" Taffeta Ribbon.  It's awesome to work with.  I coloured the Confetti stamp image with a Tangerine Tango marker and stamped it inside and out on the card.  I know this will become one of my favourites this year because it's just the right size to add some extra pizazz to your cards.

Supplies: 
Stamp Set:  Balloon Adventures Stamp Set
Ink: Crushed Curry, Pacific Point, Emerald Envy, Tangerine Tango and Whisper White
Card Stock and Paper: Party Animal Designer Series Paper,
Accessories:  Balloon Pop-Up Dies, Trimmer, Big Shot, Tom Bow Glue, Washi Tape, Party Animal Embellishments.

The Balloon Adventures photopolymer stamp set comes with 17 image and sentiment stamps and coordinates with not only the 8 piece Balloon Pop-Up Dies but also with the Balloon Bouquet Punch. It doesn't get any better than that! Here's what the stamp and dies look like:
 

For more exciting samples check out this video by Brandi Barnard from Stampin' Up!

Urban Underground Suite:Collection:
When Stampin' Up! confirmed I had been picked to be a Display Board Artist in November at the Vancouver OnStage I was over the top excited. They told me I'd receive a "top secret" box of new products from the Occasions 2017 catalogue to design my display with.

Well, I was on pins and needles waiting to receive my supply box and see what I would be designing with. When it finally arrived in September and I opened the box I'm sure you could have heard me screaming with delight from Abbotsford to Vancouver. It was over the top and this was one of the best experiences of my stamping career.

I instantly fell in love with the new products I received, which included the Nailed It and Urban District stamp sets, the Build It Thinlet Dies and Hexagon Dynamic Embossing Folder. To make it even better Stampin' Up! also provided me with a co-ordinating card stock pack some of the Urban Underground Embellishments and Urban Underground Washi tape. The rest was up to me and I had such fun creating 15 projects to put on display and to share with you.

The Nailed It Stamp Set is awesome!  You'll love it for your masculine cards!

The Build It Thinlet Dies makes it so easy to but out the stamped shapes and mix and match papers and card stocks for your designs.  I had so much fun with these dies. 
The Hexagon Dynamic Embossing Folder is out of this world.  It embosses on card stock and foil papers, and looks great on both sides. 

Urban District - the perfect Father's Day and Birthday stamp set. 
My Display Board for OnStage Vancouver:
Here are My Cards Featuring Nailed It: 
The cards below all feature elements of the Nailed It Stamp Set, Build It Thinlet dies and the Hexagon Dynamic Embossing Folder.  The card stocks used are a mixture of Delightful Dijon, Basic Gray, and Very Vanilla.  I've also used Silver Foil, Basic Rhinestones and Gold and Silver Metallic Metal Shapes to add additional bling. 


I hope you've enjoyed the cards I've created using my favourite products so far from the the Occasions 2017 catalogue.  I will provide more details on some of the cards in the coming weeks and will feature the Urban District stamp set in the next Wacky Watercooler Blog Hop which will take place on January 19th through 21st.  Be sure to come back and visit.  


Well what do you think?  I'd love to have your comments and answer any questions you may have.  

Now it's time to see what our next blog hop artist Priscilla Iver has been up to.  Just click on her name or the NEXT link below to see what she's her terrific samples.  Thanks again for joining us at the Wacky Watercooler Mini January Blog Hop part one.  Until next time, happy stamping!  

Priscilla Iver
 
Marie Green


Wacky Water Cooler

Happy Stamping!
Penny Tokens Stampin' Spot 

Thursday, May 19, 2016

WACKY WATERCOOLER MAY MASHUP BLOG HOP

Welcome to my blog and my contribution to the Wacky Watercooler May Mashup Blog Hop.  Although our hop this time around is smaller than usual, only six participant's, I'm sure you'll agree that everyone has given it their all for this mashup.  

What is a "mashup"?  Well for this month's hop we're presenting projects using products that are retiring, products that are soon to arrive and a masculine project. This hop will run from this evening through Saturday May 21st, so I hope you'll hop on board and join the fun. 

If you're joining us for the first time, this is a circular blog hop, so no matter where you joined if you keep going through you'll eventually wind up where you started from.  If you've coming from the previous blog, you'll have been checking out Heidi Weaver's blog, and her incredible projects.  After you finish seeing my projects just click on the next button at the bottom of this post and you'll arrive at Marie Green's blog.  But for now.......

My First Project - Something Old:  

Who doesn't like butterflies?  No one I know, at least none of my stamping friends.  They're all gaga every time a butterfly stamp comes into their world.  That's why I chose the soon to retire Swallowtail stamp for my "sad to see it go" segment of this blog hop.  I know every one of my stamping friends will be as sad as I am to see it gone.  Here is my final hurrah for the Swallowtail stamp: 


My inspiration for this card came from Dawn Griffith's demonstration of a technique she calls "out of the box".  I've been wanting to try this technique for sometime and I'm delighted with the results. I wont go into the details of how I made it, you can check out Dawns video of the technique on this link.

In this view you can see the embossing on the Whisper White layer.  Although you may not be able to see it clearly, I also embossed the Whisper White oval that the butterfly is part of.  The 5 1/2 x 4 1/4" card base was cut from the new Sweet Sugarplum card stock, and the next layer is Rich Razzleberry.  
Here's a view of the inside of the card.  The base is layered with Rich Razzleberry card stock and Whisper White. The sentiment and small butterflies are from the Basic Butterfly stamp set which will still be available in the 2016-17 catalogue.

I used a blender pen Sweet Sugarplum, Rich Razzleberry and Blackberry Bliss inks and the Sweet Sugarplum marker to colour this large swallowtail.  I only coloured the one side of it as once I positioned the oval framelit the rest was cut away. 

I always like to change up at least three things when I CASE a card and so here are the things I changed from the original:


1.  I changed the direction the butterfly sits on the ovals.
2.  I changed the colour of my card stock and inks so I could try out the new "Sweet Sugarplum" Incolour that will be released June 1s, added an extra layer to my card face and a sentiment. Luv, luv, luv how the Sweet Sugarplum and Rich Razzleberry compliment each other.  
3. My final change was to embossed the Whisper White layer with the "Fluttering" Embossing Folder and Silver Glimmer Paper instead of Dazzling Diamonds Glitter.   

Supplies:
Stamp Sets:  Swallowtail #129216 and Butterfly Basics # 137154
Ink:  Sweet Sugarplum, Rich Razzleberry, Blackberry Bliss
Cardstock:  Whisper White, Sweet Sugarplum, Rich Razzleberry, Silver Glimmer Paper
Accessories:  Trimmer, Big Shot, Fluttering Embossing Folder, Ovals Collection Framelit Dies, Note Tag Punch, Dimensionals, Tom Bow Glue, Basic Rhinestones, Dazzling Details,


My Second Project - Something New:
One of the great things about being a Stampin' Up! Demonstrator is getting our hands on new stamp sets and products before Stampin' Up! releases them in the new catalogues.

That's how I managed to get this fabulous new stamp set called "Swirly Bird" as well as the new Incolours and card stocks you'll see in this project. 

I've totally fallen in love with this stamp set and the coordinating die cuts called Swirly Scribbles Thinlets.   They are so much fun to play with that I can guarantee they're going to be on everyone's wishlist come June 1st.    

Here's My Project:

Just look at all those swirls!  For this Happy Birthday card I chose a combination of Watermelon Wonder and the new Flirty Flamingo inks and card stocks.  I didn't use the Swirly Scribbles thinlets for this card, although I was tempted.  This stamp set is such fun to play with you can create all kinds of images and different looks.  I'm working on some other samples which I'll post in the coming weeks. 
This is the inside of the card and the envelope to match.  I layered the Whisper White onto a piece of Emerald Envy card stock............such a beautiful new Incolour!


Supplies:
Stamp Sets:  Swirly Bird #141749 and Birthday Blooms #140658
Card Stock:  Flirty Flamingo, Emerald Envy, Watermelon Wonder, and Whisper White
Ink:  Watermelon Wonder, Flirty Flamingo, Emerald Envy
Accessories:  Scissors, Trimmer, Dimensionals, Basic Rhinestones, Tom Bow Glue

 
My Final Project - Masculine Birthday Card:I'm dedicating this next card which is indeed masculine to my nephew who turns "21" next week.  As a child he always played with Lego - almost obsessively, so I thought it would be kind of fun to create a jazzed up kid card for him using one of my all time favourite stamp sets Boys Will be Boys. 
 
It was very difficult to take pictures of this card.  The silver on the surface of the Shine On DSP and the silver foil really caught the light.  The base piece of this card which you can barely see is a 5 3/4 x 4 1/2" piece of Basic Black Cardstock followed by a 5 1/2 x 4 1/4" piece of Whisper White card stock. 

Isn't this little robot just the cutest!  I added some small and medium size silver beads that I had in my stash to really give him that futuristic look.  He's coloured with the Smokey Slate marker.
The design on this Shine On DSP really suited the card and was part of my inspiration for making it.  The pattern looks like widgets and bits that would be found in a tool box.  Love it!  This DSP is still available for purchase until May 31st in the Occasions Spring Catalogue.

The card design comes from a post and video by Linda Bauwin and is called a Fancy Fold Pullout card.  I love this fancy fold card design and find I'm going back to it more and more.  It's got just enough of that WOW factor that it makes the card special and yet it can be dressed up simply, and because it doesn't have too many layers mails easily. 

Supplies:

Stamp Sets:  Boys Will Be Boys and Big Day (SAB 2015)
Card Stock:  Basic Black, Whisper White, Silver Foil, and Shine on Specialty DSP
Ink:  Momento Tuxedo Black and a Smokey Slate Marker
Accessories:  Trimmer, Scissors for fussy cutting, Dimensionals, Silver Beads (non SU), Word Window Punch.  

I hope you've enjoyed these three projects and will try out some of these techniques.  I'd love to see what you make, and I'd like to hear your comments on whether you liked these designs.  Have fun and enjoy the rest of the hop.  Your next stop is the beautiful Tanglewood Cottage blog, by Marie Green: 


Happy Stamping!
Penny Tokens Stampin' Spot 

Thursday, September 17, 2015

September Mixup - Wacky Watercooler Blog Hop


September 2015 Blog Hop photo September 2015 Banner.jpg


What signals one of my most favourite times of the year? Well, for me the first signs are the leaves starting to turn, the weather's getting a bit chillier at night, and the kids are back in school.  Yep, FALL is officially here and it's time to start thinking about all the seasonal celebrations ahead.  

This weekend I've joined the Wacky Watercooler Blog Hop design team to  celebrate a "September Mixup".  Our hop is running from tonight through  the 19th of September and is offering some really creative ways of using products from both the new and annual catalogues. 

We have 15 terrific gals participating and showing off their talents so be sure to follow the hop and leave some love along the way! The Wacky Watercooler Blog Hop runs in a circular fashion, so no matter where in the list of participants you begin, inevitably you'll wind up in the exact same place again if you keep going to the "next".  

If you started at the beginning of the hop you've just arrived from Marsha Reed's fabulous blog.  Wasn't her project awesome?  Okay now it's time to see what I came up with...........

Halloween Gift Bags - Howl-o-ween Good Times!
We don't get many kids on Halloween night anymore, so for those 5 or 6 that brave the elements to haunt my front door, I love to have some special treat bags on hand.  
Supplies:
Stamp Sets: Howl-o-ween Treat* Six Sayings Hostess Set Holiday Catalogue
Ink: Blackberry Bliss, Hello Honey Marker. Momento Tuxedo Black Ink, Tangello Twist Re-Inker
Card stock: Tangello Twist, Gold and Black Glimmer Paper, Happy Haunting Designer Series Paper
Accessories: Lots of Labels Framelit Dies, Boo To You Framelit Dies, Spider Web (R) and BoHo Chic Embossing Folders, Bat punch(R), Google Eyes (non-SU), Dazzling Details, Pumpkin Pie and Blackberry Bliss ribbons, Word Window and Large Oval punches, Basic Rhinestones, Dimensionals, Tom Bow Glue, Big Shot and Trimmer. 

The Howl-o-ween Treat Stamp Set which comes in wood or clear mount and the Boo to You Framelit Dies are featured on page 49 of the catalogue.  They can be bought individually or you can save 15% by purchasing them as a bundle. 
I love this cute little 4" x 1 1/2" gift bag.  It's simple, very quick to make and decorates easily.  For this bag I started with a 12 x 6" piece of the Happy Haunting Designer Series Paper. If you love Halloween Paper, this set of design papers is a real winner.  Each design and the colour mix are very special.
I used a Hello Honey marker for the owl's nose and a Blackberry Bliss Marker to enhance some of the feather details on the owl's body. I punched out two small circles with the Itty Bitty Punch set from Black Glimmer paper to mount the google eyes on.  Although they don't show up very well in this photo, the wavy feathers on the owl's chest were coloured with dazzling details that I added a bit of Tangello Twist re-inker to. I used two of the Label Framelits from lots of Labels to die cut the two label tags that the owl is mounted on.  I embossed the smaller label with the Bo Ho Chic embossing folder and the larger one is cut from Gold Glimmer paper.  They are mounted to the bag with dimensionals.
 My Second Bag:
Here is the second bag which showcases the Skull and Crossbones from the Howl-oween Treat stamp set.  I layered the stamped images on two labels cut out with the Lots of Labels Framelit Dies.  The Blackberry Bliss label was embossed with the now retired "Spider Web" TIEF.  The other label was cut from Gold Glimmer Paper.  I stamped the super cute little spider from this stamp set in  Tuxedo Black ink and then punched out a piece of Black Glimmer paper with the circle punch from the Itty Bitty Accents punch set and glued it onto its back with a dimensional.  Two rhinestones coloured with a black sharpie were added to the skull's eye sockets.  The "FaBOOlous" sentiment is from the Six Sayings Hostess stamp set.  I fussy cut out the wording and added dazzling details to make it glimmer. 
 Directions for the Bag:
1.  Cut 12 x 6" piece of Designer Series Paper or Card Stock of choice.
2.  Score on long side at 4", 5 1/2", 9 1/2", and 11"
3.  Turn DSP to short side and score at 4 1/2".
4.  Cut from the bottom along score lines to the 4 1/2" score line.  Fold on score lines and trim off small rectangle in bottom right hand corner of bag.
5.  Assemble bag with Sticky Strip.  Fold so small tabs are on the inside of the bag bottom and there is a large tab on the bottom.  You only need to apply sticky strip or glue to the side seam and the bottom of the bag.  
6.  Pinch the sides of the bag together towards the top, like a lunch sack.  
7.  Make a handle area by punch through both thicknesses with either a Word Window or a large oval punch.
 
Embellished Ornament:
Do you ever look at a stamp set or dies in a magazine or catalogue and it sucks the breath right out of you?  Well that's what happened to me when I turned to page 15 in the Holiday Catalogue and saw the Embellished Ornament stamp set and coordinating Delicate Ornament Thinlet Dies.  I fell in love with them, and they quickly went to the top of my wish list.  Here's what I've made with them so far:

I pride myself on finishing the insides of my cards to mirror the exterior.  When I finished this card, I laughed because the inside could actually be the outside it turned out so pretty. I owe that to the Delicate Ornament Thinlet die that I used to cut out this precious bauble.  These are pretty intricate dies but I use a cardboard and wax paper shim when I run these dies through my big shot and I find they cut like butter on card stock, glimmer and foil papers.  
I stamped two additional ornament images and fussy cut the flower from the center of both.  These were mounted with dimensionals on the original ornament and a basic rhinestone was added to the center.  You might think that the shiny circles on the ornament were achieved with rhinestones, but think again.  I actually cut the 1/8" circles from Dazzling Diamonds glimmer paper using a punch and then glued them on to each of the spots on the ornament.  I cut the point off a toothpick and used that to apply the glue to the back of the dots and then add them to the ornament. 
Supplies:
Stamp Set: Embellished Ornaments

Card Stock:  Smokey Slate, Whisper White and Blackberry Bliss, Silver Foil and Dazzling Diamonds Glimmer paper
Ink: Blackberry Bliss
Accessories:  Softly Falling TIEF, Big Shot, Delicate Ornament Thinlet Dies, Basic Rhinestones, detail scissors, dimensionals, Tom Bow adhesive.   1/8" circle punch

You can bundle and save 15% on the Embellished Ornament and Delicate Ornament Thinlet Dies through January 4, 2016.  


Usually I do three projects for these hops, and although I have one in the works I unfortunately didn't get the time I'd anticipated to finish it.  But don't worry, rather than rush and botch the project I'm going to finish it later this week and then I'll share it with you under a separate post. So please make sure you come back and check it out.

Now that I'm done I'm passing you along to our next talented designer, Bev, who is sure to delight you with her projects. Make sure you click  on her name here or on the "Next" watercooler icon below.  


Wacky Watercooler September Mixup
Happy Stamping Everyone!
Penny Tokens Stampin Spot

Atlantic Hearts Sketch Challenge #572:

April has sure been living up to its reputation for rain showers but it's been really on the cold side which isn't normal for this t...